Window - Duplicate
(or shift+D) - Close the original and proceed on the copy
Selections - Load/Save Selection - Load Selection From Alpha Channel
- selectie 1
Selections -
Promote Selection to Layer
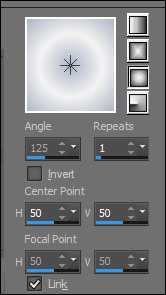
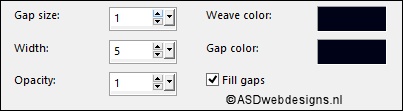
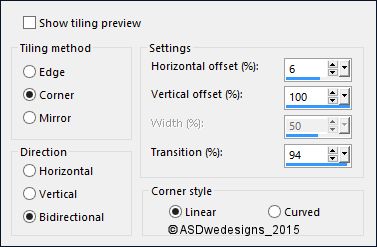
Effects - Texture Effects - Weave -
Weave & Gap Color #010619

Selections - Select
None
02
Layers -
Duplicate
Image - Mirror -
Mirror
Horizontal (
Image - Mirror
in previous PSP
Versions)
Image -
Mirror -
Mirror Vertical (
Image - Flip in
previous PSP
Versions)
Layers - Merge -
Merge Down
03
Layers -
Duplicate
Effects -
Image Effects - Seamless Tiling - Default settings
Effects - 3D Effects - Drop
Shadow - Vertical 0 -
Horizontal 0 - Opacity 40
- Blur - 20 -
Color - #000000

Layers -
Arrange - Move Down
Layer Palette -
Double click on this Layer and set the Blend Mode to
"Multiply" and the Layer Opacity to 50
04
Layer Palette - Click on the Top
Layer
Effects - 3D Effects - Drop
Shadow - Vertical 2 -
Horizontal 2 - Opacity 35
- Blur - 20 -
Color - #000000
Layer Palette -
Double click on this Layer and set
the Layer Opacity of this Layer to
50
05
Layer Palette - Click on the Bottom
Layer
Selections - Load/Save Selection - Load Selection From Alpha Channel
- Selectie 2
Selections - Promote Selection to Layer
Layers - Arrange - Bring to Top
Selections - Select None
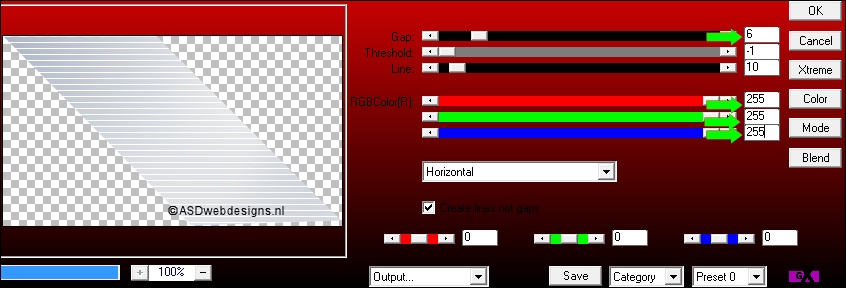
Effects - Plugins -
Toadies - Weaver
- Default
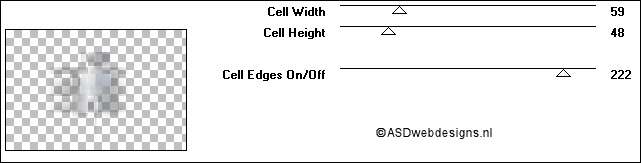
Effects - Plugins -
Simple - 4Way
Average
Layer Palette -
Double click on this Layer and set the Blend Mode to
"Multiply"
06
Layers - Duplicate
Effects - Image Effects - Seamless
Tiling - Preset Side by Side
Layers - Arrange - Move Down
Edit - Repeat Layer move down
Selections - Load/Save Selection - Load Selection From Alpha Channel
- Selectie 3
Edit - Cut (Or hit the Delete Key of
your Keyboard)
Selections -
Select None
07
Layer Palette - Click on the Top
Layer
Layers - Duplicate
Layers - Merge - Merge Down
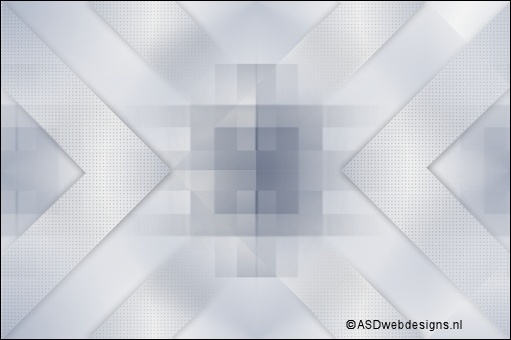
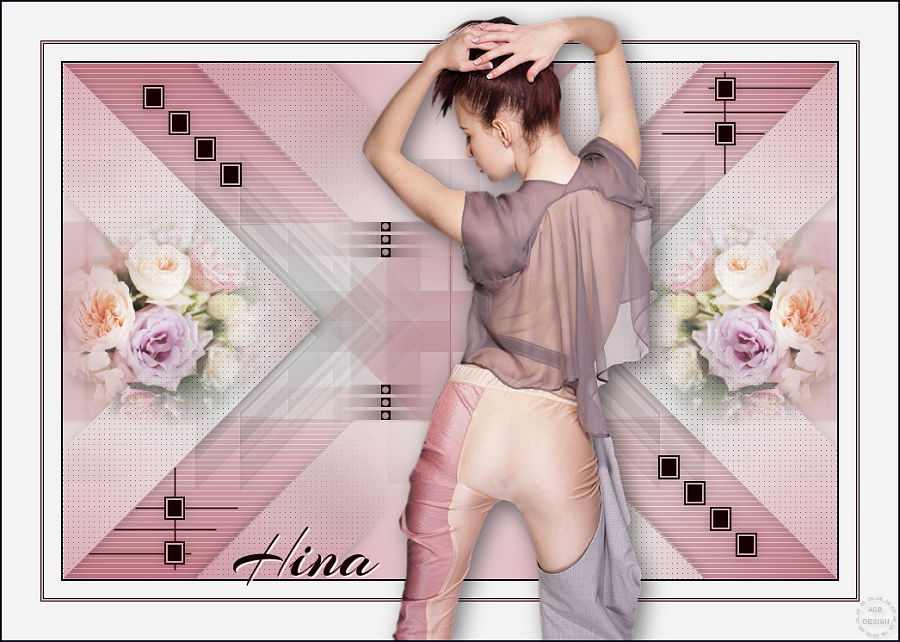
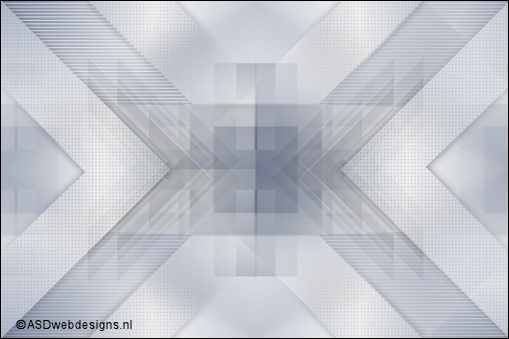
Your work looks like this now:
08
Layer Palette - Click on the Bottom
Layer
Selections - Load/Save Selection - Load Selection From Alpha Channel
- selectie 4
Selections - Promote Selection to Layer
Effects - Plugins -
AP 01[Innovations] - Lines - SilverLining
Selections - Select None
09
Layers - Duplicate
Image - Mirror -
Mirror
Horizontal (
Image - Mirror
in previous PSP
Versions)
Layers - Merge - Merge Down
10
Layers - Duplicate
Image -
Mirror -
Mirror Vertical (
Image - Flip in
previous PSP
Versions)
Layers - Merge - Merge Down
Layer Palette -
Double click on this Layer and set the Blend Mode to
"Multiply"
11
Layer Palette - Click on the Second Layer from the Top
Layers - Duplicate
Image - Resize - 60% - Resize
all Layers not checked
Layers - Duplicate
Image - Resize - 60% - Resize
all Layers not checked
Layers - Merge - Merge Down
Effects - Plugins -
It@lian Editors
Effect - Effetto
Fantasma - Sposta- X
15 - Sposta Y 15
Adjust -
Sharpness - Sharpen More
Layers -
Arrange - Send To Bottom
Layers
- Arrange - Move Up
Layer Palette -
Double click on this Layer and set the Blend Mode to
"Difference" and the Layer Opacity to
30
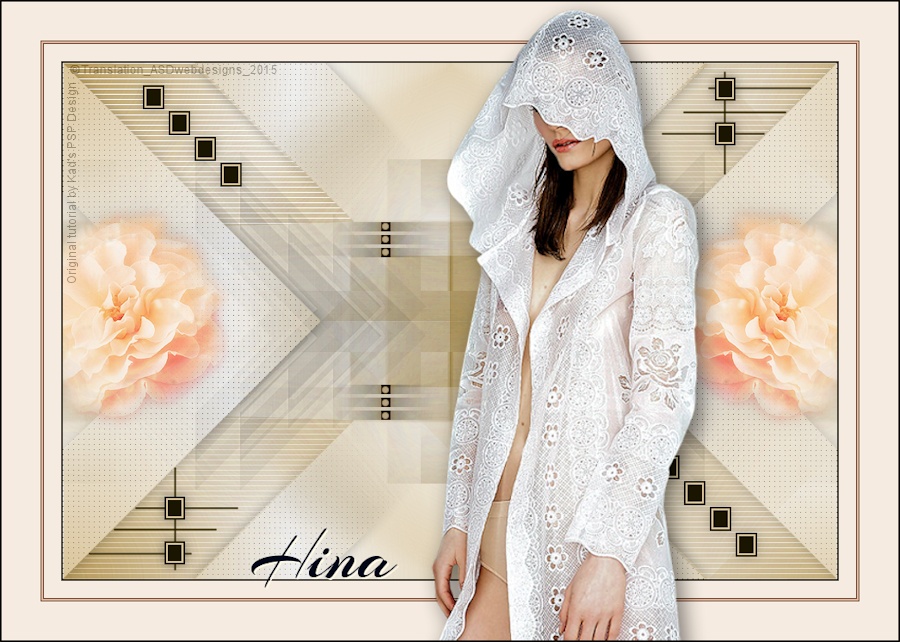
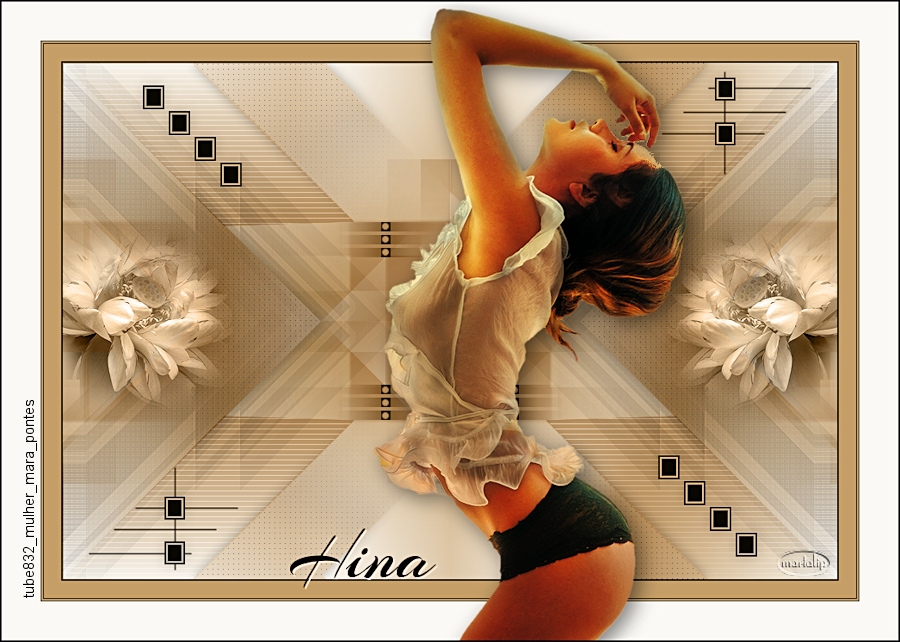
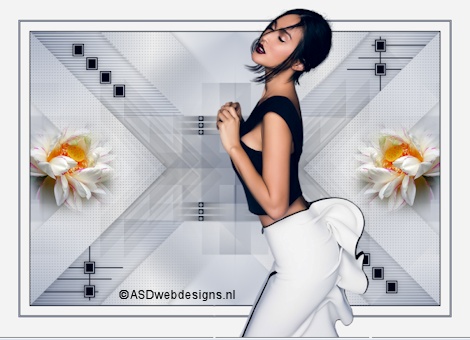
Your work looks like this now:
12
Layer Palette - Click on the Top
Layer
Open Tube "374_KaD_Deco1"
Edit - Copy
On your work image: Edit - Paste
As New Layer ( Set
to Blend Mode
Luminance (Legacy)
if you use different
colors.
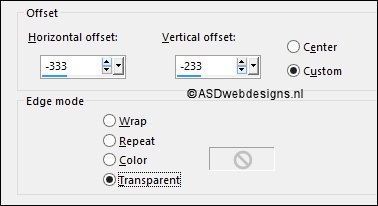
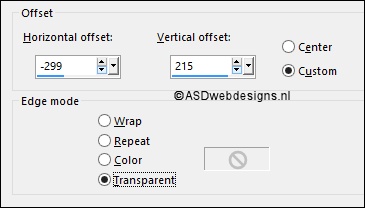
Effects - Image
Effects - Offset
13
Layers - Duplicate
Image - Mirror - Mirror Horizontal ( Image - Mirror in previous PSP
Versions)
Image -
Mirror -
Mirror Vertical (
Image - Flip in
previous PSP
Versions)
14
Open Tube "374_KaD_Deco2"
Edit - Copy
On your work image: Edit - Paste
As New Layer
( Set to Blend Mode Luminance
(Legacy) if you use
different colors.
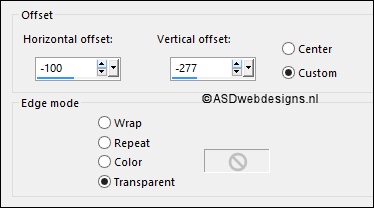
Effects - Image
Effects - Offset
15
Layers - Duplicate
Image - Mirror - Mirror Horizontal ( Image - Mirror in previous PSP
Versions)
Image -
Mirror -
Mirror Vertical (
Image - Flip in
previous PSP
Versions)
16
Open Tube "374_KaD_Deco3"
( Set to Blend Mode Luminance (Legacy)
if you use different colors.
Edit - Copy
On your work image: Edit - Paste
As New Layer
No need to move
17
Layer Palette - Click on the Sixth Layer from
the Top (Promoted
Selection)
Open Tube "374_KaD_Deco4"
( Set to Blend Mode Luminance (Legacy)
if you use different colors.
Edit - Copy
On your work image: Edit - Paste
As New Layer
No need to move
18
Image - Add Borders - Symmetric
checked - 2 px -
#010619
Image - Add Borders - Symmetric
checked - 20 px -
#f3f3f3

Image - Add Borders - Symmetric
checked - 1 px -
#010619
Image - Add Borders - Symmetric
checked - 2 px -
#aeb6c6

Image - Add Borders - Symmetric
checked - 1 px -
#010619
Image - Add Borders - Symmetric
checked - 45 px - #f3f3f3
19
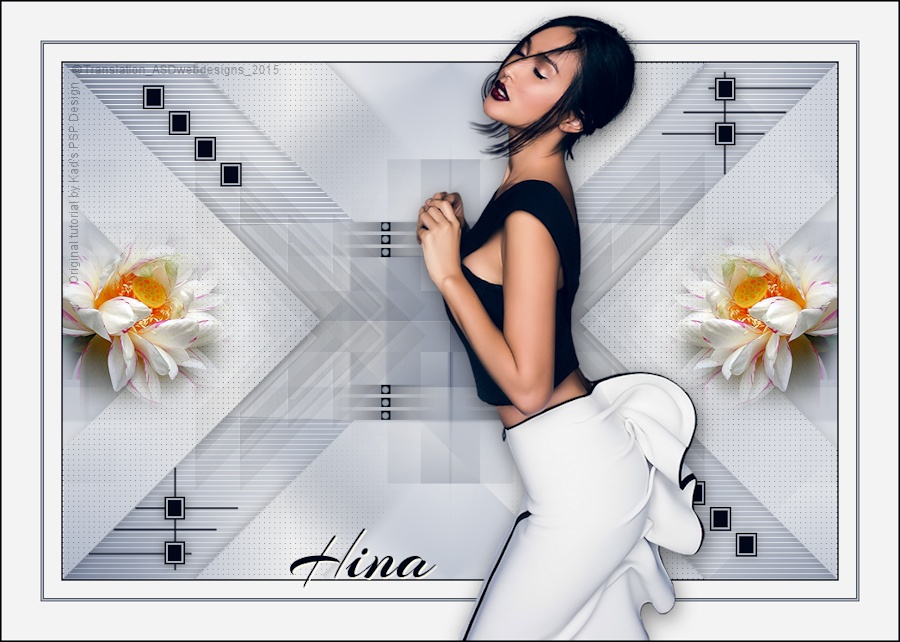
Open Tube "ketwomen20140135"
Edit - Copy
On your work image: Edit - Paste
As New Layer
Image - Resize - 83% - Resize
all Layers not checked
Move to the Right
like this:
Effects - 3D Effects - Drop
Shadow - Vertical 7 -
Horizontal 7 - Opacity 50
- Blur - 35 -
Color - #000000
20
Open Tube "374_KaD_Deco5"
( Set to Blend Mode Luminance (Legacy)
if you use different colors.
Edit - Copy
On your work image: Edit - Paste
As New Layer
Effects - Image
Effects - Offset
21
Image - Add Borders - Symmetric
checked - 2 px -
#010619
Image - Resize - Width 900 Pixels
- Resize all Layers checked
Adjust - Sharpness - Unsharp Mask -
Radius
2 - Strength
28 - Clipping
2 - Luminance Only
not Checked