The tutorial:
01
Open a
new transparent image of 900 x 600
px
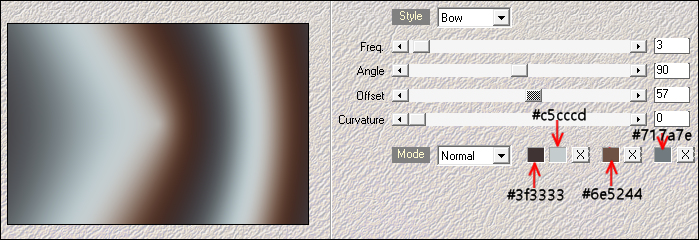
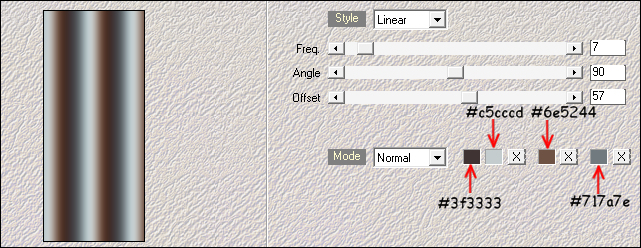
Effects -
Plugins - Mehdi
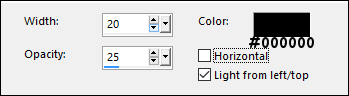
- Wavy Lab 1.1
Layers -
Duplicate
Image - Mirror -
Mirror
Horizontal
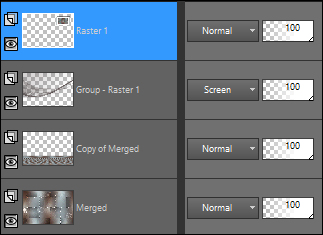
Layer Palette:
Lower the
Opacity of this
Layer to 59
Layers -
Merge - Merge
Down
02
Layers -
Duplicate
Effects - Plugins
- Photoshopfun II-
Kylie
Effects - Edge
Effects - Enhance
03
Layer Palette:
Click on the Bottom
Layer
Effects - Plugins
- Carolaine and
Sensibility -
CS-LDots
Layers - Merge -
Merge Visible
Result:
04
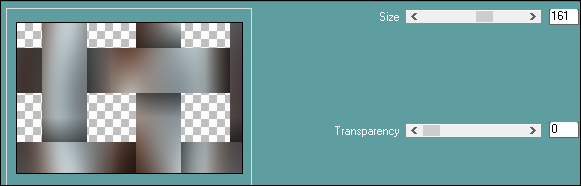
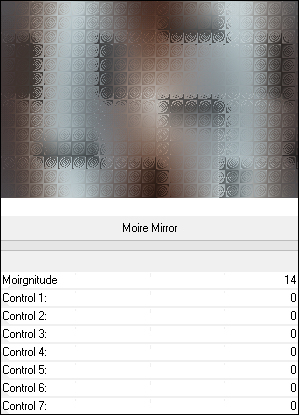
Effects - Plugins
- Filters Unlimited-
Funhouse - Moire
Mirror
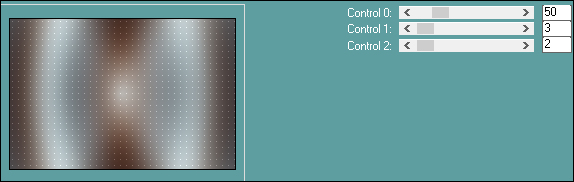
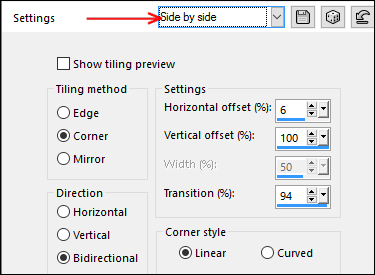
Effects - Image
Effects - Seamless
Tiling - Preset -
Side by side
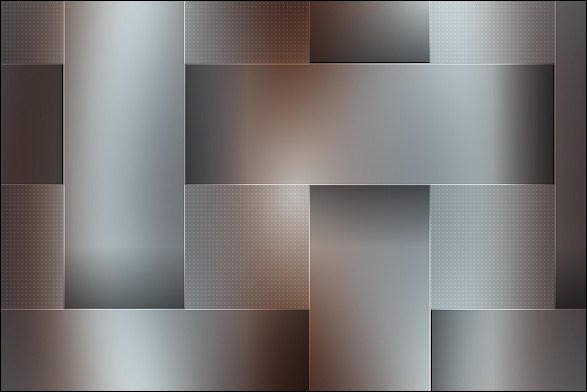
Adjust -
Sharpness - Sharpen
05
Layers -
Duplicate
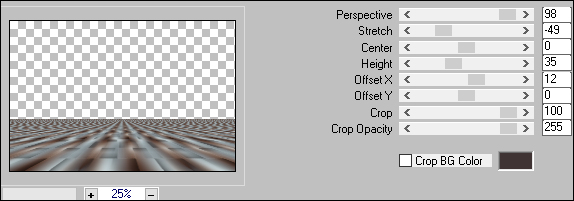
Effects - Plugins
- MuRa's Meister -
Perspective Tiling
Effects -
Geometric Effects -
Cylinder Horizontal

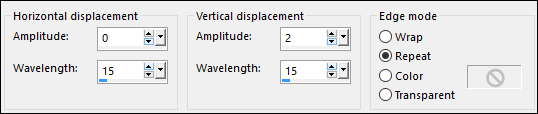
Effects - 3D
Effects - Drop
Shadow - Vertical: 0
Horizontal: 0
Opacity: 80
Blur: 40
Color: #000000
06
Layers - New
Raster Layer
Fill the Layer
with the
Backgroundcolor

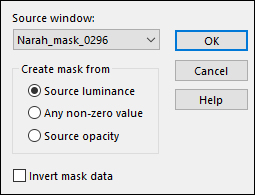
Layers - New Mask
Layer - From Image -
"Narah_mask_0296"
Layers - Merge -
Merge Group
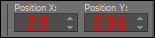
Press K on your
keyboard to activate
the Pick Tool
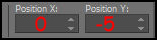
Enter these
Parameters for the X
and Y positions on
the Toolbar
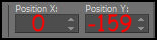
Press any key to
close the Pick Tool
Adjust -
Sharpness - Sharpen
Layer Palette:
Change the Blend
Mode of this Layer
to Screen
07
Layer Palette:
Click on the Bottom
Layer
Edit - Copy
Edit - Paste -
Paste As New
Image
Working on the
copy: Adjust - Blur
- Gaussian Blur -
Radius: 25
Effects -
Artistic Effects -
Topography
08
Image - Resize -
25% - Resize All
Layers - checked
Effects - Plugins
- AAA Frames - Foto
Frame
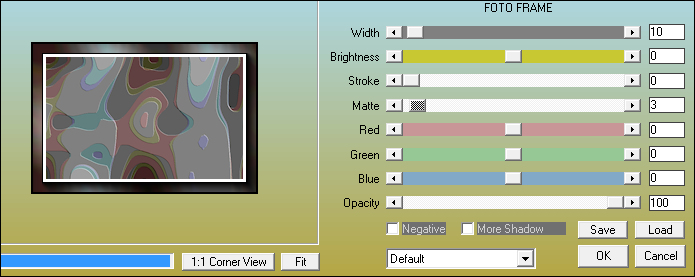
Image - Add
Borders - 5px -
Foregroundcolor

Edit - Copy
09
On your main work
image:
Edit - Paste - Paste
As New Layer
Layers - Arrange
- Bring to Top
Adjust -
Sharpness - Sharpen
Press K on your
keyboard to activate
the Pick Tool
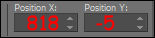
Enter these
Parameters for the X
and Y positions on
the Toolbar
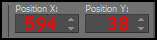
Press any key to
close the Pick Tool
Effects - 3D
Effects - Drop
Shadow
Vertical:
minus 5
Horizontal: 5
Opacity: 45
Blur: 2
Color: #000000
Your work and
Layer Palette look
like this now:
10
Layers - New
Raster Layer
Selection Tool
(S) - Custom
Selection

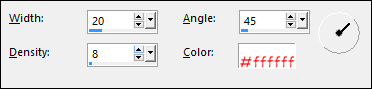
Effects - Plugins
- Mehdi - Wavy Lab
1.1
11
Effects - Texture
Effects - Blinds
Selections -
Select None
Press K on your
keyboard to activate
the Pick Tool
Enter these
Parameters for the X
and Y positions on
the Toolbar
Press any key to
close the Pick Tool
Effects -
Distortion Effects -
Wave
Effects - 3D
Effects - Drop
Shadow
Vertical: 7
Horizontal: 7
Opacity: 50
Blur: 15
Color: #000000
12
Layers -
Duplicate
Image - Mirror -
Mirror Horizontal
Press K on your
keyboard to activate
the Pick Tool
Enter these
Parameters for the X
and Y positions on
the Toolbar
Press any key to
close the Pick Tool
Layers - Merge -
Merge Down
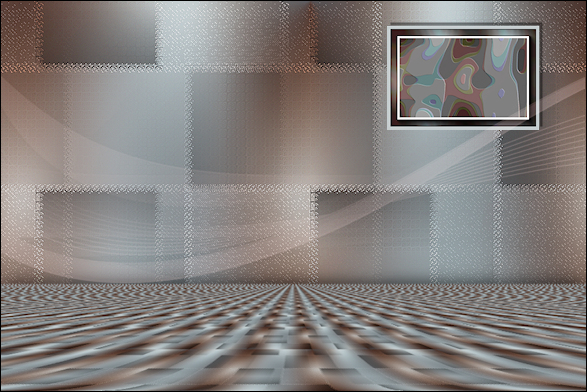
Result:
13
Maximize
"KaD_Deco17"
from tray
Edit - Copy
On your work
image: Edit -
Paste - Paste As New
Layer
Image - Resize -
55% - Resize All
Layers - not
checked
Effects - 3D
Effects - Drop
Shadow
Vertical: 7
Horizontal: 7
Opacity: 50
Blur: 15
Color: #000000
Adjust -
Sharpness - Sharpen
Press K on your
keyboard to activate
the Pick Tool
Enter these
Parameters for the X
and Y positions on
the Toolbar

Press any key to
close the Pick Tool
14
Maximize
"KaD_Woman_116"
from tray
Erase the
watermark
Edit - Copy
On your work
image: Edit -
Paste - Paste As New
Layer
Image - Resize -
50% - Resize All
Layers - not
checked
Effects - 3D
Effects - Drop
Shadow
Vertical: 7
Horizontal: 7
Opacity: 50
Blur: 15
Color: #000000
Adjust -
Sharpness - Sharpen
Press K on your
keyboard to activate
the Pick Tool
Enter these
Parameters for the X
and Y positions on
the Toolbar

Press any key to
close the Pick Tool
15
Maximize
"Gabry-varie
ornamenti 15"
from tray
Click on Raster 1
Edit - Copy
On your work
image: Edit -
Paste - Paste As New
Layer
Image - Resize -
60% - Resize All
Layers - not
checked
Effects - 3D
Effects - Drop
Shadow
Vertical: 7
Horizontal: 7
Opacity: 50
Blur: 15
Color: #000000
Adjust -
Sharpeness - Sharpen
Press K on your
keyboard to activate
the Pick Tool
Enter these
Parameters for the X
and Y positions on
the Toolbar
Press any key to
close the Pick Tool
16
Layer Palette:
Click on the Bottom
Layer
Edit - Copy
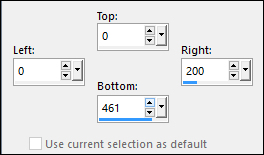
Image - Add
Borders - Symmetric
checked - 1px -
Backgroundcolor
Image - Add
Borders - Symmetric
checked - 3px -
Foregroundcolor
Image - Add
Borders - Symmetric
checked - 1px -
Backgroundcolor
Selections -
Select All
Image - Add
Borders - Symmetric
checked - 25px -
#ffffff

Selections -
Invert
Edit - Paste -
Paste Into Selection
(image is still in
memory)
Adjust - Blur -
Gaussian Blur -
Radius: 25
Keep selected
17
Effects - Plugins
- Graphics Plus -
Cross Shadow
Selections -
Invert
Effects - 3D
Effects - Drop
Shadow
Vertical: 0
Horizontal: 0
Opacity: 80
Blur: 20
Color:
Backgroundcolor
Edit - Repeat
Drop Shadow
Selections -
Select None
18
Image - Add
Borders - Symmetric
checked - 1px -
Backgroundcolor
Image - Add
Borders - Symmetric
checked - 3px -
Foregroundcolor
Image - Add
Borders - Symmetric
checked - 1px -
Backgroundcolor
19
Optional:
Image - Resize - Width 900 Pixels - Resize all Layers checked
Adjust -
Sharpness -
Unsharp Mask

Add your name or watermark, save as JPG
file and you're done!