Open "367_KaD_Alfakanaal"
This image contains Alpha Selections
Window - Duplicate
(or shift+D) - Close the original and proceed on the copy
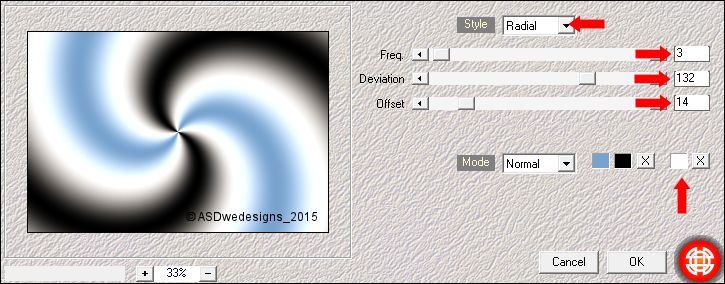
Effects - Plugins -
Mehdi - Wavy Lab -
Change the third color to #ffffff

Adjust - Blur - Gaussian Blur -
45
Effects - Plugins - Mock - Windo
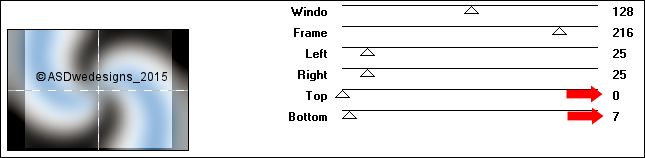
02
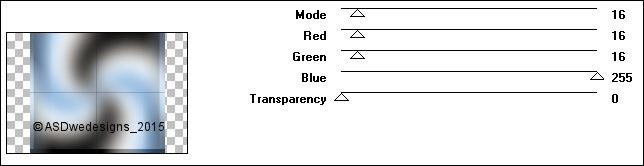
Change the Backgroundcolor to
#08175a

Layers - New Raster Layer
Fill with the Backgroundcolor
(Right Mouse Click)
Layers - Arrange - Send to
Bottom
Layers - Merge - Merge Visible
03
Layers - Duplicate
Effects - Plugins -
VM Toolbox -
Seamless Tile
Effects - Edge Effects - Enhance More
Effects - 3D Effects - Drop
Shadow - Vertical 0 -
Horizontal 0 - Opacity 40
- Blur - 20 -
Color - #000000

Layers - Merge - Merge
Visible
Effects - Plugins
- Richard Rosenman -
Solid Border
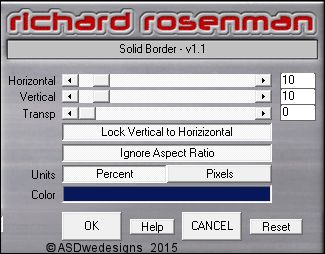
Effects - Image Effects - Seamless
Tiling
04
Layers - Duplicate
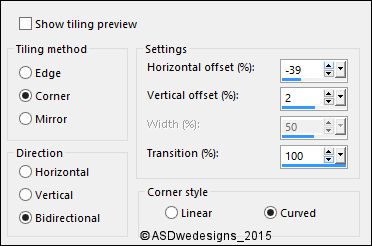
Effects - Plugins -
MuRa's Meister -
Perspective Tiling

Effects - 3D Effects - Drop
Shadow - Vertical 0 -
Horizontal 0 - Opacity 40
- Blur - 20 -
Color - #000000
Adjust - Sharpness - Sharpen More
05
Layer Palette - Click on the Bottom
Layer
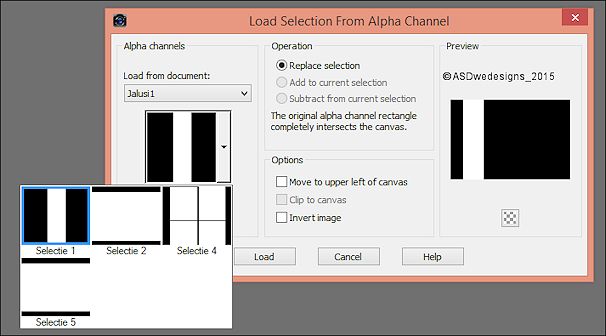
Selections - Load/Save Selection - Load Selection From Alpha Channel
- Selectie 1
Selections - Promote Selection to Layer
Selections - Select None
Effects - Plugins -
Toadies - What Are
You? - X-dose 20 -
Y-dose 20
06
Layers - Duplicate
Image - Mirror -
Mirror
Horizontal (
Image - Mirror
in previous PSP
Versions)
Layers - Merge -
Merge Down
Effects - Edge Effects - Enhance
Effects - 3D Effects - Drop
Shadow - Vertical 1 -
Horizontal 1 - Opacity 35
- Blur - 2 -
Color - #000000
Edit - Repeat Dropshadow
07
Layer Palette - Click on the Bottom
Layer
Selections - Load/Save Selection - Load Selection From Alpha Channel
- Selectie 2
Selections - Promote Selection to Layer
Selections - Select None
08
Layers - Duplicate
Effects - Image
Effects - Offset
Layers - Merge - Merge Down
09
Layers - Duplicate
Image - Mirror -
Mirror
Horizontal (
Image - Mirror
in previous PSP
Versions)
Layers - Merge -
Merge Down
Layer Palette -
Double click on this Layer and set the Blend Mode to
"Hard Light"
Effects - Plugins -
Alien Skin Eye Candy
5 - Impact - Extrude
- Settings
Tab:
Preset
367_KaD_Extrude
Effects - 3D Effects - Drop
Shadow - Vertical 0 -
Horizontal 0 - Opacity 80
- Blur - 40 -
Color - #000000
Adjust -
Sharpness -
Sharpen
Layers - Arrange
- Bring to Top
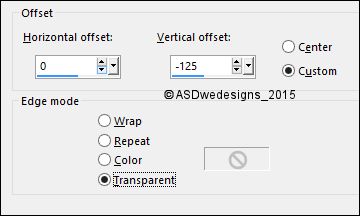
Effects - Image
Effects - Offset
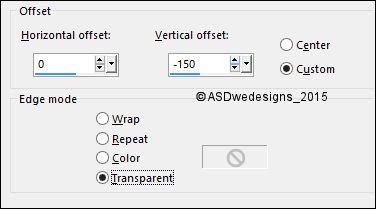
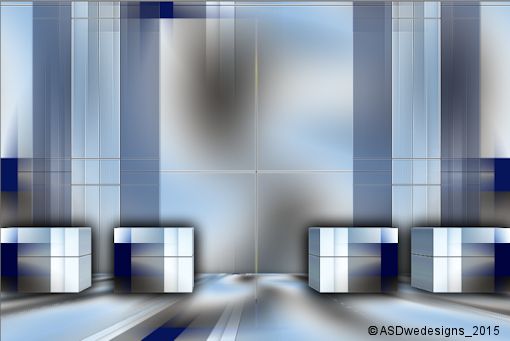
10
Layers - Duplicate
Layer Palette - Click on the Second Layer from the Top
Layer Palette -
Double click on this Layer and set the Blend Mode to
"Normal"
Layer Palette - Click on the Top
Layer
Layers - Merge - Merge Down
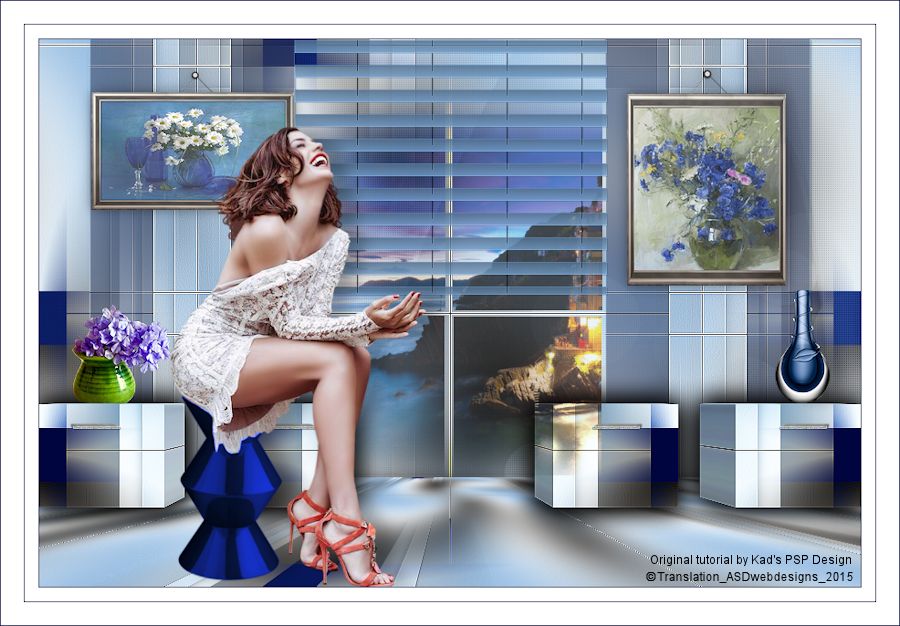
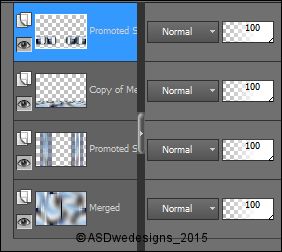
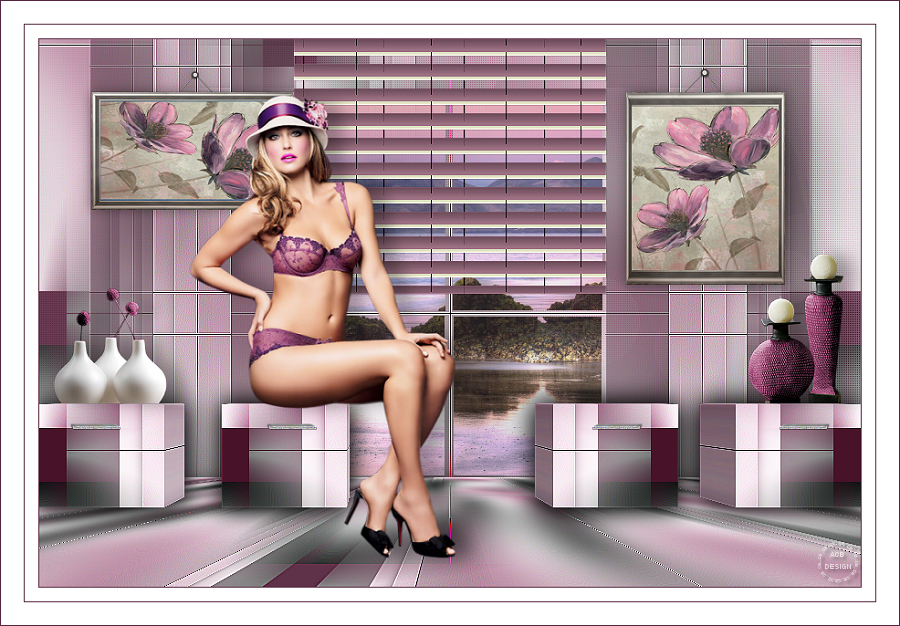
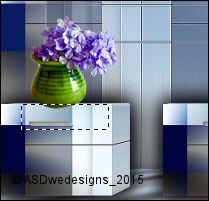
Your work and Layer Palette look like this now:
11
Open Tube "Bewerkt_calguiscadredeco30082012"
Note: If you wish you can
replace the Flower image with an
Image of your own
Edit - Copy Special - Copy
Merged
On your work image: Edit - Paste
As New Layer
Image - Resize - 35% - Resize
all Layers not checked
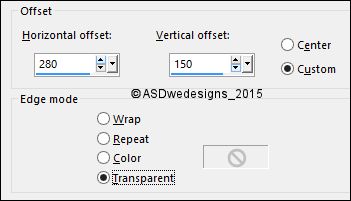
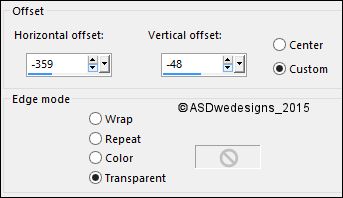
Effects - Image
Effects - Offset
Adjust - Sharpness -
Sharpen
Effects - 3D Effects - Drop
Shadow - Vertical 0 -
Horizontal 0 - Opacity 40
- Blur - 20 -
Color - #000000
12
Open Tube "Bewerkt2_calguiscadredeco30082012"
Note: If you wish you can
replace the Flower image with an
Image of your own
Edit - Copy Special - Copy
Merged
On your work image: Edit - Paste
As New Layer
Image - Resize - 40% - Resize
all Layers not checked
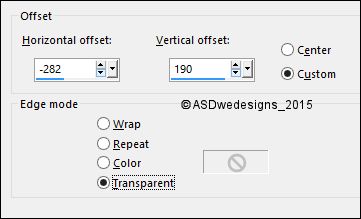
Effects - Image
Effects - Offset
Adjust - Sharpness -
Sharpen
Effects - 3D Effects - Drop
Shadow - Vertical 0 -
Horizontal 0 - Opacity 40
- Blur - 20 -
Color - #000000
13
Open Tube "calguisdecovase28072012"
Edit - Copy
On your work image: Edit - Paste
As New Layer
Image - Resize - 25% - Resize
all Layers not checked
Effects - Image
Effects - Offset
Adjust - Sharpness -
Sharpen
Effects - 3D Effects - Drop
Shadow - Vertical 0 -
Horizontal 17 - Opacity 30
- Blur - 25 -
Color - #000000
14
Color Palette:
Change the
Foregroundcolor
to #ffffff
Layer Palette - Click on the Bottom
Layer
Layers - New Raster Layer
Fill with the Foregroundcolor
Layers - New Mask
Layer - From Image -
adita'screations_mask_abstract - Source
luminance Checked -
Invert mask data NOT checked
Layers - Merge - Merge Group
Image - Mirror - Mirror
Horizontal ( Image - Mirror in
previous PSP Versions)
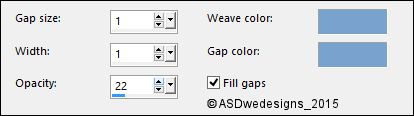
Effects - Texture Effects - Weave -
Weave Color & Gap Color
#78a3ce

Adjust - Sharpness -
Sharpen
Layer Palette -
Double click on this Layer and set the Blend Mode to
"Soft Light"
15
Layer Palette - Click on the Top
Layer
Open Tube "367_KaD_Deco1"
Edit - Copy
On your work image: Edit - Paste
As New Layer
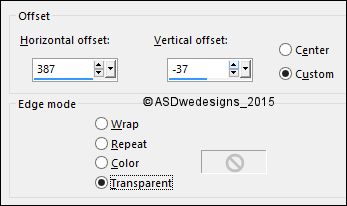
Effects - Image
Effets - Offset
16
Open Tube "LF-PurpleFlowers-09042014"
Edit - Copy
On your work image: Edit - Paste
As New Layer
Image - Mirror - Mirror
Horizontal ( Image - Mirror in
previous PSP Versions)
Image - Resize - 30% - Resize
all Layers not checked
Effects - Image Effets - Offset
Adjust - Sharpness -
Sharpen
Effects - 3D Effects - Drop
Shadow - Vertical 0 -
Horizontal 17 - Opacity 30
- Blur - 25 -
Color - #000000
Selection Tool -
Rectangle
Make a selection around the vase like this: (If you use a different
tube you can probably skip this)
Edit - Cut (Or hit the Delete Key of
your Keyboard)
17
Selections - Load/Save Selection -
Load Selection From Alpha Channel -
Selectie 4
Open Tube "1647
- misted paisaje - LB TUBES"
Edit - Copy
On your work image: Edit - Paste
As New Layer
Move into the
Selection like this:

Selections - Invert
Edit - Cut (Or hit the Delete Key of
your Keyboard)
Selections - Select None
Layer Palette -
Double click on this Layer and set the Blend Mode to
"Hard Light" and the Layer Opacity to 66
Layers - Arrange - Move Down - REPEAT 5 TIMES!!
18
Layer Palette - Click on the Top
Layer
Layers - New Raster Layer
Selections - Load/Save Selection -
Load Selection From Alpha Channel -
Selectie 5
Effects - Plugins -
VanDerLee -
Unplugged X - Jalusi
- Color
#78a3ce
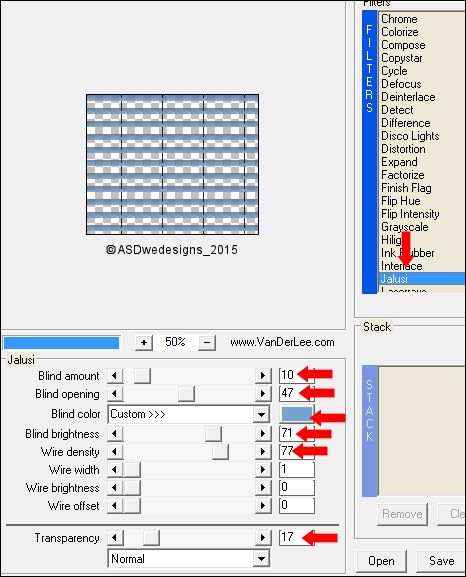
Selections - Select None
Adjust - Sharpness - Sharpen
Effects - 3D Effects - Drop
Shadow - Vertical 1 -
Horizontal 1 - Opacity 15
- Blur - 0 -
Color - #000000
19
Open Tube "MinaLady4@"
Edit - Copy
On your work image: Edit - Paste
As New Layer
Image - Resize - 66% - Resize
all Layers not checked
Move like this:
Adjust - Sharpness -
Sharpen
Effects - 3D Effects - Drop
Shadow - Vertical 0 -
Horizontal 17 - Opacity 30
- Blur - 25 -
Color - #000000
20
Image - Add Borders - Symmetric
checked - 1 px -
#08175a
Image - Add Borders - Symmetric
checked - 15 px - #ffffff
Image - Add Borders - Symmetric
checked - 1 px -
#08175a
Image - Add Borders - Symmetric
checked - 25 px - #ffffff
Image - Add Borders - Symmetric
checked - 1 px -
#08175a
21