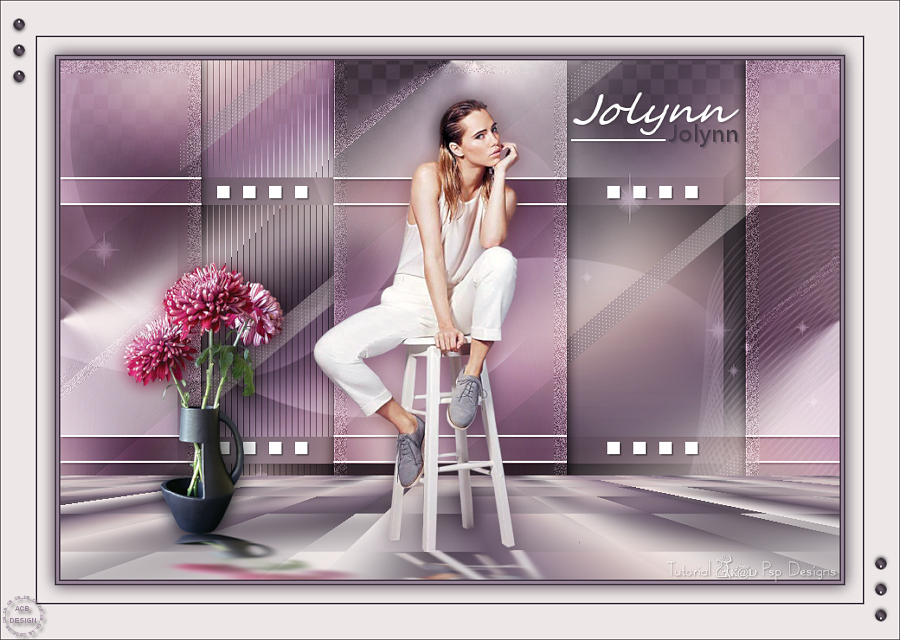
The tutorial:
01
Maximize
"376_KaD_Alfakanaal"
from tray (This
image contains
Alpha
Selections)
Window -
Duplicate
or Shift+D
Close the
original and
continue on the copy
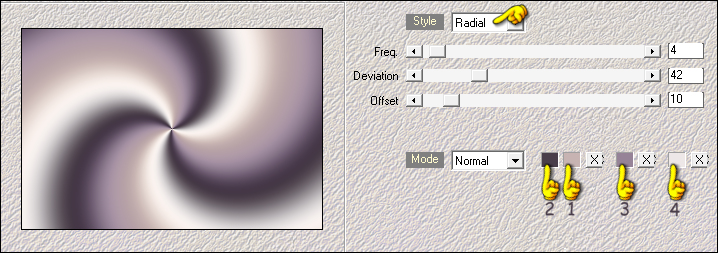
Effects - Plugins
- Mehdi - Wavy Lab
1.1
Adjust - Blur -
Gaussian Blur -
Radius: 40
02
Layers -
Duplicate
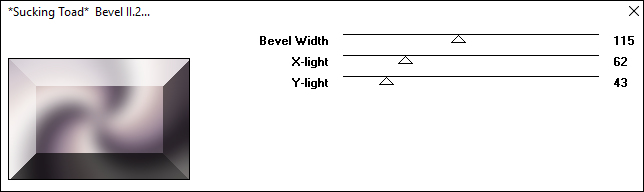
Effects - Plugins
- Toadies - *Sucking
Toad* - Bevel II.2 -
Default settings
03
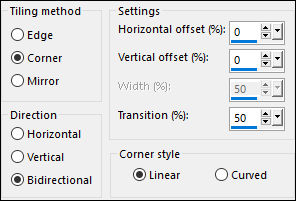
Effects - Image
Effects - Seamless
Tiling - Default
settings
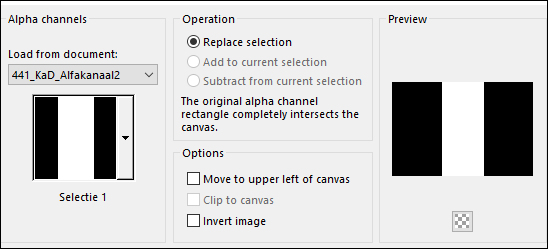
04
Selections -
Load/Save - Load
Selection From Alpha
Channel - "Selectie
1"
Selections -
Promote Selection to
Layer
Effects - Plugins
- Simple - 4 Way
Average
Keep selected
05
Layers -
Duplicate
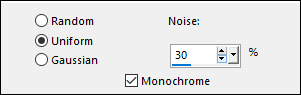
Adjust -
Add/Remove Noise -
Add Noise
Selections -
Modify - Contract -
15px
Edit - Cut
(or hit Delete on
your keyboard)
Selections -
Select none
Layers - Merge -
Merge Down
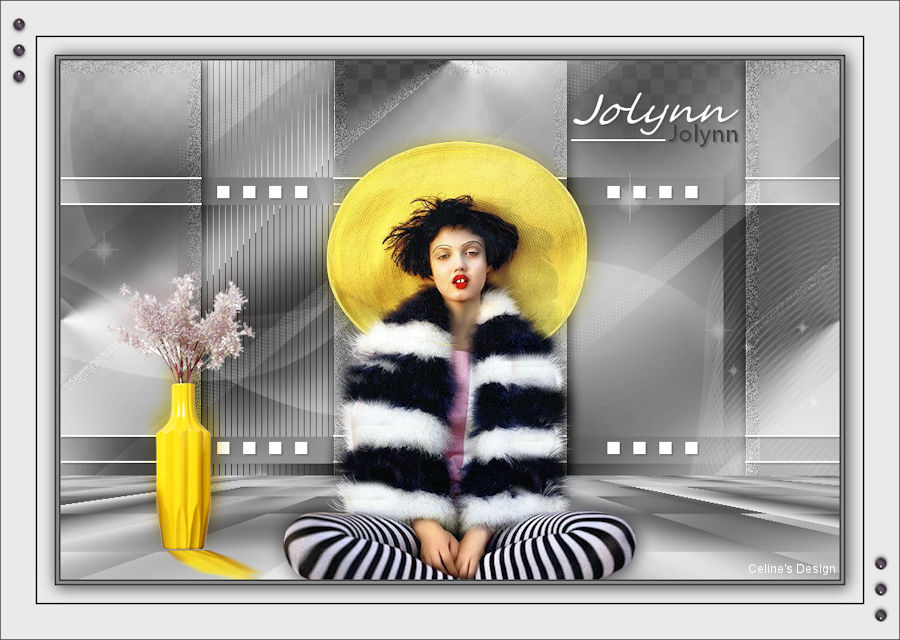
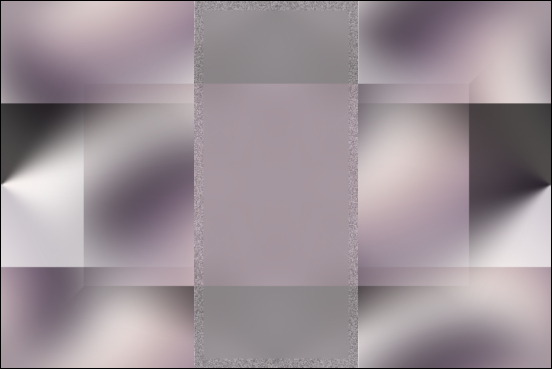
Result:
06
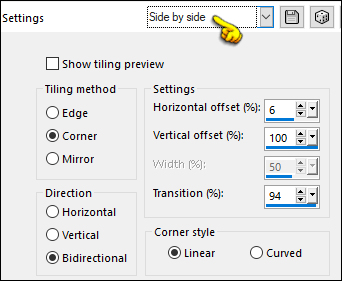
Effects - Image
Effects - Seamless
Tiling - Preset -
Side by Side
Effects - 3D
Effects - Drop
Shadow:
Vertical: 0
Horizontal: 0
Opacity: 40
Blur: 20
Color: #000000
Layer Palette:
Change the Blend
mode of this Layer
to Hard Light
07
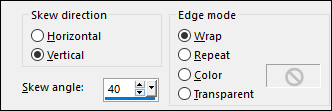
Layers -
Duplicate
Effects -
Geometric Effects -
Skew
Layers - Arrange
- Move Down
Adjust -
Sharpness - Sharpen
Layer Palette:
Change the Blend
Mode of this Layer
to Overlay
08
Layer Palette:
Click on the Bottom
Layer (Raster1)
Layers - Arrange
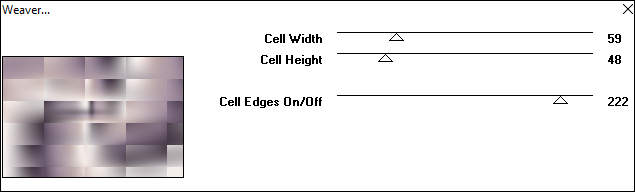
- Bring To Top
Effects - Plugins
- Toadies - Weaver -
Default settings
09
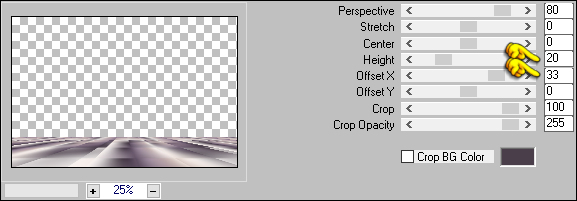
Effects - Plugins
- MuRa's Meister -
Perspective Tiling
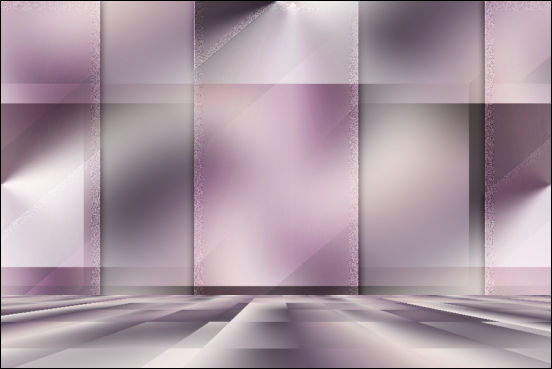
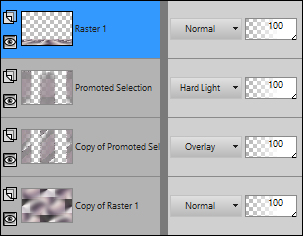
Your work and
Layer Palette look
like this now:
10
Layer Palette:
Click on the Bottom
Layer (Copy of
Raster 1)
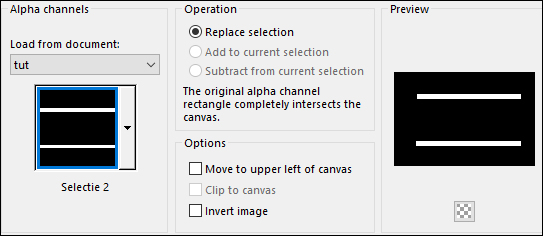
Selections -
Load/Save - Load
Selection From Alpha
Channel - "Selectie
2"
Selections -
Promote Selection to
Layer
Keep selected
11
Effects - Plugins
- AP 01[innovations]
- Lines -
SilverLining

Selections -
Select none
Effects -
Geometric Effects -
Skew
Layer Palette:
Change the Blend
mode of this Layer
to Soft Light
12
Selections -
Load/Save - Load
Selection From Alpha
Channel - Again
"Selectie 1"
Edit - Cut
(or hit Delete on
your keyboard)
Selections -
Select none
Result:
13
Layer Palette:
Click on the Bottom
Layer (Copy of
Raster 1)
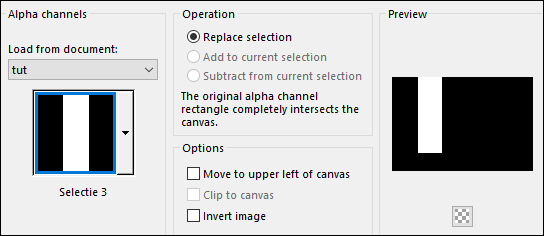
Selections -
Load/Save - Load
Selection From Alpha
Channel - "Selectie
3"
Selections -
Promote Selection to
Layer
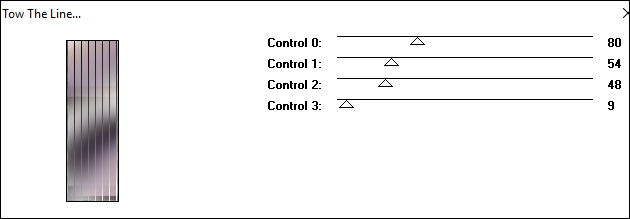
Effects - Plugins
- Tramages - Tow the
Line - Default
settings
Selections -
Select None
Layer Palette:
Change the Blend
Mode of this Layer
to Overlay
and lower the Opacity
to 69
14
Selections -
Load/Save - Load
Selection From Alpha
Channel - "Selectie
2"
Edit - Cut (or
hit Delete on your
keyboard)
Selections -
Select none
Result:
15
Materials
Palette: Change the
Foregroundcolor to
#968397

Layer Palette:
Click on the Bottom
Layer (Copy of
Raster 1)
Layers - New
Raster Layer
Fill the Layer
with the
Foregroundcolor
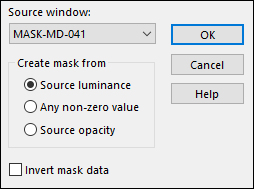
Layers - New Mask
Layer - From Image
-"MASK-MD-041.jpg"
Layers - Merge -
Merge Group
Layer Palette:
Change the Blend
Mode of this Layer
to Screen and
lower the Opacity to
80
16
Layer Palette:
Click on the Top
Layer
Maximize
"441_KaD_Deco01"
from tray
Edit - Copy
On your work
image: Edit -
Paste - Paste As New
Layer
No need to move
Effects - 3D
Effects - Drop
Shadow:
Vertical: 2
Horizontal: 2
Opacity: 35
Blur: 2
Color:
#4a3e4a

17
Maximize
"441_KaD_Text1"
from tray
Edit - Copy
On your work
image: Edit -
Paste - Paste As New
Layer
Pick Tool (K)
 Enter these
parameters for the
X and Y
positions on the
Toolbar
Enter these
parameters for the
X and Y
positions on the
Toolbar
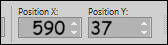 590.00 37.00
Press any key to
close the Pick Tool
Effects - 3D
Effects - Drop
Shadow:
Vertical: 2
Horizontal: 2
Opacity: 35
Blur: 2
Color:
#4a3e4a
18
Maximize
"KaD_Woman_160"
from tray
Erase the
watermark
Edit - Copy
On your work
image: Edit -
Paste - Paste As New
Layer
Image - Resize -
50% - Resize All
Layers - not
checked
Pick Tool (K)
Enter these
parameters for the
X and Y
positions on the
Toolbar
 292.00 43.00
Press any key to
close the Pick Tool
19
Layers -
Duplicate
Click on the
Layer below
(original tube
Layer)
Adjust - Blur -
Gaussian Blur -
Radius: 10
Layer palette:
Change the Blend
Mode of this Layer
to Multiply
and lower the
Opacity to 80
Click on the Top
Layer
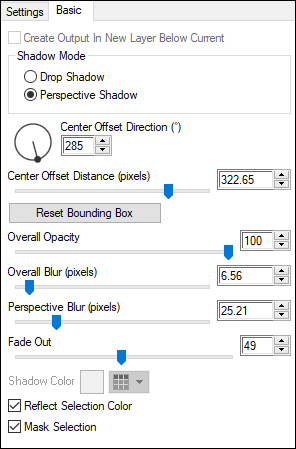
Effects - Plugins
- Alien Skin Eye
Candy 5 - Impact -
Perspective Shadow -
Preset
-"441_KaD_Shadow1"
Note: If the
Preset isn't working
for you, use these
settings in the
Basic Tab
20
Maximize "SvB
Vase with
Chrysanthemums"
Copy the Bottom
Layer
On your work
image: Edit -
Paste - Paste As New
Layer
Image - Resize -
65% - Resize All
Layers - not
checked
Pick Tool (K)
Enter these
parameters for the
X and Y
positions on the
Toolbar
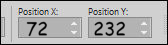 72.00 232.00
Press any key to
close the Pick Tool
21
Layers -
Duplicate
Click on the
Layer below
(original tube
Layer)
Adjust - Blur -
Gaussian Blur -
Radius: 10
Layer Palette:
Change the Blend
Mode of this Layer
to Multiply
and lower the
Opacity to 80
Click on the Top
Layer
Effects - Plugins
- Alien Skin Eye
Candy 5 - Impact -
Perspective Shadow -
Preset
-"441_KaD_Shadow1"
Basic settings
are already set
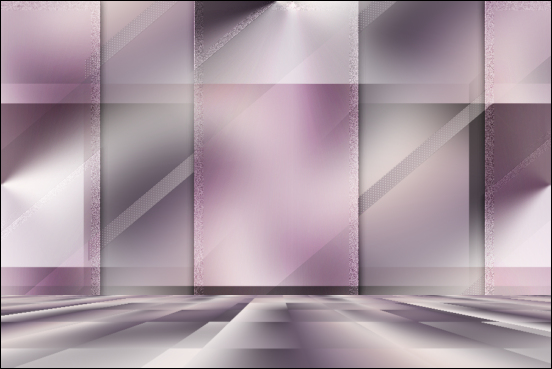
Your work looks
like this now:
22
Layer Palette:
Layer Palette: Click
on the Bottom Layer
(Copy of Raster 1)
Layers -
Duplicate
Change the Blend
Mode of this Layer
to Multiply
and lower the
Opacity to 75
Layers - Merge -
Merge All Flatten
23
Image - Add
Borders - Symmetric
checked - 2px -
#4a3e4a
Image - Add
Borders - Symmetric
checked - 3px -
#968397
Image - Add
Borders - Symmetric
checked - 2px -
#4a3e4a
Selections -
Select All
Image - Add
Borders - Symmetric
checked - 20px -
#ede8e7
Effects - 3D
Effects - Drop
Shadow:
Vertical: 0
Horizontal: 0
Opacity: 60
Blur: 25
Color:
#4a3e4a
Edit - Repeat
Drop Shadow
Selections -
Select None
Image - Add
Borders - Symmetric
checked - 2px -
#4a3e4a
Image - Add
Borders - Symmetric
checked - 40px -
#ede8e7
24
Maximize
"441_KaD_Deco2 from
tray
Edit - Copy
On your work
image: Edit -
Paste - Paste As New
Layer
No need to move
Image - Add
Borders - Symmetric
checked - 1px
- #4a3e4a
24
Optional:
Image - Resize - Width 900 Pixels - Resize all Layers checked
Adjust -
Sharpness -
Unsharp Mask

Add your name or watermark,
also add KaD's
watermark from the
Materials. Save as JPG
file and you're done!