This tutorial is written with PSPX2
But can easily made with other versions
Preparations :
Open tubes in PSP
Install filters before you open PSP!
Install fonts in fonts folder in PSP
Install mask in your mask folder in PSP, unless otherwise specified
Install textures in texture folder in PSP
Filters Here
Materialen Here
Materials
2 Tubes :
SS_316.psp – Suzy Squai
Bloemen – Daantje
lente..008.. – Daantje
Font : Cassandra
Filters :
Graphics Plus - Crosshadow
Background designers sf10I (in zip)
Filter Factory Gallery D - Vertigo
----------------------------------------
Procedure
Let’s get started – Have fun!
Remember to save your work often
colors :
foreground: #faf9f7
background : #927a75
Foreground gradient : linear : 70 – 3 – INVERT
1
Open a new image 650x500 – transparent
Fill with gradient
2
Layers – duplicate
Adjust – blur – Gaussian 15
Selections – select all
Open tube : ente..008..
Edit – copy
Edit – paste into selection
Selections - select none
Layers – merge down
Opacity : 65
3
Effects – unlimited2 – Background Designers sf10I – 4 Way Average – standard
Layers – merge down
4
Open tube : SS_316.psp
Edit – copy
Edit – paste as a new layer
Move right and up
5
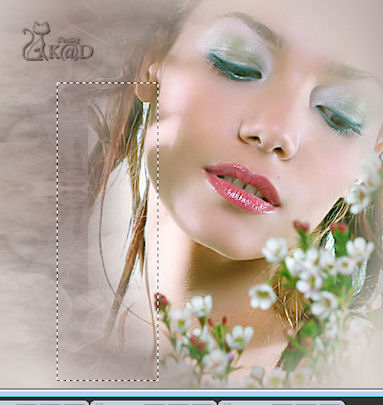
Activate eraser tool – smoke wise – see print screen

Now erase the straight line of the tube less straight – see print screen

6
Open tube : lente..008.. again
Edit – copy
Edit – paste as a new layer
Image – resize : 70% - uncheck all layers
Move it left and up
Opacity : 70
7
Open tube : Bloemen
Edit – copy
Edit – paste as a new layer
Image – resize : 90%, uncheck all layers
Move left and down
Opacity 90
8
Activate text tool
Font : Cassandra – 48 pix – smooth – stroke width 1
Type text
Image – free rotate : left – 15 – rotate single layer around center canvas
9
Effects – 3D-effects – dropshadow : V&H 1 – 100 – 1
Move left and up
10
Layers – new raster layer
Place name and/or watermark
11
Image – add borders
2 pix background
25 pix foreground
12
Select 25 pix border
Change gradient to linear : 45 – 5
Fill with gradient
13
Effects – Filter Factory Gallery D – Vertigo – Intensity on 237
Effects – edge effects – enhance
14
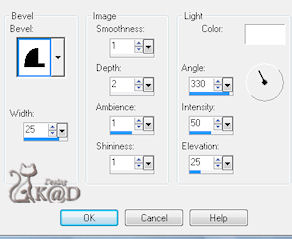
Effects – inner bevel – see print screen

Selections – select none
Image – add borders – 1 pix background
15
Image – resize – 650 pix
16
Adjust – sharpness – unsharp mask : 1 – 64 – 4
17
Edit - copy
18
Open Jac’s Animation shop
Paste as a new animation
19
Duplicater 2x = total 3 frames
Select all with Ctrl+A
20
Open vlammetje in Animation Shop
Select all with Ctr+A
Animation – resize animation: 70%
Edit copy
Back to your creation
Paste into selected frame – paste on the big candle
21
Back to vlammetje
Click undo once
Animation – resize : 50%
Edit – copy
Back to creation
Edit – paste into selected frame – paste on the middle candle
22
Back to vlammetje
Click undo once
Animation – resize : 40%
Edit – copy
Back to creation
Edit – paste into selected frame – paste on the little candle
23
Click on the filmstrip to check your animation
24
Save as .gif
Your image is ready
I hope you enjoyed making it
Hugs,
K@rin – K@D’s Designs
23-02-2010
