Waterfalls - Animated
This tutorial is written with PSPX2
But can easily made with other versions
Preparations :
Open tubes in PSP
Install filters before you open PSP!
Install fonts in fonts folder in PSP
Install mask in your mask folder in PSP, unless otherwise specified
Install textures in texture folder in PSP
* If you recognize a tube as one of yours, please contact me so I canbr>
give you credit or – if you wish – remove the tube.
Filters HERE
Materiaal HERE
Materials :
4 Tubes :
1/ LexHa_WildVoyage_Juni 2010 - Lexha
2/ 2026-luzcristina – Luz Cristina
3/ 2271-luzcristina – Luz Cristina
4/ SS_382 – Suzy Sqai
Filters :
1/ EyeCandy 4000 – Jiggle
2/ Bordermania
3/ FM Tile Tools
Jac’s Animation Shop (A/S)
----------------------------------------
Procedure
Let’s get started – Have Fun!
Remember to save your work often.
Colors :
Foreground: #c5ddbc
Background : #144133
Gradient : Lineair : 45 – 0 – check invert
1
Open a new image – 650x500 pix – transparent
Fill with gradient
2
Open tube : SS_382
Edit – copy
Edit – paste as a new layer
Image – mirror
Move left against the border
effects – FM Tile Tools – Blend emboss - standard
3
Open tube : 2271-luzcristina
Edit – copy
Edit – paste as a new layer
Move right and up – see example
4
Open tube : 2026-luzcristina
Edit – copy
Edit – paste as a new layer
Image – resize : 70%, uncheck all layers
Move right and down – see example
Layers – arrange – move down
5
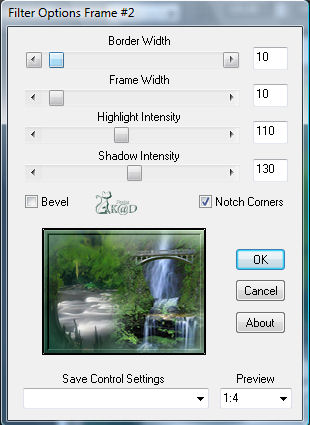
Layers – merge visible
Effects – Bordermania – Frame #2 – see print screen
6
Layers – new raster layer
Place your name and/or watermark
Layers – merge down
7
Open tube : LexHa_WildVoyage_Juni 2010
Edit – copy
Edit – paste as a new layer
Image - mirror
Image – resize : 80%, uncheck all layers
Move to the left – see example
Adjust – sharpness – sharpen 1x
Effects – 3D_effects – drop shadow : V10 – H8 – 65 – 20
Close this layer
8
Make a selection with free hand tool – anti-alias - inside
See print screen
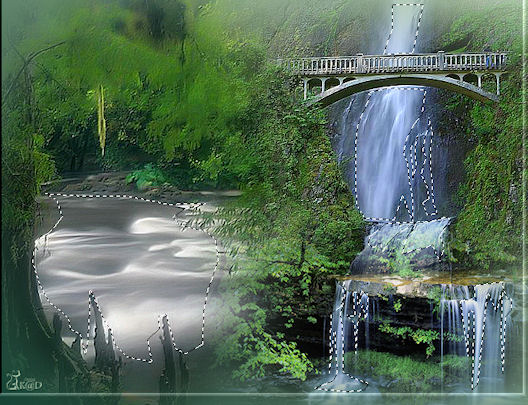
Stay away from the border or it will move too
9
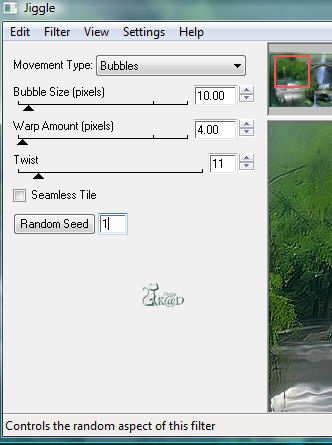
Effects – EyeCandy 4000 – Jiggle – see print screen
10
Selections – none
Open raster 2 (woman)
Edit – copy merged
11
Open A/S
Edit – paste as a new layer
12
Back to PSP
Click UNDO 3x
Effects – EyeCandy 4000 – Jiggle – Click random seed 1x
Open raster 2
Edit – copy merged
13
Back to A/S
Edit – paste after current frame
14
Back to PSP
Click UNDO 3x
Effects – EyeCandy 4000 – Jiggle – Click random seed 1x
Open raster 2
Edit – copy merged
15
Back to A/S
Edit – paste after current frame
16
Animation – frame properties –display time : 25
17
Click on the film icon to check your animation
18
Save as .gif
Your image is ready
I hope you enjoyed making it
Hugs,
K@rin – K@D’s Designs
20-07-2010
