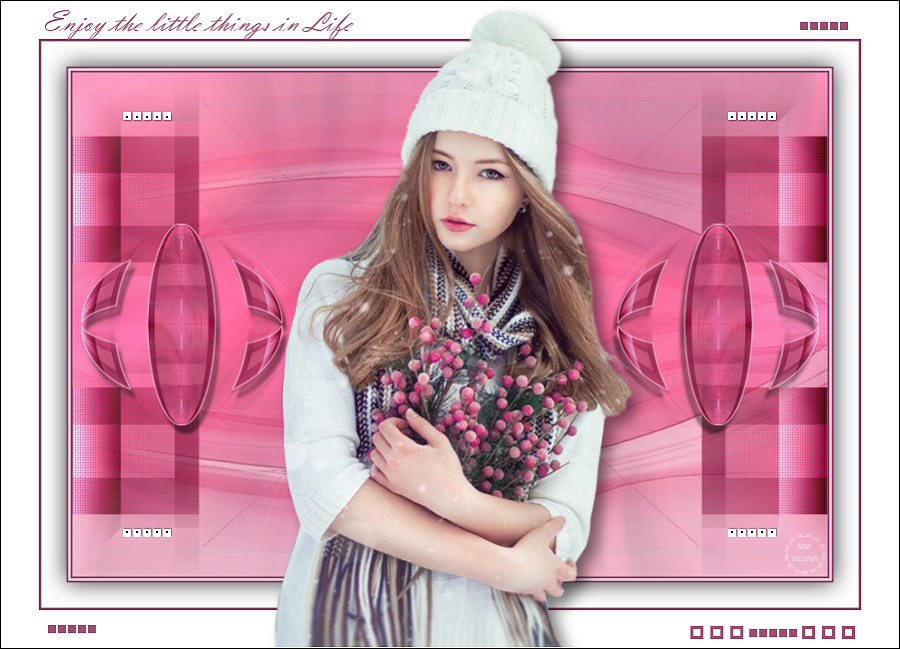
The tutorial:
01
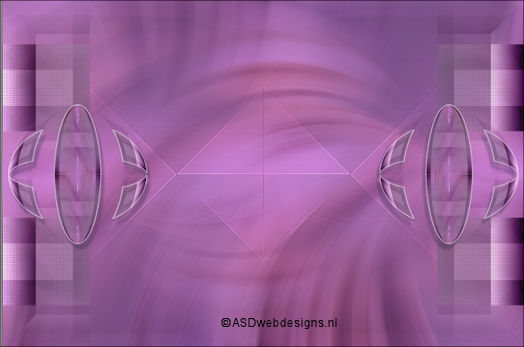
Open "392_KaD_Alfakanaal"
This image contains Alpha Selections
Window - Duplicate
(or shift+D) - Close the original and proceed on the copy
Fill with the
Backgroundcolor
 (Right Mouse Click)
02
Layers - New
Raster Layer
Selections -
Select All
Maximize Tube
"KaD_Woman_84" from
tray
Remove the Watermark
Edit - Copy
Minimize to Tray again, you need it
again.
On your work image: Edit - Paste
Into Selection
Selections - Select
None
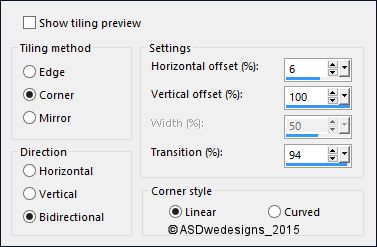
Effects - Image
Effects - Seamless
Tiling -
Preset Side by Side
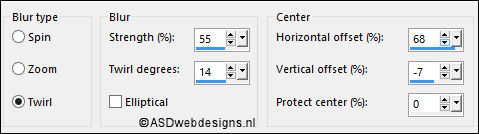
Adjust - Blur -
Radial Blur
Layer Palette -
Double click on this Layer and set the Blend Mode to
"Overlay"
Layers - Merge -
Merge Down
03
Layers - Duplicate
Image - Mirror -
Mirror
Horizontal (
Image - Mirror
in previous PSP
Versions)
Image -
Mirror -
Mirror Vertical (
Image - Flip in
previous PSP
Versions)
Layer Palette -
Double click on this Layer and set the Blend Mode to
"Screen" and the Layer Opacity to 50
Layers - Merge -
Merge Down
04
Layers - Duplicate
Effects - Plugins -
Simple - Pizza Slice
Mirror
Effects - Edge
Effects - Enhance
More
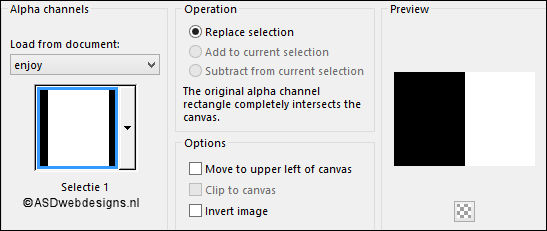
Selections - Load/Save
Selection - Load
Selection From Alpha
Channel: selectie
1
Edit - Cut (Or hit the Delete Key of
your Keyboard)

Selections - Select
None
05
Layers -
Duplicate
Image - Mirror -
Mirror
Horizontal (
Image - Mirror
in previous PSP
Versions)
Layers - Merge -
Merge Down
Adjust - Sharpness -
Sharpen More
Layer Palette -
Double click on this Layer and set the Blend Mode to
"Dodge" and the Layer Opacity to 40
Layers - Merge -
Merge Down
06
Layers -
Duplicate
Effects - Plugins -
Mock - Windo
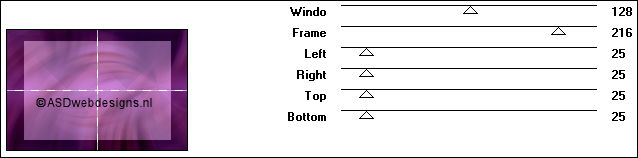
Image - Resize - 50% - Resize
all Layers not checked
Image - Free Rotate - Right
checked - 90° -
Both boxes unchecked
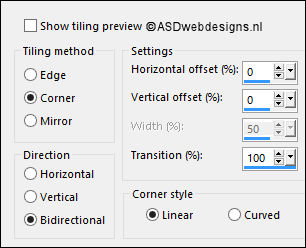
Effects - Image
Effects - Seamless
Tiling
Effects - Plugins -
<I.C.NET Software> -
Filters Unlimited
2.0 - Buttons &
Frames - 3D Glass
Frame 2

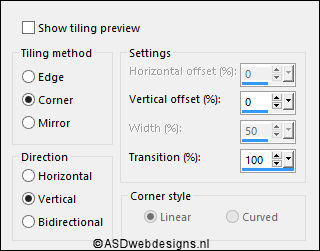
Effects - Image
Effects - Seamless
Tiling
Effects - Texture Effects - Weave -
Weave Color & Gap Color
#4a3558

07
Layers - Duplicate
Effects - Geometric Effects - Circle
- Transparent checked
Effects - Plugins -
Alien Skin Eye Candy
5 - Impact - Gradient Glow
- Settings
Tab:
Preset
392_KaD_GradientGlow
Note: If you
are using other
colors you can
change them at the
Basic Tab
Image - Resize - 40% - Resize
all Layers not checked
Adjust - Sharpness -
Sharpen
Effects - 3D Effects - Drop
Shadow - Vertical 10 -
Horizontal 5 - Opacity 50
- Blur - 5 Color
#4a3558
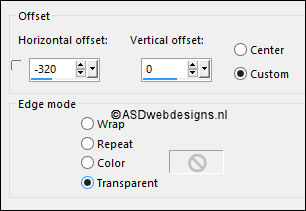
Effects - Image
Effects - Offset
Layers - Duplicate
Image - Mirror -
Mirror
Horizontal (
Image - Mirror
in previous PSP
Versions)
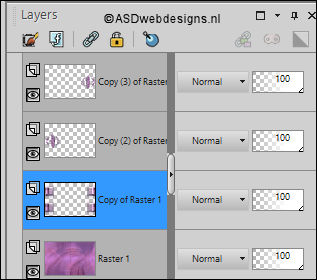
08
Layer Palette - Click on the Second Layer from
the Bottom (Copy of Raster 1)
Selections - Load/Save Selection - Load Selection From Alpha Channel
Selectie 2

Edit - Cut (Or hit the Delete Key of
your Keyboard)
Selections - Select
None
Your work and Layer
Palette look like
this now:
09
Color Palette:
Change the
Backgroundcolor to
#ffffff

Layer Palette - Click on the Bottom
Layer
Layers - New Raster
Layer
Fill with the
Backgroundcolor
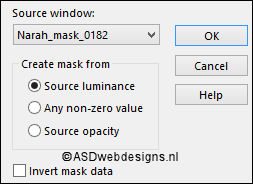
Layers - New Mask
Layer - From Image -
Narah_mask_0182
Layers - Merge - Merge Group
Layer Palette -
Double click on this Layer and
set
the Opacity of this Layer to
56
Layers - Duplicate
Image -
Mirror -
Mirror Vertical (
Image - Flip in
previous PSP
Versions)
Layers - Merge -
Merge Down
Effects - Edge
Effects - Enhance
More
10
Image - Add Borders - Symmetric
checked - 2 px -
#4a3558
Image - Add Borders - Symmetric
checked - 3 px -
#a595a8

Image - Add Borders - Symmetric
checked - 2 px -
#4a3558
Selections - Select
All
Image - Add Borders - Symmetric
checked - 30 px - #ffffff
Image - Add Borders - Symmetric
checked - 3 px -
#4a3558
Image - Add Borders - Symmetric
checked - 45 px - #ffffff
Effects - 3D Effects - Drop
Shadow - Vertical 0 -
Horizontal 0 - Opacity 80
- Blur - 40 -
Color - #000000

Selections - Select
None
11
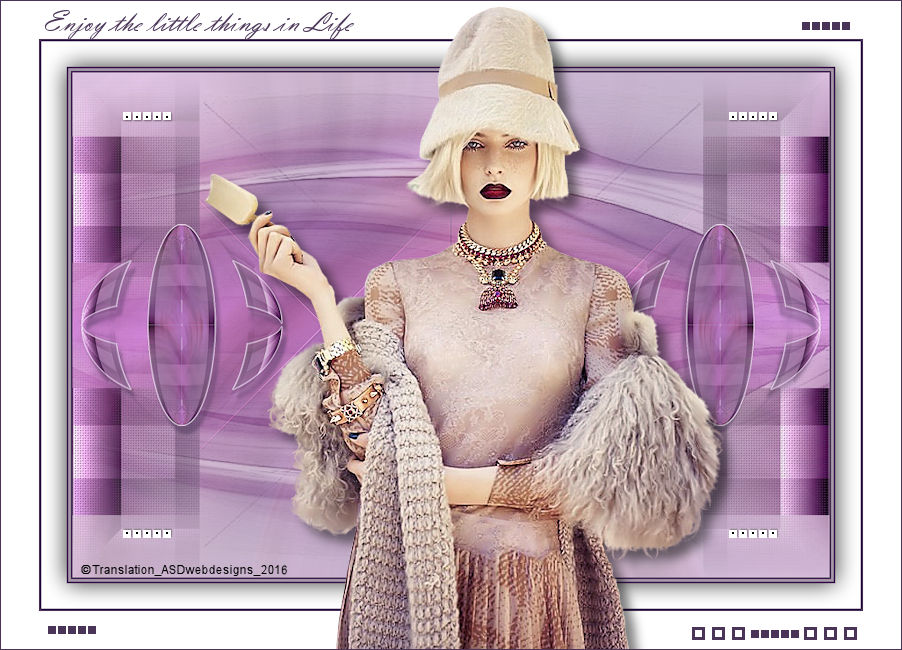
Image - Resize - Width 900 Pixels - Resize all Layers checked!!
Maximize Tube
"KaD_Woman_84" from
tray
Edit - Copy
You can close
this now, You no longer need it
On your work image: Edit - Paste
As New Layer
Image - Resize -
90% - Resize all
Layers not
checked
Move like this:
Effects - 3D Effects - Drop
Shadow - Vertical 10 -
Horizontal 10 - Opacity 50
- Blur 15 -
Color - #000000
Adjust - Sharpness - Unsharp Mask -
Radius
2 - Strength
30 - Clipping
2 - Luminance Only
Checked
12
Maximize Tube
"392_KaD_Deco1" from
tray
Edit - Copy
On your work image: Edit - Paste
As New Layer
No need to move
13
Maximize Tube
"392_KaD_Deco2" from
tray
Edit - Copy
On your work image: Edit - Paste
As New Layer
No need to move
Colorize if you use
your own colors
14
Optional:
Image - Add Borders - Symmetric
checked - 1 px -
#4a3558
Add your name or watermark, save as JPG
file and you're done!