Materials

This translation is
written with PSP15 but can also be made with other PSP versions.
Plugins:
-
Filters Unlimited 2.0
-
&<Bkg Kaleidoscope - *Import into Filters Unlimited
-
AP Lines – Silverlining
-
Vanderlee - Unplugged X
-
Carolaine and Sensibility – CS-LDots
-
Graphics Plus – Cross shadow
-
AAA Frames – Foto frame
-
Toadies – What are You?
-
EyeCandy5 – Impact
-
Muhra Meister – Copies
Preparations:
In PSP 14 & 15 there is no option for Image - Mirror & Image - Flip. There is
a new option but this does not give the same result except when the tube/image
covers the whole image from side to side. There is a easy way to add
the old Mirror and Flip options to the Image Menu. I have written a tutorial
you can find it
HERE
Used Colors

~°~°~°~°~
01.
Open a new transparent
image of 800 x 500 px
Set your Foregroundcolor to
Foreground/Background Gradient
(Corel_06_029) - Style: Linear
- Angle
0 - Repeats 2 - Invert not
checked
Fill your image with the
gradient
Layers - New Raster Layer
Selections - Select All
Open Tube "KaD_Woman3" -
Edit - Copy
On your work image
- Edit - Paste Into
Selection
Selections - Select None
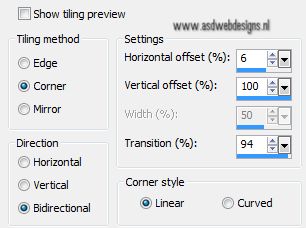
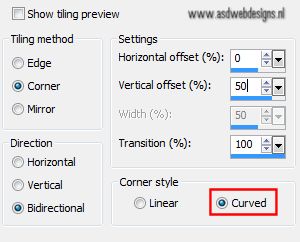
Effects - Image Effects - Seamless
Tiling
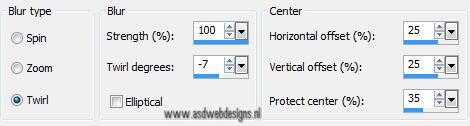
Adjust - Blur - Radial Blur
Effects - Edge Effects - Enhance More
Layers - Merge - Merge Down
Effects - Plugins -
Filters Unlimited -
&Bkg Kaleidoscope> -
@Blueberry Pie - Default
02.
Layers - Duplicate
Image - Mirror
**
Users
PSP 14 & 15
( use the new icons
you created!, see the
tutorial here
**
Image - Flip
**
Users PSP 14 & 15
( use the new icons
you created!, see the
tutorial here
**
Layer Palette - Set the Layer
Opacity of this layer to 50
Layers - Merge - Merge Down
Effects - Edge Effects - Enhance
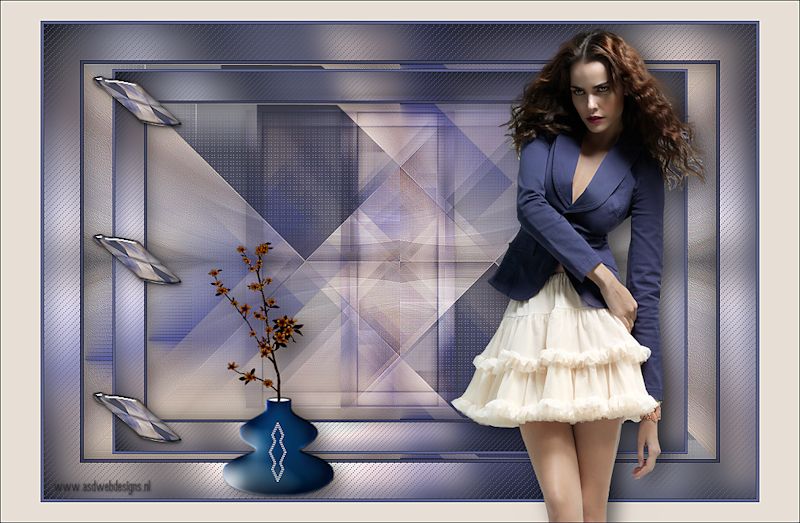
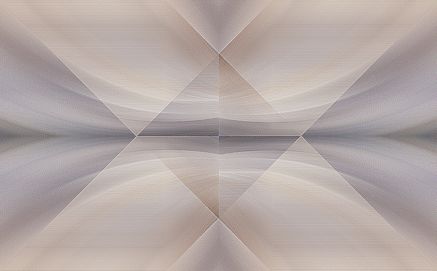
It looks like this now:
03.
Layers - New Raster Layer
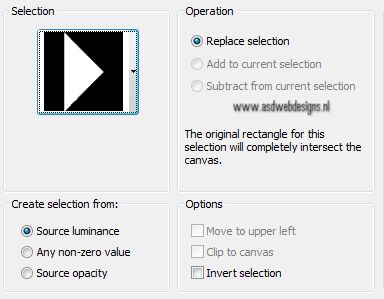
Selections - Load/Save Selection -
Load Selection From Disk -
KaD_Saranda_Sel1
Fill the selection with the Backgroundcolor
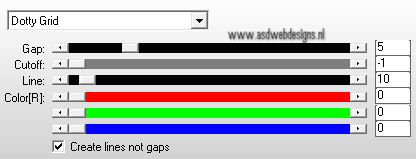
AP [Lines] - Lines - SilverLining
- Dotty Grid
Selections - Select
None
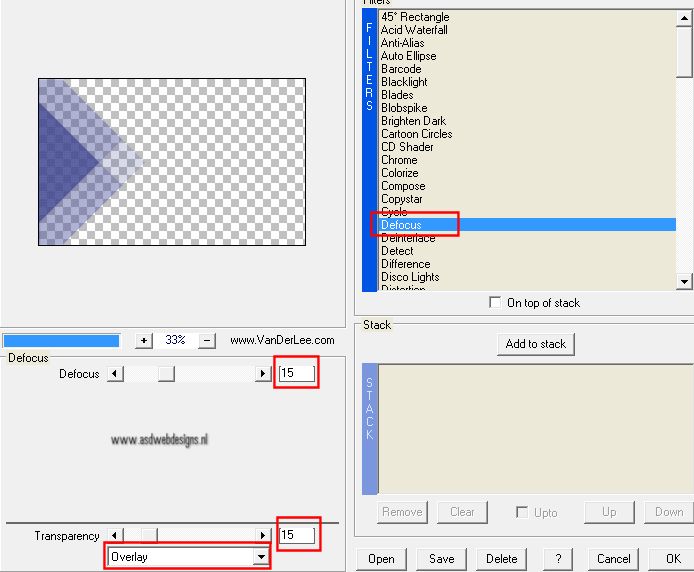
Effects - Plugins -
VanDerLee -
Unplugged X -
Defocus
Effects - Image Effects - Seamless
Tiling
It looks like this now:
04.
Set your Foregropundcolor to color and to #2b3046
Layer Palette - Click on the Bottom layer
Layers - New Raster Layer
Selections - Load/Save Selection -
Load Selection From Disk -
KaD_Saranda_Sel2 - Same settings as before
Fill with
#2b3046
Selections - Select None
Effects - Plugins -
Carolaine and
Sensibility –
CS-LDots
-
Default settings
05.
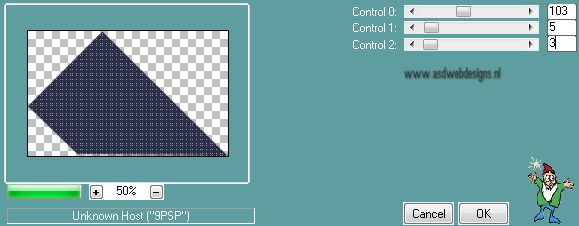
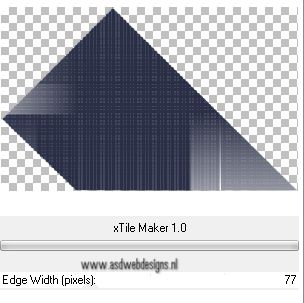
Effects - Plugins – Carolaine and Sensibility - CS-LDots – zie PS
Effects - Plugins -
Filters Unlimited -
&Bkg Kaleidoscope>
-
xTile Maker 1.0
Layer Palette - Set the Blend Mode
of this layer to "Hard Light"
06.
Layers - Duplicate
Image - Mirror
**
Users
PSP 14 & 15
( use the new icons
you created!
Image - Flip
**
Users PSP 14 & 15
( use the new icons
you created!
Layers - Merge - Merge Down
Layer Palette - Set the Layer
Opacity of this layer to 80
07.
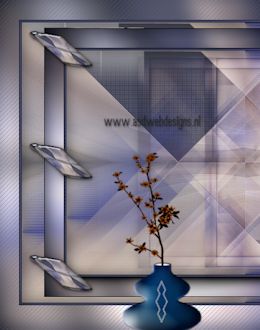
Image - Add Borders - Symmetric
checked - 1 px -
#2b3046
Image - Add Borders - Symmetric
checked - 3 px - #5f648e
Image - Add Borders - Symmetric
checked - 1 px - #2b3046
Edit Copy
08.
Selections - Select All
Image - Add Borders - Symmetric
checked - 45 px -
#e7ded5
Selections - Invert
Edit - Paste into selection
Adjust - Blur - Gaussian Blur - 15
Effects - Plugins - Graphic
Plus - Cross Shadow
- Default
Effects 3D Effects - DropShadow -
10 - 10 - 35 -
40 - #000000
Effects 3D Effects - DropShadow -
Minus 10 - Minus10 - 35 -
40 - #000000
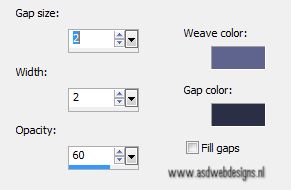
Effects - Texture Effects - Weave -
Weave Color #5f648e
Selections - Select None
09.
Image - Add Borders - Symmetric
checked - 1 px -
#2b3046
Image - Add Borders - Symmetric
checked - 3 px - #5f648e
Image - Add Borders - Symmetric
checked - 1 px - #2b3046
10.
Layers - Duplicate
Image - Resize - 80% - Resize all
layers not checked
Layers - Duplicate
Layer Palette -
Close this new layer for now and click on the
middle layer
Selections - Select All
Selections - Float
Selections -
Defloat
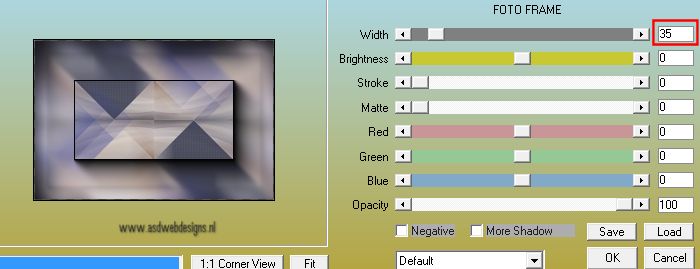
Effects - Plugins -
AAA Frames - Foto
frame
Selections - Select None
11.
Layer Palette - Click on the top
layer and open it again
Image - Resize - 55% - Resize all
layers not checked
Image - Free Rotate - Left - 90°
Effects - Plugins -
Toadies -What are
You? - 34 - 8
Layer Palette - Set the Blend Mode
of this layer to "Hard Light"
Effects 3D Effects - DropShadow -
3 - 3 - 33 -
25 - #000000
12.
Layer Palette - Click on the
middle layer
Layers - Duplicate
Layers - Arrange - Bring to Top
Image - Resize - 25% - Resize all
layers not checked
Image - Free Rotate - Left - Free -
15°
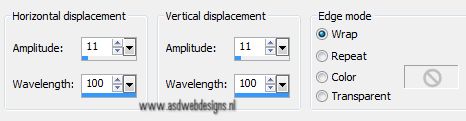
Effects - Distortion Effects - Wave
Image - Resize - 30% - Resize all
layers not checked
Adjust - Sharpness - Sharpen
Effects - Plugins -
Alien Skin Eye Candy
5 - Impact - Glass
-
Settings Tab: Click
on Factory Default
and next on preset
"Clear"
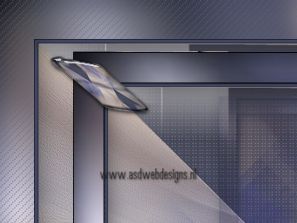
Basic Tab: Change the Glass color to #5f648e
Move to the top left corner like this:
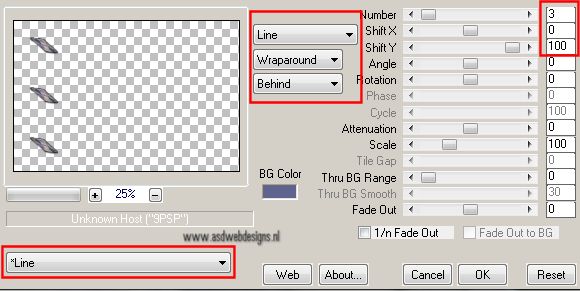
Effects - Plugins -
MuRa's Meister -
Copies
Effects 3D Effects - DropShadow -
3 - 3 - 33 -
25 - #000000
13.
Open Tube "vase_3_exclusifbycrealinemars2012" -
Edit - Copy
On your work image - Edit
-
Paste As New Layer
Image - Resize - 70% - Resize all
layers not checked
Move like this:
Effects - Plugins -
Alien Skin Eye Candy 5 -
Impact - Perspective Shadow
- Settings Tab: Dropshadow,Blurry.
Basic Tab:
Set the Overall
Opacity to 60
14.
Image - Add Borders - Symmetric
not checked - Color #e7ded5
15.
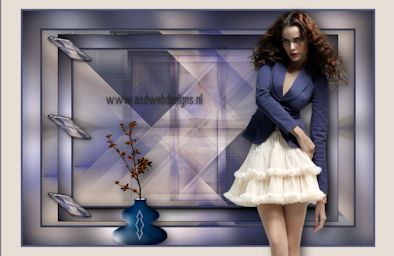
Open Tube "KaD_Woman3" -
Edit - Copy
On your work image - Edit
-
Paste As New Layer
Image - Resize - 65% - Resize all
layers not checked
Image - Mirror
**
Users
PSP 14 & 15
( use the new icons
you created!)
Effects - Plugins -
Alien Skin Eye Candy 5 -
Impact - Perspective Shadow
- Settings Tab: Dropshadow,Blurry
- Same settings
Move to the right
like this:
16.
Image - Add Borders - Symmetric
checked - 1 px -
#2b3046
Adjust - Sharpness - Unsharp Mask -
Radius
1 - Strength
64 - Clipping 4 - Luminance Only
UnChecked
Add your name or watermark, save as JPG
file and you're done!
Optional:
Image - Resize - Width 800 px - Resize
all Layers checked
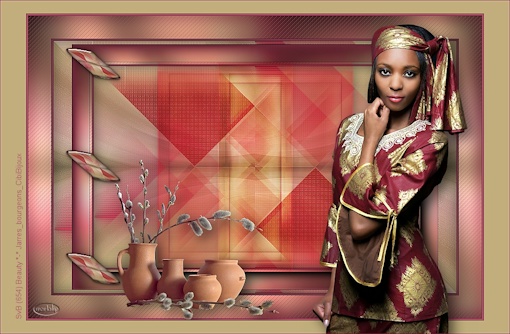
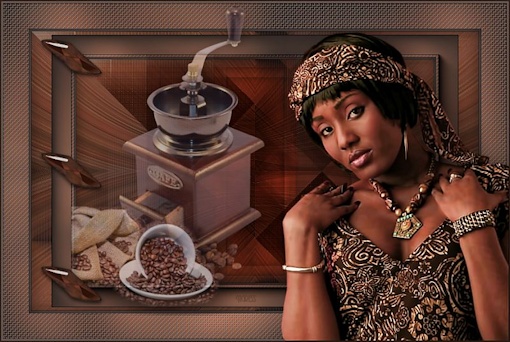
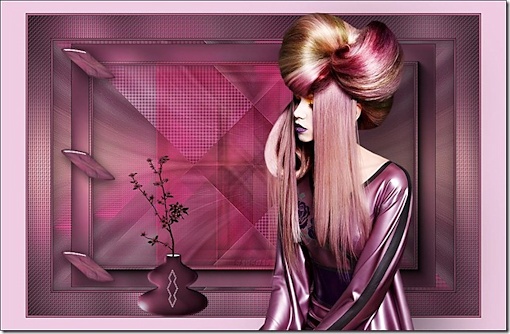
With special thanks to my testers,
this is what they
made:
Chris:
***
Martalip:
***
Tigress:
**
Julie:
**
Back to the top