Open "357_KaD_Alfakanaal"
This image contains Alpha Selections
Window - Duplicate
(or shift+D) - Close the original and proceed on the copy
Selections - Select
All
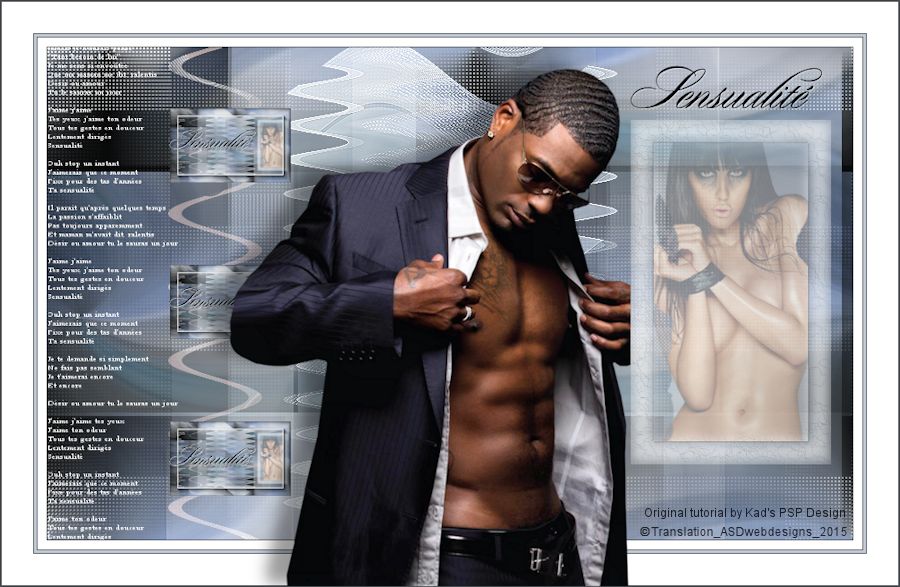
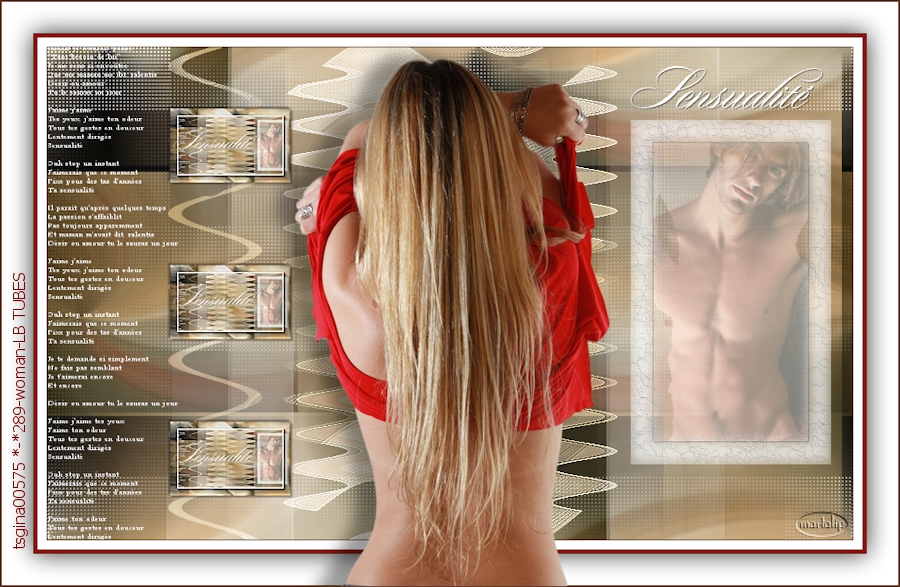
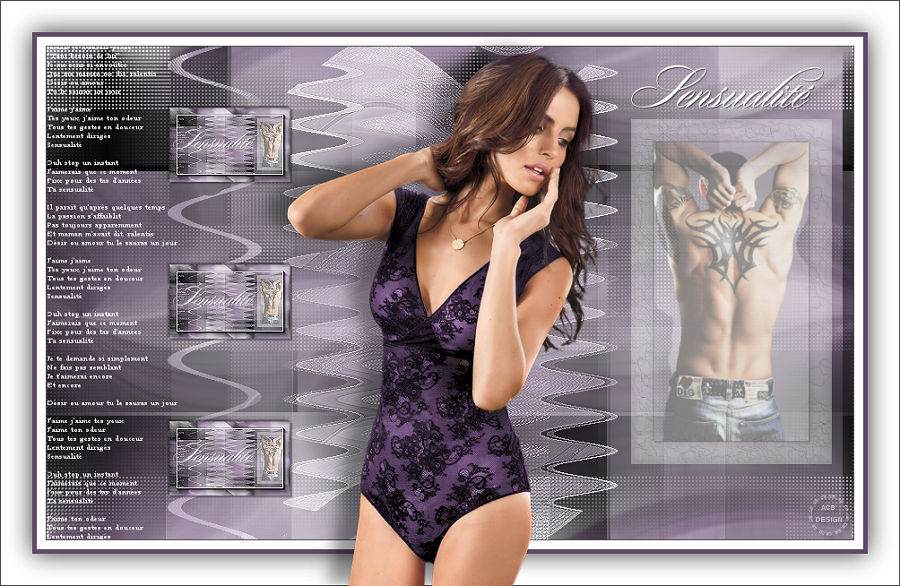
Open Tube "1853
- woman - LB TUBES"
Note:
If
you are using tubes and colors of
your own,
it is best to use the tube provided in the
Materials for this step, otherwise
the result will be different. You
can colorize it to match your work.
Edit - Copy
On your work image: Edit - Paste
Into
Selection
Selections - Select
None
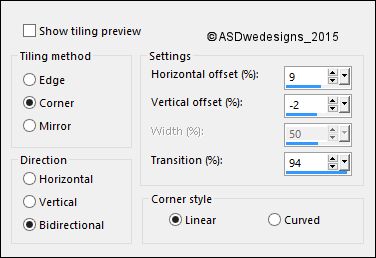
Effects - Image
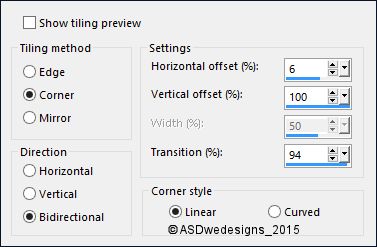
Effects - Seamless
Tiling

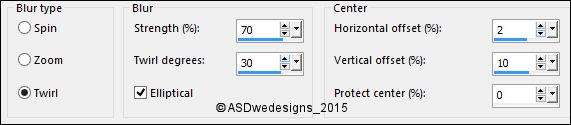
Adjust - Blur -
Radial Blur
Layers - Merge - Merge all (Flatten)
02
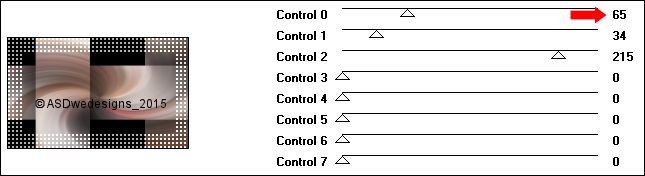
Effects - Plugins - Photoshopfun
II -
Kylie

Effects - Plugins - [AFS IMPORT] -
sqborder2
Effects - Image
Effects - Seamless
Tiling
03
Layers - Duplicate
Image - Free Rotate - Left checked -
90° -
Both boxes unchecked
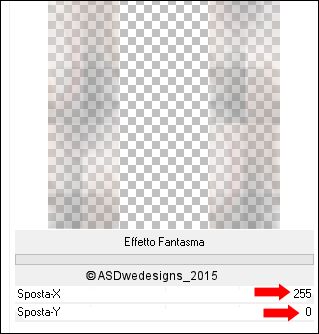
Effects - Plugins - <I.C.NET Software> - Filters Unlimited 2.0
- It@lian Editors Effect – Effetto Fantasma
Adjust - Sharpness - Sharpen More
Layer Palette -
Double click on this Layer and set the Blend Mode to
"Luminance" and the Layer Opacity to 55
04
Layers - Merge - Merge Visible
Effects - Image Effects - Seamless
Tiling - Preset Side By Side
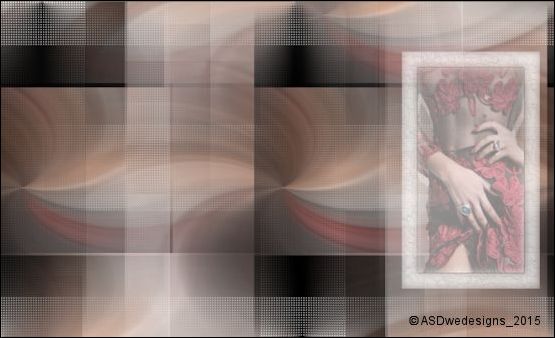
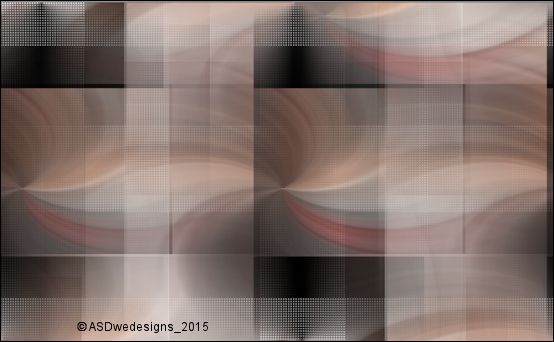
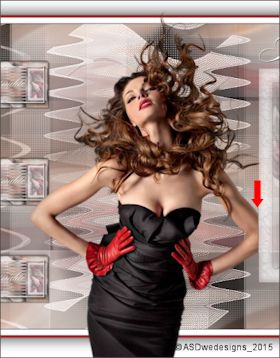
Your work looks like this now:
05
Color Palette: Change the Foregroundcolor to #ffffff

Layers - New Raster Layer
Layer Palette -
Double click on this Layer and set
the Layer Opacity of this Layer to
50
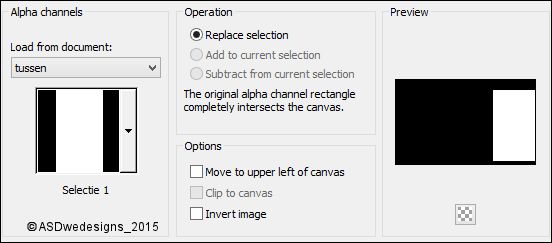
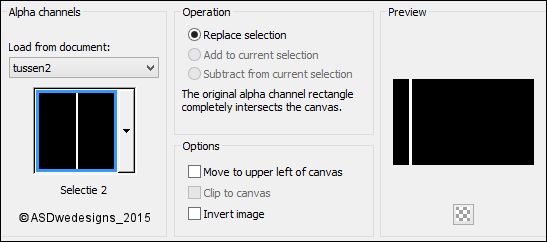
Selections - Load/Save Selection - Load Selection From Alpha Channel
- selectie 1
Fill the Selection with the Foregroundcolor
Keep Selected!
06
Layer Palette - Click on the Bottom
Layer
Layers - New Raster Layer
Fill the Selection with the Foregroundcolor
Selections - Modify - Contract - 30 px
Edit - Cut (Or hit the Delete Key of
your Keyboard)
Keep selected
07
Open Tube "1862
- woman"
Edit - Copy
On your work image: Edit - Paste
As New Layer
Image - Resize - 75% - Resize
all Layers not checked
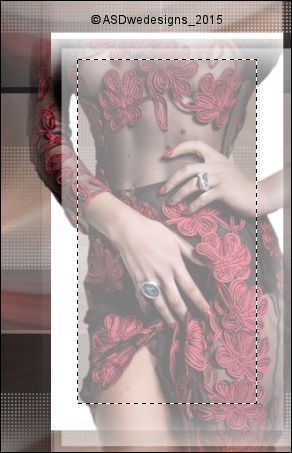
Move to the
Selection like this:
Selections - Invert
Edit - Cut (Or hit the Delete Key of
your Keyboard)
Selections - Select None
Layer Palette -
Double click on this Layer and set
the Layer Opacity of this Layer to
85
08
Layer Palette - Click on the Second Layer from
the Bottom (Raster 2)
Layers - Arrange - Bring to Top
Effects - Texture
Effects - Fine
Leather - Color
#848284
Layer Palette -
Double click on this Layer and set
the Layer Opacity of this Layer to
73
09
Selections - Load/Save Selection - Load Selection From Alpha Channel
- again selectie 1
Selections - Invert
Edit - Cut (Or hit the Delete Key of
your Keyboard)
Selections - Invert
Selections - Modify - Contract - 30 px
Effects - 3D Effects - Drop
Shadow - Vertical 1 -
Horizontal 1 - Opacity 50
- Blur - 1
Color - #000000

Repeat with the Vertical and
Horizontal Offset to Minus 1
Selections - Select None
10
Layers - Merge - Merge Down
Edit - Repeat Layer Merge Down
Image - Resize - 85% - Resize
all Layers not checked
Edit Cut!
Selections - Load/Save Selection - Load Selection From Alpha Channel
- selectie 3
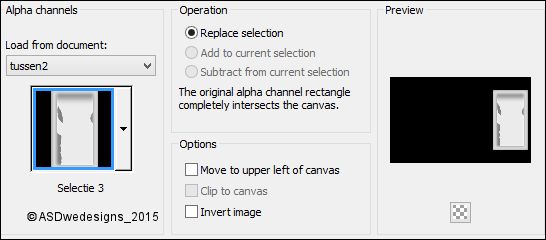
Edit - Paste into Selection
(Image is still in your PSP memory)
Selections - Select None
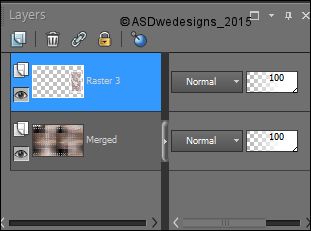
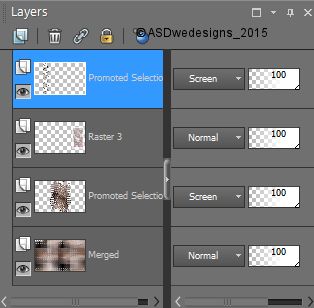
Your work and Layer Palette look like this now:
11
Layer Palette - Click on the Bottom
Layer
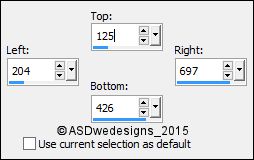
Selection Tool -
Rectangle
 - Custom
Selection:
- Custom
Selection:
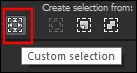
Selections -
Promote Selection to Layer
Selections - Select None
Image - Free Rotate - Right
checked - 90° -
Both boxes unchecked
Effects - Distortion Effects - Wave
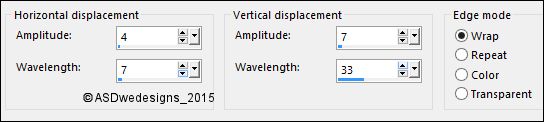
Effects - Edge Effects - Enhance
Layer Palette -
Double click on this Layer and set the Blend Mode to
"Screen"
12
Layer Palette - Click on the Bottom
Layer
Selections - Load/Save Selection -
Load Selection From Alpha Channel -
selectie 2
Selections - Promote Selection to
Layer
Selections - Select None
Layers - Arrange - Bring to Top
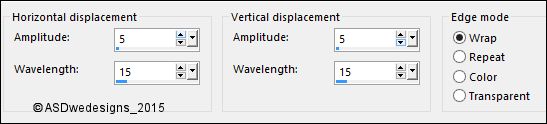
Effects - Distortion Effects - Wave
Effects - 3D Effects - Drop
Shadow - Vertical 2 -
Horizontal 2 - Opacity 35
- Blur - 2
Color - #000000
Repeat with the Vertical and
Horizontal Offset to Minus
2
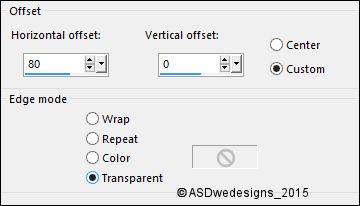
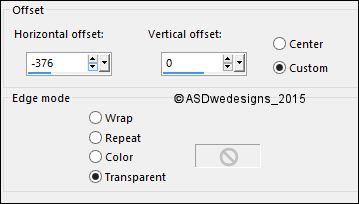
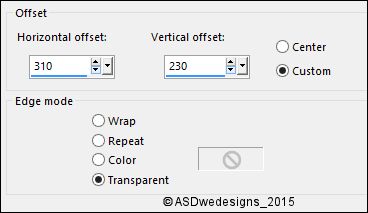
Effects - Image Effects - Offset
Layer Palette -
Double click on this Layer and set the Blend Mode to
"Screen"
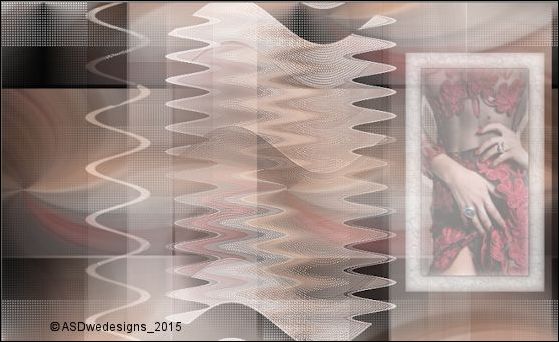
Your work and Layer Palette look like this now:
13
Open Tube "357_KaD_Text1"
Edit - Copy
On your work image: Edit - Paste
As New Layer
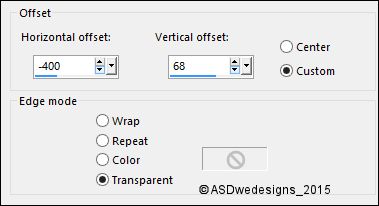
Effects - Image
Effects - Offset
14
Edit - Copy Special - Copy Merged
Edit - Paste as New
Image
(If you do not have
the Copy Merged option:
Window - Duplicate ,
on the copy:
Layers - Merge -
Merge All (Flatten)
Effects - Plugins -
AAA Frames - Foto
Frame
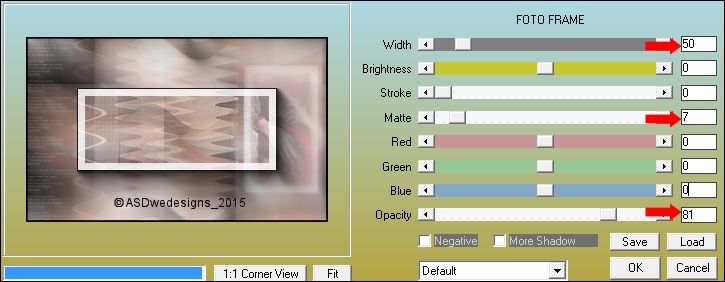
Image - Add Borders - Symmetric
checked - 1 px - #554f51

Image - Resize - 15% - Resize all
Layers checked
Edit - Copy!
15
Go back to your main your work image:
Edit - Paste
As New Layer
Adjust - Sharpness -
Sharpen More
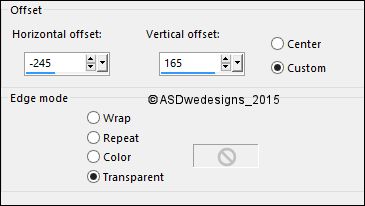
Effects - Image Effects - Offset
Effects - Plugins -
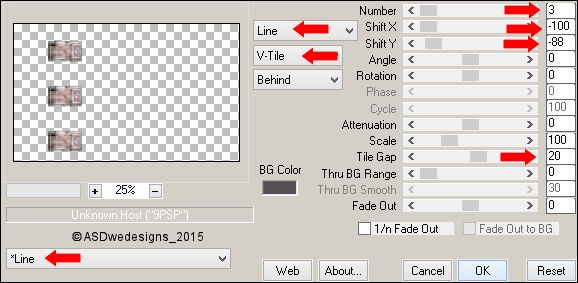
MuRa's Meister -
Copies
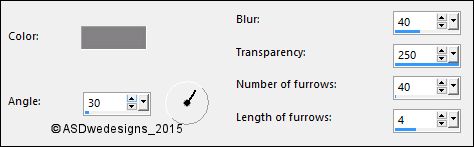
Effects - 3D Effects - Drop
Shadow - Vertical Minus 2 -
Horizontal Minus 2 - Opacity
35
- Blur - 2
Color - #000000
Repeat with the Vertical and
Horizontal Offset to 2
16
Open Tube "357_KaD_Text2"
Edit - Copy
On your work image: Edit - Paste
As New Layer
Effects - Image
Effects - Offset
17
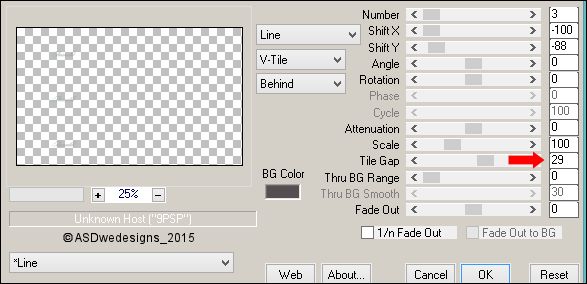
Layers - Duplicate
Image - Resize - 45% - Resize
all Layers not checked
Effects - Image Effects - Offset
Effects - Plugins -
MuRa's Meister -
Copies
18
Image - Add Borders - Symmetric
checked - 1 px -
#554f51
Image - Add Borders - Symmetric
checked - 10 px - #ffffff
Image - Add Borders - Symmetric
checked - 1 px -
#554f51
Image - Add Borders - Symmetric
checked - 3 px -
#c92327

Image - Add Borders - Symmetric
checked - 1 px -
#554f51
Image - Add Borders - Symmetric
checked - 35 px - #ffffff
Image - Add Borders - Symmetric
checked - 1 px -
#554f51
19
Selections - Select All
Selections - Modify - Contract - 36 px
Effects - 3D Effects - Drop
Shadow - Vertical 0 -
Horizontal 0 - Opacity 80
- Blur - 40
Color - #000000
Selections - Select None
20
Open Tube "1853
- woman - LB TUBES"
Edit - Copy
On your work image: Edit - Paste
As New Layer
Image - Mirror -
Mirror
Horizontal (
Image - Mirror
in previous PSP
Versions)
Image - Resize - 90% - Resize
all Layers not checked
Move like this:
Effects - Plugins -
Alien Skin Eye Candy
5 - Impact -
Perspective Shadow
- Settings
Tab:
Preset
357_KaD_PerspShadow_Sensualité
Layers - Merge - Merge all (Flatten)
21
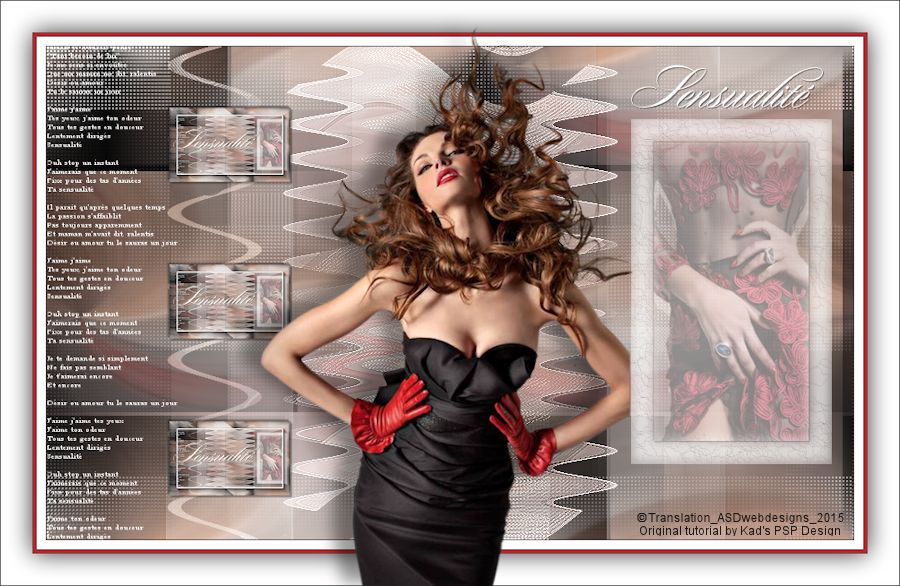
Image - Resize - Width 900 Pixels
- Resize all Layers checked