1/ 499_KaD_Text1
2/ 499_KaD_Text2
3/ 499_KaD_Deco1
4/ Kerstpatronen
Alpha Selections : open in PSP and minimize
(this image is not empty – it contains alpha selections)
1/ BL40_KaD_Alfakanaal
Masks : open in PSP and minimize
1/ Ildiko_Desings_Created@Mask_&_di (3)
2/ Narah_Mask_1027
Color palette :
If you work with your own colors, make your own color palette with the alpha channel,
so you can easily switch between your colors.
There are color differences in the different versions of Psp.
Therefore, use the html codes of the color palette to be sure,
that you have the same colors. Also when merging layers, there may be color differences.
Plugins :
1/ LandK-LandKsiteofwonders : Zitah
2/ Alien Skin – Eye Candy 5 – Impact
3/ Nik Software – Color Efex Pro
(-) Import into Filters Unlimited
------------------------------------------------
THE TUTORIAL
When working with your own colors, play with the Blend Mode and/or Opacity at your own discretion
From now on I use the terms "MIRROR" and "FLIP" again.
Mirror: Mirror horizontal - Flip: Mirror vertical
Let’s get started.
Remember to save your work often
Some print screens have other colors than the original.
Colors :
Foreground color : Color 1 = #886514
Background color : Color 2 = #000000
1
Open the alpha channel : BL40_KaD_Alfakanaal
Window – Duplicate
Minimize the original – we continue on the copy
2
Fill with background color
Plugins – L en K landKsiteofwonders – Zitah – see PS
3
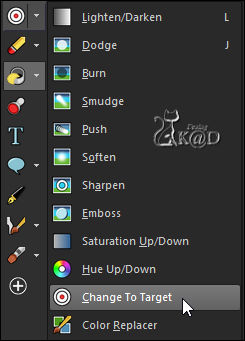
Activate the tool “Change to target” – see PS
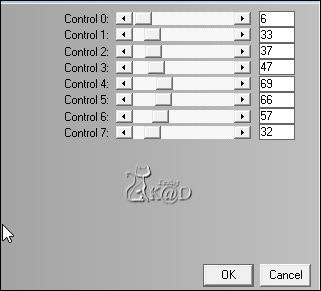
Settings – see PS

Color the lines with your Foreground Color (Left mouse click)
4
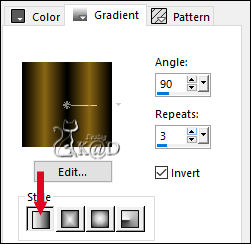
Change Foreground color to gradient : Linear – see PS
Layers – New Raster layer
Fill with gradient
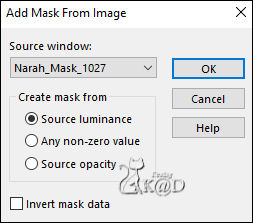
Layers – New Mask Layers – From image “Narah_Mask_1027” – see PS
Layers – Merge – Merge group (Group - Raster 2)
5
Change Foreground color back to Color 1
Layers – New Raster layer (Raster 2)
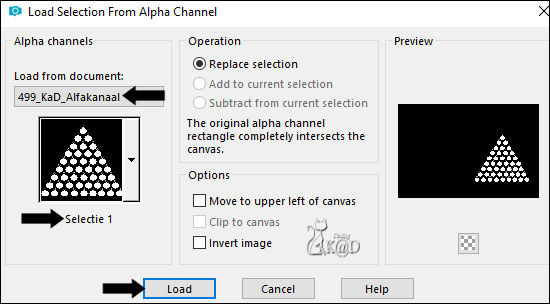
Selections – Load/Save Selection – Load Selection From Alpha Channel – selectie 1 – see PS
Fill with Foreground color
Select none
6
Now select some Christmas balls with your magic wandLayers – New Raster layer (Raster 3)
Fill with Foreground color
Selections – Modify – Contract : 1
Press Delete on the keyboard
TIP : You can close Raster 2 for a while to work easier
6-1
Copy one of the Christmas papers and paste as a new layer
Duplicate until all your selected balls are covered
Or make a round selection and copy, paste and slide into your selected balls
Merge down all the papers
Selection – Invert
Press Delete on the keyboard
Select none
Layers – Merge down (Raster 3)
7
Activate Raster 2
Now select some other balls
and do the same as point 6 and 6-1, but now with a different paper
7-1
Repeat until all your balls are filled.
7-2
Merge down all the papers – see PS
8
Plugins – Alien Skin – Eye Candy 5 – Impact – Glass – Clear
Select none
8-1
Plugins – Nick Color Efex Pro – see PS

Adjust – Sharpness – Sharpen
9
Activate Raster 2
Layers – Duplicate
Layers – Merge – Merge down
9-1
Activate top layer
Layers – Merge – Merge down
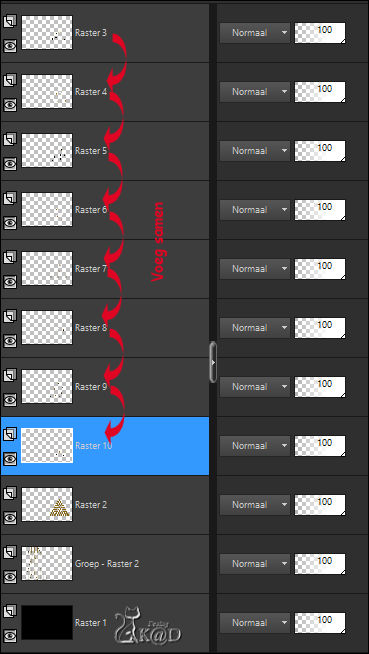
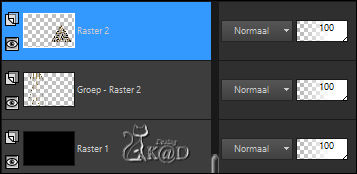
Your layers now look like this
10
Change Foreground color to Color 3
Layers – New Raster layer
Fill with Foreground color
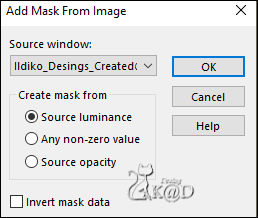
Layers – New Mask Layers – From image “Ildiko_Desings_Created@Mask_&_di (3)” – see PS
Layers – Duplicate (you now have 2x the mask in your layers)
Layers – Merge – Merge group (Group - Raster 3)
10-1
Image – Mirror and Flip
Press K – Pos X : 0 – Pos Y : -46 – Press M UITLEG
Adjust – Sharpness – Sharpen more–
Change Layer opacity to 65
Layers – Arrange – move down
11
Activate top layer
Activate & copy : 499_KaD_Text1
Edit – Paste as a new layer (Raster 3)
Press K – Pos X : 113 – Pos Y : 277 – Press M
12
Activate & copy : 499_KaD_Text2
Edit – Paste as a new layer (Raster 4)
Press K – Pos X : 502 – Pos Y : 44 – Press M
13
Activate & copy : 499_KaD_Deco1
Edit – Paste as a new layer (Raster 5)
Press K – Pos X : 51 – Pos Y : 241 – Press M
14
Layers – New Raster layer (Raster 6)
Select all
Fill with background color
Selection – Modify – Contract : 15
Fill with foreground color (Color 3)
Selection – Modify – Contract : 1
Fill with background color
Selection – Modify – Contract : 2
Fill with foreground color
Selection – Modify – Contract : 1
Fill with background color
Selection – Modify – Contract : 2
Fill with foreground color
Selection – Modify – Contract : 1
Fill with background color
Selection – Modify – Contract : 2
Press Delete on the keyboard
Select none
15
Add your name or watermark,
Add my watermark to your creation HERE
16
Image – Add Borders : 1 pix color background
Save as JPG file and you're done!
I hope you enjoyed this tutorial
Karin
08/09/2021
Mail me your version 

Click on banner below to go to the gallery