Chanel - Tag
This tutorial is written with PSPX2
But can easily made with other versions
Preparations :
Open tubes in PSP
Install filters before you open PSP!
Install fonts in fonts folder in PSP
Install mask in your mask folder in PSP, unless otherwise specified
Install textures in texture folder in PSP
* If you recognize a tube as one of yours, please contact me so I can
give you credit or – if you wish – remove the tube.
Filters HERE
Material HERE
Materials :
3 Tubes :
1/ 2372-luzcristina – Luz Cristina
2/ ChanelLogo
3/ Parfum_Chanel5 _ K@D – mezelf
1 background
1/ Chanel_Bckg*
Filters :
1/ Filters Unlimited2 – Bkg sf10I – Alf’s Border Mirror Bevel
2/ Filter Muhra Meister - Copies
----------------------------------------
Procedure
Let’s get started – Have Fun!
Remember to save your work often.
Colors :
Foreground : #afbad7
Background : #2d3f70
Gradient : Foreground : Lineair : 45 – 3
1
Open a new image – 650x500 pix – transparent
Fill with gradient
2
Selections – select all
3
Open tube : 2372-luzcristina
Edit – copy
Edit – paste into selection
Selections – none
Effects – image effects – seamless tiling – standard
Adjust – hue and saturation – colorize : 158 – 89
4
Adjust – blur – Gaussian : 20
5
Effects – Filters Unlimited2 – Bkg sf10I – Alf’s Border Mirror Bevel – standard
6
Make selection – see Print screen
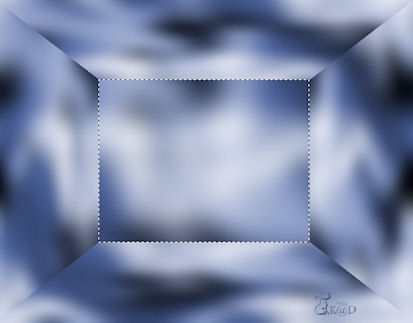
Layers – new raster layer
7
Open : Chanel_Bckg
Edit – copy
Edit – paste into selection
Selections – none
Blend mode : soft light
8
Make selection – see Print screen
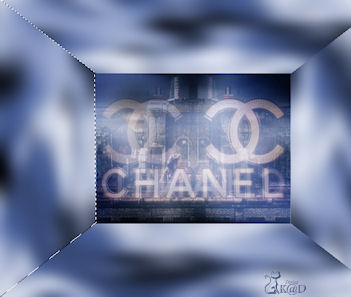
Layers – new raster layer
Open tube : ChanelLogo
Edit – copy
Edit – paste into selection
Selections – none
Adjust – hue and saturation – colorize : 158 – 89
9
Layers – duplicate
Image - mirror
10
Open tube : 2372-luzcristina
Edit – copy
Edit – paste as a new layer
Image – resize : 2x85% - 1x90%, uncheck all layers
Move left against the edge
Effects – 3D-effects – drop shadow : V10 – H8 – 65 – 20
11
Open tube : Parfum_Chanel5 _ K@D
Edit – copy
Edit – paste as a new layer
Image – resize : 120%, uncheck all layers
Move down and to the right – see example
12
Layers – duplicate
Adjust – hue and saturation – colorize : 158 – 89
Move to the left down corner
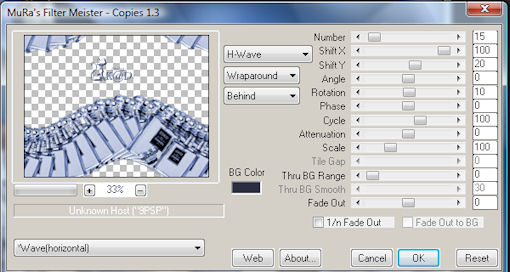
Effects – Mura’s Meister – Copies – see print screen
Opacity : 35
Layers – arrange – move down (2x)
13
Activate top layer
Effects – 3D-effects – drop shadow : V10 – H8 – 65 – 20
14
Image – add borders
1 pix background : #2d3f70
30 pix white
15
Select white border with magic wand – anti-alias – inside
Fill with gradient
Effects – Filters Unlimited2 – Bkg sf10I – Alf’s Border Mirror Bevel – standard
16
Selections – invert
Effects – 3D-effects – drop : V&H 5 – 65 – 5
Repeat with V&H -5
Selections - none
17
Layers – new raster layer
Place your name and/or watermark
Layers – merge all
18
Image – resize : 650 pix
19
Adjust – sharpness – unsharp mask: 1 – 64 – 4
Save as .jpeg
Your image is ready
I hope you enjoyed making it
Hugs,
K@rin – K@D’s Designs
30-06-2010
