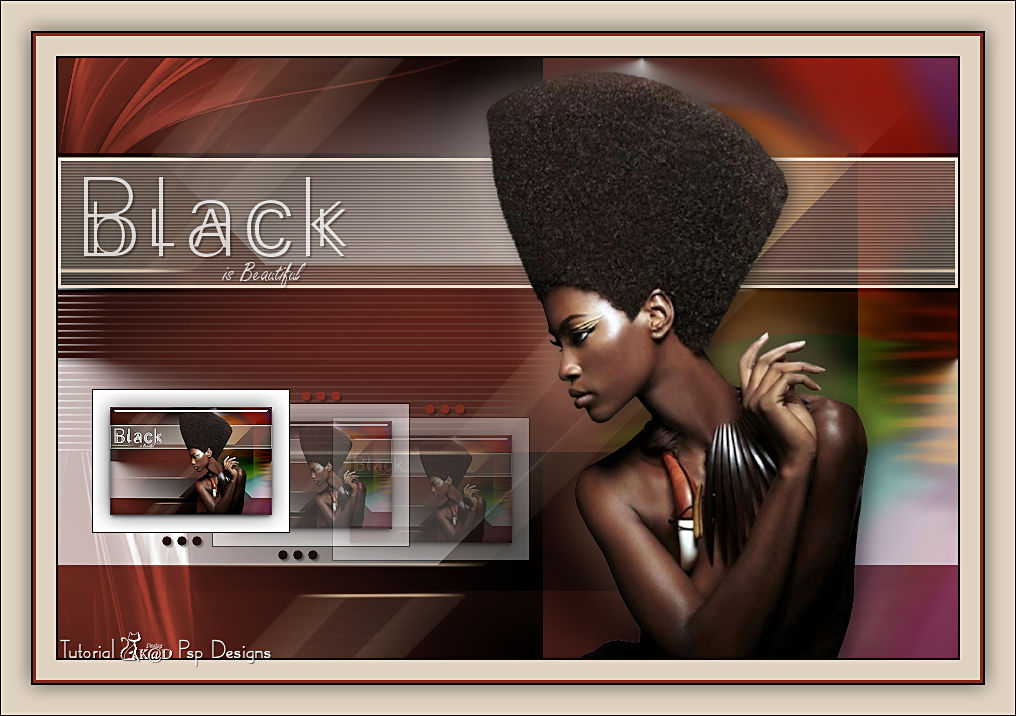
THE TUTORIAL
When working with your own colors, play with the Blend Mode and/or Opacity at your own discretion
From now on I use the terms "MIRROR" and "FLIP" again.
Mirror: Mirror horizontal - Flip: Mirror vertical
Let’s get started.
Remember to save your work often
Colors :
Color 1 : Foreground : Choose a color from your tube (Don’t take brown!)
Color 2 : Background : Choose a dark color Brown from your tube
Color 3 : Light beige, check your tube
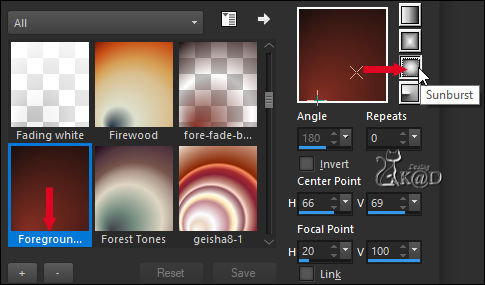
Foreground Gradient : Sunburst – see PS
1
Open the alpha channel : BL26_KaD_Alfakanaal
Window – Duplicate
Minimize the original – we continue on the copy
Fill with gradient
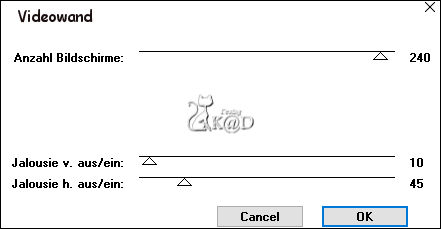
Plugins – °V° Kiwi’s Oelfilter – Videowand – see PS
2
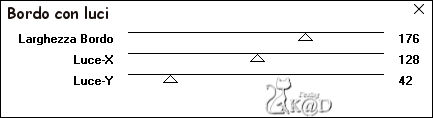
Plugins – Itali@n Editors effect – Bordo con luci – see PS
3
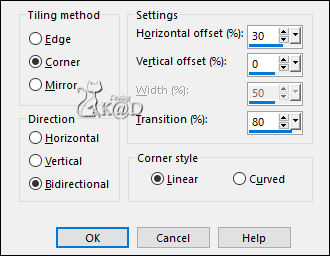
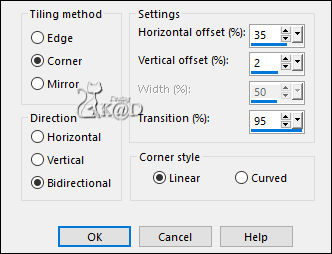
Effects – Image effects – Seamless Tiling – see PS
4
Change foreground color to color 1
Change background color to color 3
Layers – New Raster layer (Raster 2)
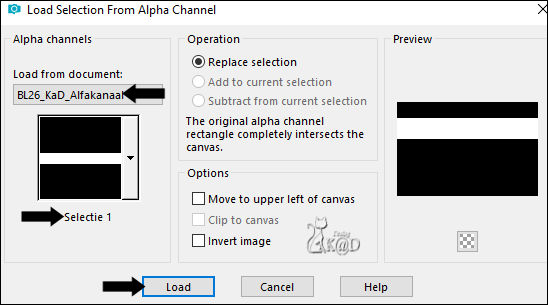
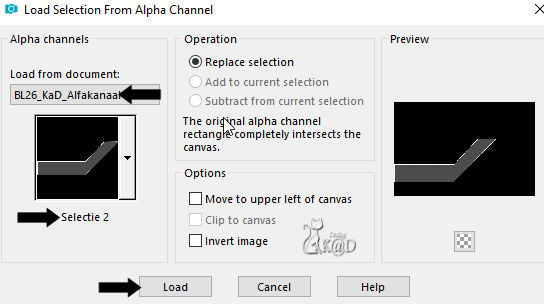
Selections – Load/Save Selection – Load Selection From Alpha Channel – Selectie 1 – see PS
Fill with background color
5
Selection – Modify – Contract : 3
Press delete on the keyboard
Change opacity of the filling tool to 45

Fill with background color
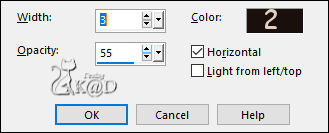
Effects – Texture effects – Blinds – see PS
Select none
Change opacity of the filling tool to 100
6
Layers – New Raster layer (Raster 3)
Selections – Load/Save Selection – Load Selection From Alpha Channel – Selectie 2 – see PS
Fill with background color (Click 1x)
Select none
7
Effects – Image effects – Seamless Tiling – see PS
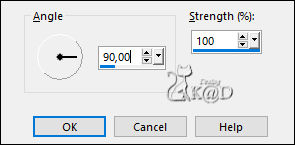
Adjust – Blur – Motion Blur – see PS
Change Blend mode to Hard Light
8
Activate Raster 1
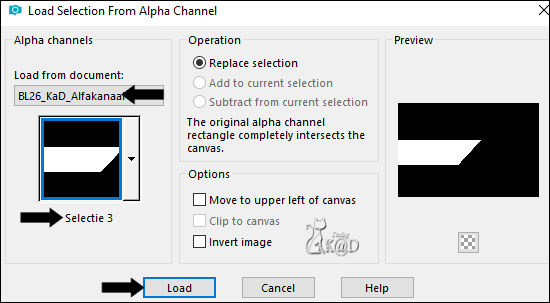
Selections – Load/Save Selection – Load Selection From Alpha Channel – Selectie 3 – see PS
Selections – Promote selection to layer (Promoted Selection)
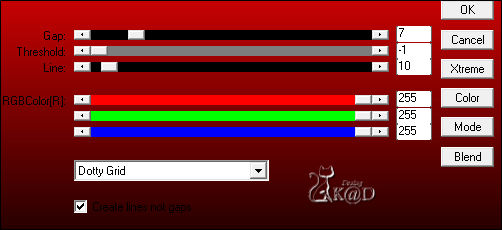
Plugins – AP 01 [Innovations] – Lines – Silverlining – Dotty Grid – see PS
Select none
Adjust – Blur – Motion Blur – same values as before
9
Activate top layer (Raster 3)
Activate and copy : BL26_KaD_Text
Edit – Paste as a new layer (Raster 4)
Press K – Pos X : 26 – Pos Y : 119 – Press M HELP
(K : activate the Move Tool – M : deactivate the Move Tool)
Effects – 3D-effects – Drop Shadow : V&H 2 – 35 – 2 – Color #000000
Bring opacity down to 70
10
Activate Raster 1
Activate and copy : Bewerkt_cas_tube10_8_bloem_13072011
Edit – Paste as a new layer (Raster 5)
Press K – Pos X : 521 – Pos Y : 0 – Press M
Change Blend Mode to Soft Light
Adjust – Blur – Motion Blur – same values as before
11
Activate and copy : your woman’s tube
Edit – Paste as a new layer (Raster 6)
Layers – Arrange – Bring tot top
Resize if necessary
Place at the bottom against the edge and slightly off center to the Right
12
Window – duplicate (shift d)
Image – Add borders : 1 pix Color 6
Image – Resize : 18%, all layers
12-1
Select all
Image – Add borders : 17 pix Color 5
Effects – 3D-effects – Drop Shadow : V&H 0 – 60 – 30 – Color #000000
12-2
Plugins – Alien Skin – Eye Candy 5 – Impact – Glass : CLEAR
Select none
Image – Add borders : 1 pix Color 6
Edit – Copy
13
Back to your work
Edit – Paste as a new layer (Raster 7)
Press K – Pos X : 34 – Pos Y : 331 – Press M
Adjust – Sharpness – Sharpen
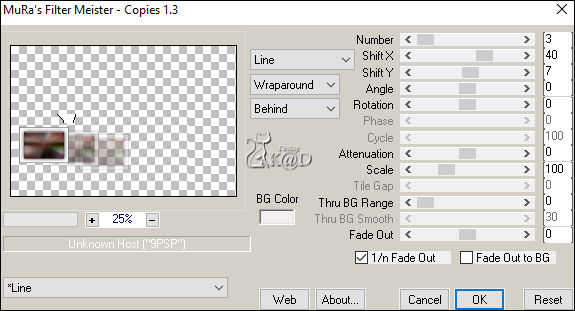
Plugins – MuRa’s Meister – Copies – see PS
Layers – Arrange – Move down
14
Activate top layer (Raster 6)
If necessary, move your tube to the right, so it’s beside the frames
15
Layers – Duplicate (Copy of Raster 6)
Activate de layer just below (Raster 6)
Adjust – Blur – Gaussian Blur : 30
Change Blend mode to Screen or Dodge
16
Activate top layer (Copy of Raster 6)
Effects – 3D-effects – Drop Shadow : V 0 – H 7 – 50 – 30 – Color #000000
17
Activate Raster 5
Change background color to color 5
Layers – New Raster layer
Fill with background color
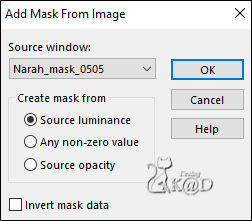
Layers – New Mask layer – From image “Narah_mask_0505” – see PS
17-1
Image – Mirror
Layers – Duplicate (you now have 2x the mask in the layer palette)
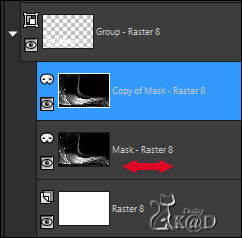
Layers – Merge – Merge Group
17-2
Image – Free Rotate : Right – 90 – No check marks
Press K – Pos X : -34 – Pos Y : -64 – Press M
Change blend mode to Overlay
Adjust – Sharpness - Sharpen
18
Activate Raster 1
Select all
Image – Crop to selection
19
Activate top layer (Copy of Raster 6)
Change background color to color 2
Change foreground color to gradient – see PS

20
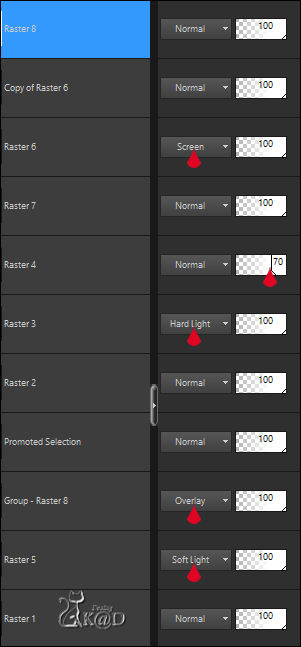
Layers – New Raster layer (Raster 8)
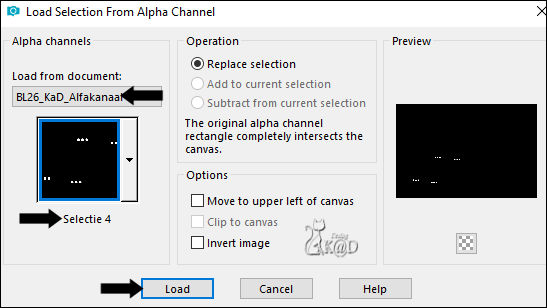
Selections – Load/Save Selection – Load Selection From Alpha Channel – Selectie 4 – see PS
Fill with gradient
Select none
Effects – 3D-effects – Drop Shadow : V&H 2 – 35 – 2 – Color #000000
Result
21
Image – Add borders :
2 pix color 2
20 pix color 3
3 pix color 1
2 pix color 2
22
Select all
Image – Add borders : 30 pix color 3
Effects – 3D-effects – Drop Shadow : V&H 0 – 60 – 30 – Color #000000
Select none
23
Add your name or watermark,
Add my watermark to your creation HERE
24
Image – Add borders : 1 pix color 2
Image – Resize – Width 900 Pixels – Resize all Layers checked
Adjust – Sharpen – Unsharp Mask : 2 – 30 – 2 – no check marks
Save as JPG file and you're done!
I hope you enjoyed this tutorial
Karin
20/03/2020
Email me your result 
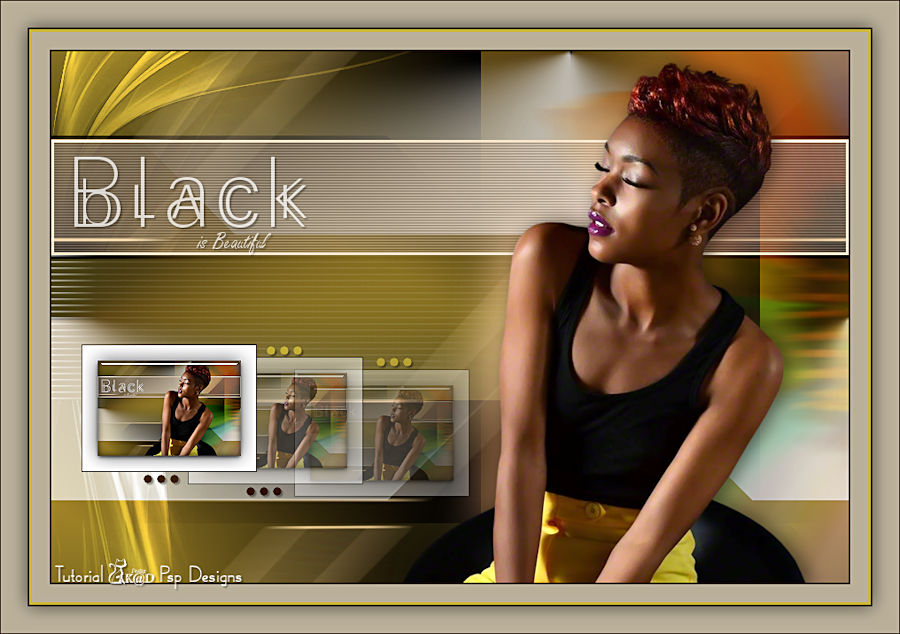
Extra example, tube from SvB