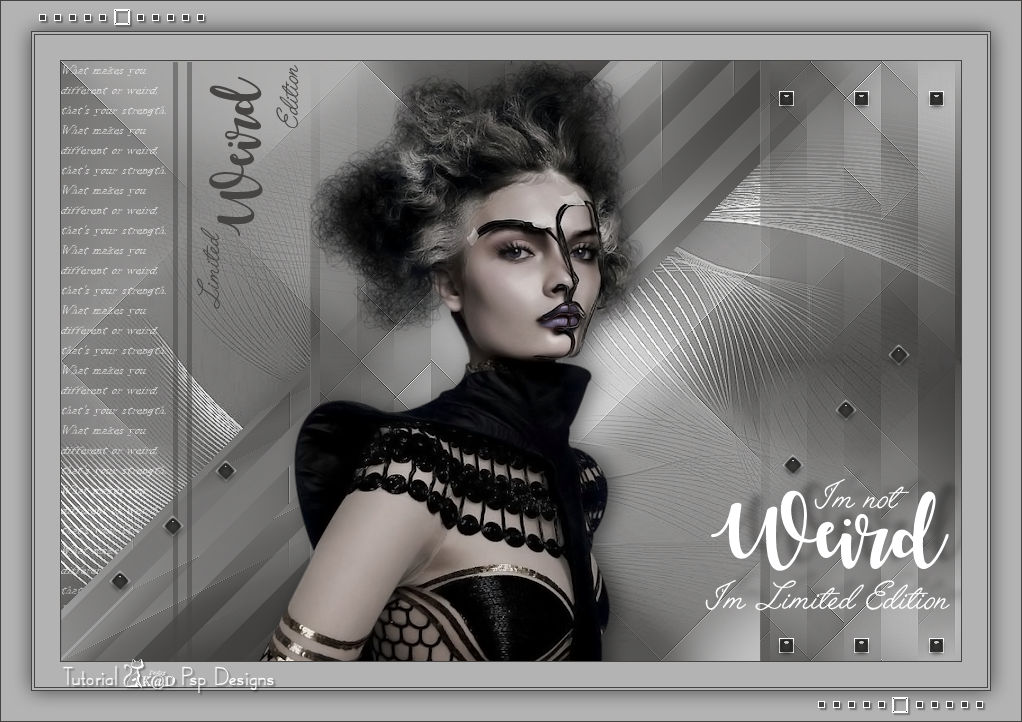
Materials for the tutorial :
Disclaimer :
Each Graphic is the property of the original artist to whom the copyright belongs and
may not be placed in a collection or offered for sale on-line or otherwise.
Choose a tube from a woman up to the waist, which comes with the theme “Weird” (weird, strange, eccentric, ...) .
I use a tube from Jewel
1/ BL28_KaD_Deco
2/ BL28_KaD_Text
3/ BL28_KaD_Text1
4/ BL28_KaD_Text2
Alpha Selections : open in PSP and minimize
1/ BL28_KaD_Alfakanaal (this image is not empty – it contains alpha selections)
Masks : open in PSP and minimize
1/ Narah_Mask_1234
Color palette :
If you work with your own colors, make your own color palette with the alpha channel,
so you can easily switch between your colors.
There are color differences in the different versions of Psp.
Therefore, use the html codes of the color palette to be sure,
that you have the same colors. Also when merging layers, there may be color differences.
Plugins :
1/ Mehdi : Sorting Tiles
2/ DSB Flux : Linear Transmission
3/ Alien Skin Eye Candy 5 : Impact
(-) Import into Filters Unlimited
---------------------------------------
THE TUTORIAL
When working with your own colors, play with the Blend Mode and/or Opacity at your own discretion
From now on I use the terms "MIRROR" and "FLIP" again.
Mirror: Mirror horizontal - Flip: Mirror vertical
Let’s get started.
Remember to save your work often
Colors :
Color 1 (Foreground color) = Light color from your tube
Color 2 (Background color )= Dark color from your tube
Color 3 : white (#ffffff)
Color 4 : black (#000000)
Foreground Gradiant : Radial – see PS
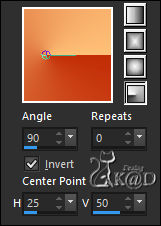
1
Open the alpha channel : BL28_KaD_Alfakanaal
Window – Duplicate
Minimize the original – we continue on the copy
2
Fill with Gradient
Effects – Distortion effects – Wave – see PS

Adjust – Blur – Gaussian Blur : 25
2-1
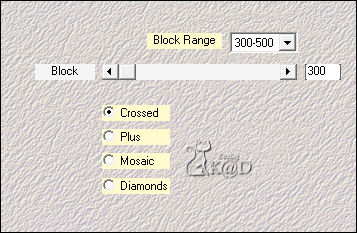
Plugins – Mehdi – Sorting Tiles – see PS
2-2
Effects – Edge effects – Enhance
3
Layers – Duplicate
Image – Flip
Change Blend Mode to Hard Light & Layer Opacity to 70
Layers – Merge – Merge down (Raster 1)
4
Selections – Load/Save Selection – Load Selection From Alpha Channel – Selectie 1 – see PS
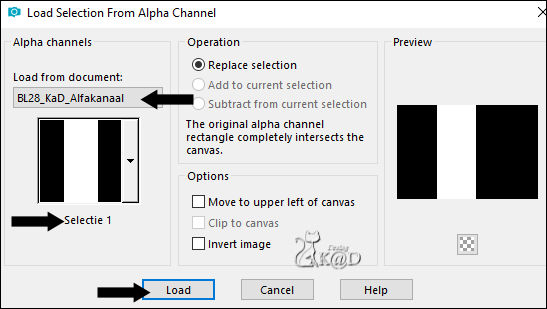
Selections – Promote selection to layer (Promoted selection)
Select none
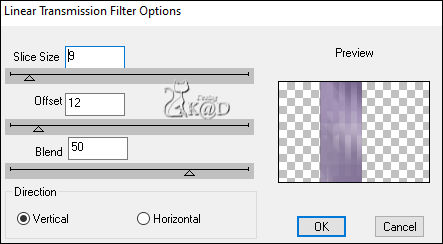
Plugins – DSB Flux – Linear Transmission – see PS
6
Layers – Duplicate (Copy from Promoted selection)
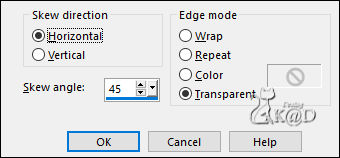
Effects – Geometric effects – Skew – see PS
Layers – Arrange – Move down 1x
6-1
Effects – 3D-effects – Drop Shadow : V&H 0 – 30 – 60 – Color #000000
7
Activate top layer (Promoted selection)
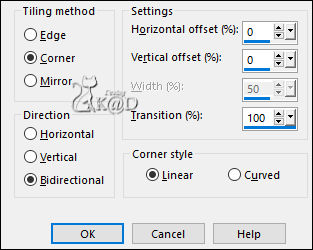
Effects – Image effects – Seamless Tiling – see PS
8
Selections – Load/Save Selection – Load Selection From Alpha Channel – Selectie 2 – see PS
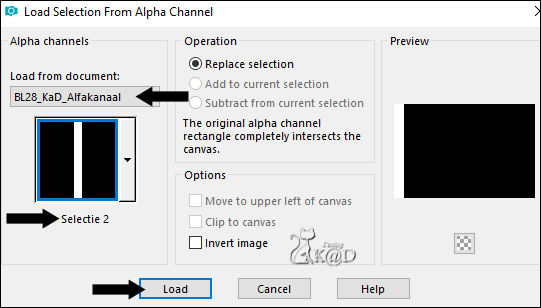
Press delete on the keyboard
Select none
Adjust – Sharpness – Sharpen
9
Change foreground color to white (#ffffff)
Layers – New Raster layer
Fill with foreground color
Layers – New Mask Layer – From image “Narah_Mask_1234” – see PS
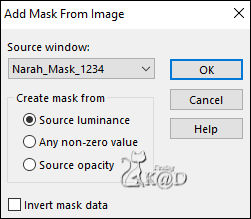
Layers – Merge – Merge group (Group - Raster 2)
Layers – Arrange – Move down 2x
Image – Flip
9-1
Layers – Duplicate
Change Blend Mode to Hard Light
Layers – Merge – Merge down
Adjust – Sharpness – Sharpen
10
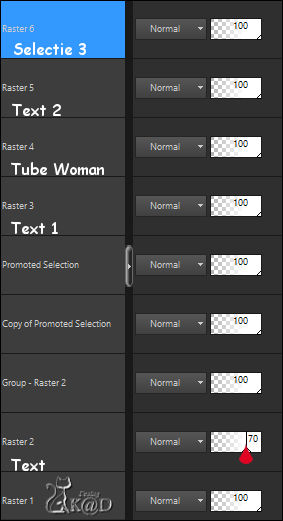
Activate & copy : BL28_KaD_Text
Edit – Paste as a new layer (Raster 2)
Layers – Arrange – Move down
Objects – Align – Left
Change Layer opacity to 70
11
Activate & copy : BL28_KaD_Text1
Edit – Paste as a new layer (Raster 3)
Layers – Arrange – Bring to top
Press K – Pos X : 112 – Pos Y : 1 – Press M HELP
(K : activate the Move Tool – M : deactivate the Move Tool)
Colorize with Background color (use color changer or Change to target brush)
12
Activate & copy : woman tube
Edit – Paste as a new layer (Raster 4)
Resize, if necessary
Place her with the nose to the right, slightly to the left off center
Effects – 3D-effects – Drop Shadow : V 0 – H 7 – 50 – 30 – Color #000000
13
Activate & copy : BL28_KaD_Text2
Edit – Paste as a new layer (Raster 5)
Press K – Pos X : 644 – Pos Y : 418 – Press M
Effects – 3D-effects – Drop Shadow : V -8 – H 20 – 30 – 10 Color #000000
14
Foreground color is still white
Layers – New Raster layer (Raster 6)
Selections – Load/Save Selection – Load Selection From Alpha Channel – Selectie 3 – see PS
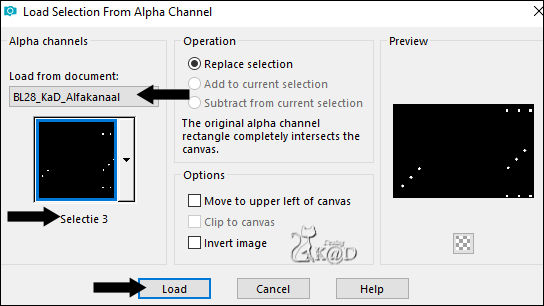
Fill with foreground color
14-1
Selection– Modify – Contract : 1
Fill with Background color
Plugins – Alien Skin Eye Candy 5 – Impact – Glass : CLEAR
Select none
Result
15
Image – Add Borders :
1 pix color 2
25 pix color 1
1 pix color 2
2 pix color 1
1 pix color 2
16
Select all
Image – Add Borders : 30 pix color 1
Effects – 3D-effects – Drop Shadow : V&H 0 – 60 – 30 – Color #000000
Select none
17
Activate & copy : BL28_KaD_Deco
Edit – Paste as a new layer (colorize with background color)
Effects – 3D-effects – Drop Shadow : V&H 2 – 35 – 2 – Color #000000
18
Add your name or watermark,
Add my watermark to your creation HERE
19
Image – Add Borders : 1 pix color 2
Image – Resize – Width 900 Pixels – Resize all Layers checked
Adjust – Sharpen – Unsharp Mask : 2 – 30 – 2 – no check marks
Save as JPG file and you're done!
I hope you enjoyed this tutorial
Karin
04/05/2020
