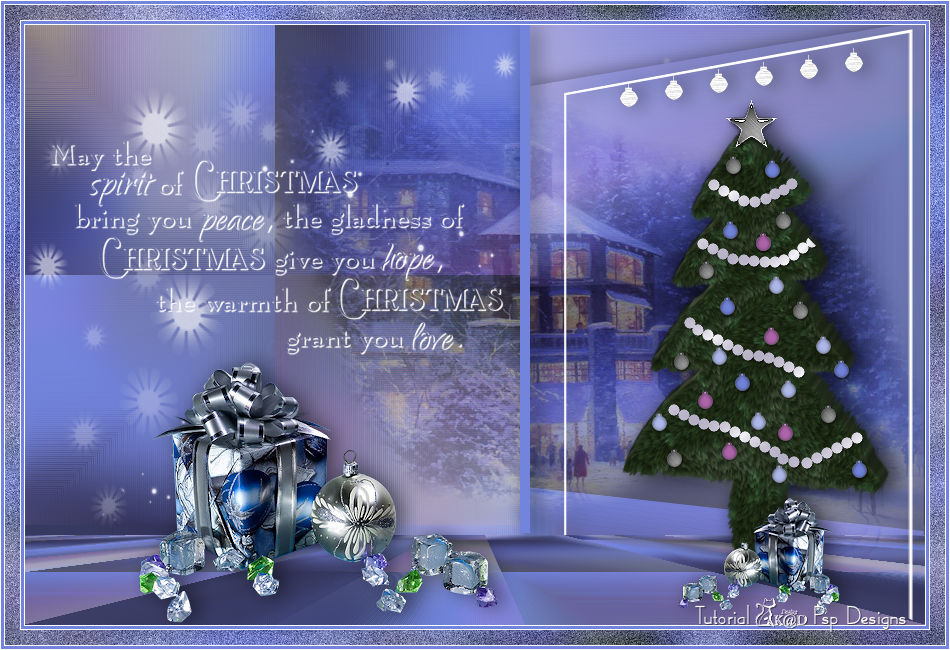
Materials for the tutorial :
Disclaimer :
Each Graphic is the property of the original artist to whom the copyright belongs and
may not be placed in a collection or offered for sale on-line or otherwise.
Find a tube of a Christmas gift or candle or ...
I use a tube of @LadyCrea
1/ @LadyCrea376
2/ AndromedPunt5
3/ BL30_KaD_Element1
4/ BL30_KaD_Text1
Alpha Selections : open in PSP and minimize
1/ BL30_KaD_Alfakanaal
2/ BL30_KaD_Alfakanaal_Kerstbal
Masks : open in PSP and minimize
1/ Narah_Mask_1240
Patern : Place in your folder Paterns
1/ 250-SeamlessSwirl
2/ 229-SeamlessSwirl
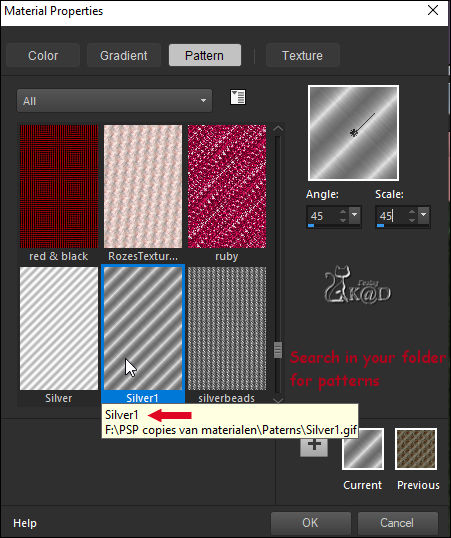
3/ Silver1
Filter Preset : double click to install
1/ BL30_KaD_Extrude
2/ BL30_KaD_Textures
Color palette :
If you work with your own colors, make your own color palette with the alpha channel,
so you can easily switch between your colors.
There are color differences in the different versions of Psp.
Therefore, use the html codes of the color palette to be sure,
that you have the same colors. Also when merging layers, there may be color differences.
Plugins :
1/ Unlimited 2.0 – Funhous : Loom
2/ Mehdi : Sorting Tiles
3/ Andromeda : Perspective (Explanation & working filter further in the tutorial)
4/ MuRa’s Meister : Perspective
5/ Alien Skin – Eyde Candy 5 : Textures
6/ Alien Skin – Eyde Candy 5 : Impact
7/ Simple : Zoom out and Flip
(-) Import into Filters Unlimited
---------------------------------------
THE TUTORIAL
When working with your own colors, play with the Blend Mode and/or Opacity at your own discretion
From now on I use the terms "MIRROR" and "FLIP" again.
Mirror: Mirror horizontal - Flip: Mirror vertical
Let’s get started.
Remember to save your work often
Colors :
Color 1 = Foreground color (#7284db)
Color 2 = Background color (#ffffff)
2 more colors needed further in the tutorial
1
Open : BL30_KaD_Alfakanaal
Window – Duplicate
Minimize the original – we continue on the copy
2
Fill with foreground
Select all
Activate and copy : @LadyCrea376 : Groupe - Raster 1
Edit – Paste into Selection
Select none
Effects – Image effects – Seamless Tiling – DEFAULT
2-1
Adjust – Blur – Gaussian Blur : 30
You can now change your colors with Adjust-Variations or Nick- Color Efets
3
Plugins – Unlimited 2.0 – Funhouse – Loom – see PS
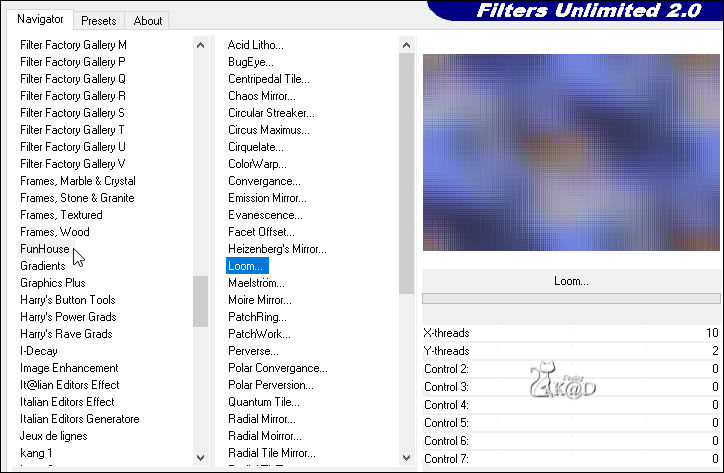
Adjust – Sharpness – Sharpen
4
Plugins – Mehdi – Sorting Tiles – see PS
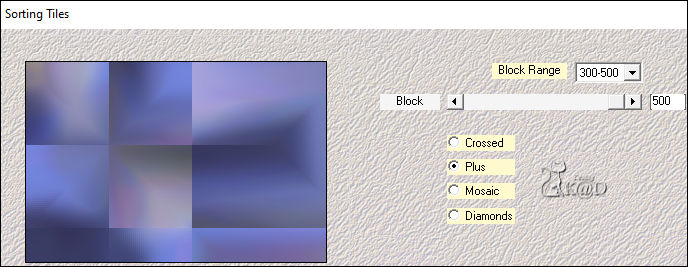
5
Selections – Load/Save Selection – Load Selection From Alpha Channel – Selectie 1 – see PS
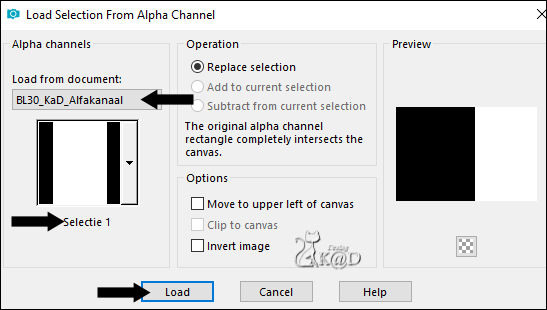
Selections – Promote selection to layer (Promoted selection)
Select none
Plugins – Andromeda – Perspective* - see PS
* Filter & explanation to install: HERE
* If it doesn't work, use : AndromedPunt5, Paste as new layer and align objects: Right
Rename the layer: Promoted selection
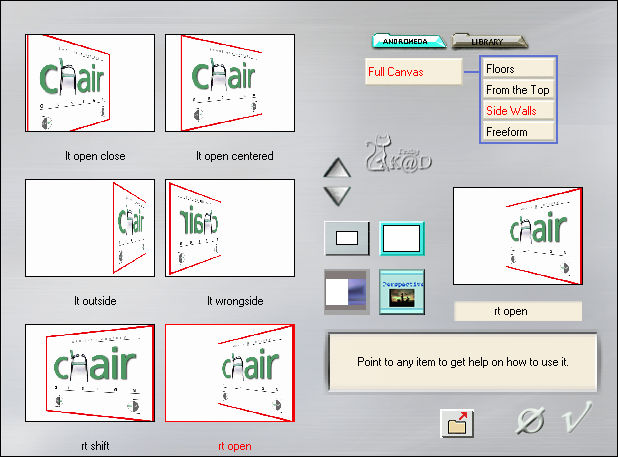
6
Objects – Align – Right
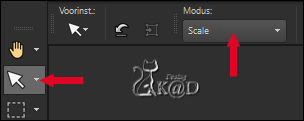
Press K – make sure you are on mode “scale” – see PS
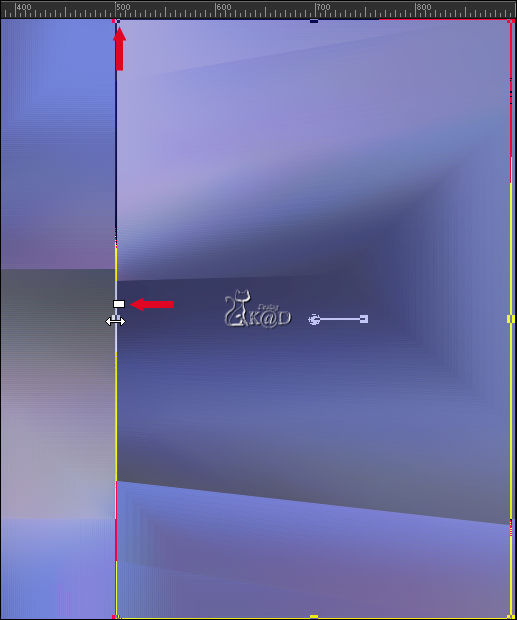
Pull the middle block to 500– see PS
Effects – 3D-effects – Drop Shadow : V0 – H 7 – 50 – 30 – Color #000000
7
Activate Raster 1
Layers – Duplicate (Copy of Raster 1)
Plugins – MuRa’s Meister – Perspective Tiling – STANDAARD : HEIGHT to 15
Layers – Arrange – Bring to top
8
Layers – New Raster Layer (Raster 2)
Selections – Load/Save Selection – Load Selection From Alpha Channel – Selectie 2 – see PS
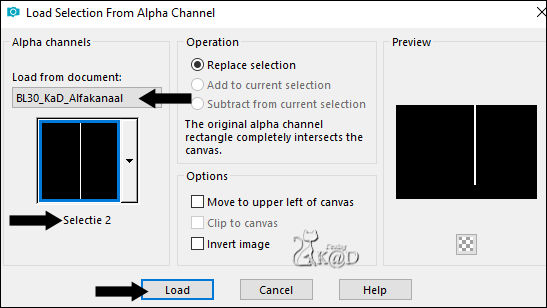
Fill selection with foreground color
Effects – 3D-effects – Drop Shadow: V0 – H 7 – 50 – 30 – Color #000000
Select none
9
Change background to PATTERN “250-SeamlessSwirl” – see PS
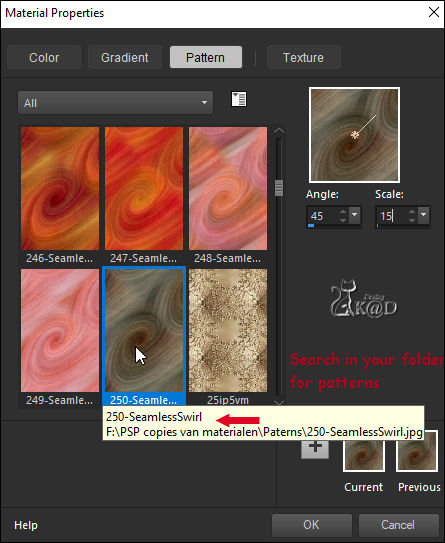
Layers – New Raster Layer (Raster 3)
Selections – Load/Save Selection – Load Selection From Alpha Channel – Selectie 3 – see PS
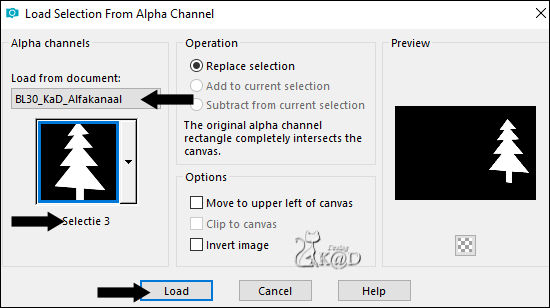
Fill selection with pattern
Adjust – Blur – Average – see PS
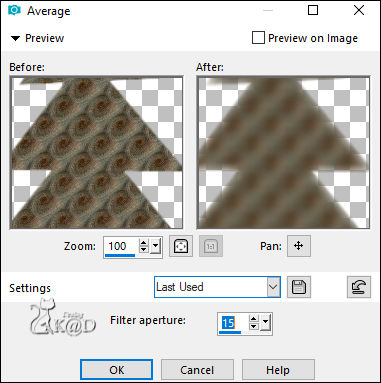
9-1
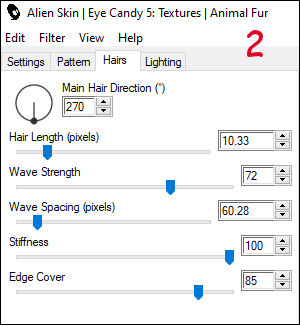
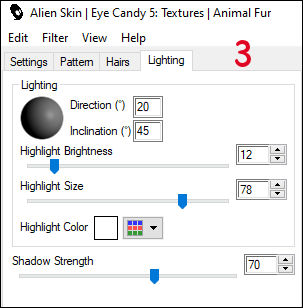
Plugins – Alien Skin – Eyde Candy 5 – Textures – Animal Fur – see PS
Use my preset : BL30_KaD_Textures or enter the values manually.
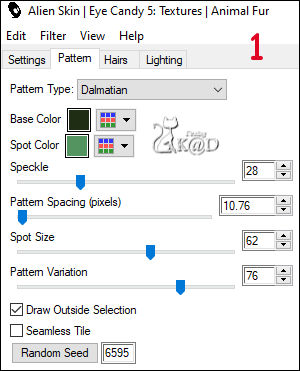
Select none
9-2
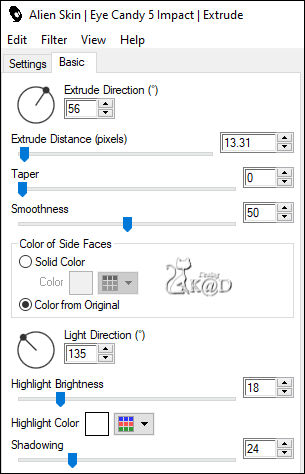
Plugins – Alien Skin – Eye Candy 5 – Impact – Extrude – see PS
Use my preset: BL30_KaD_Extrude or enter the values manually.
10
Change background to PATTERN “Silver1” – see PS
Layers – New Raster Layer (Raster 4)
Selections – Load/Save Selection – Load Selection From Alpha Channel – Selectie 4 – see PS

Fill selection with pattern
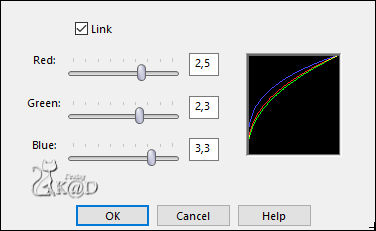
Effects – Gamma Correction (Shift g) – see PS
Sometimes You need to uncheck "Link".
Select none
10-1
Effects – 3D-effects – Drop Shadow: V&H 1 – 50 – 1 – Color #000000
11
Layers – Merge down
Press K – Pos X : 597 – Pos Y : 102 – Press M HELP
(K : activate the Move Tool – M : deactivate the Move Tool)
Effects – 3D-effects – Drop Shadow: V0 – H 7 – 50 – 30 – Color #000000
12
Layers – New Raster Layer (Raster 4)
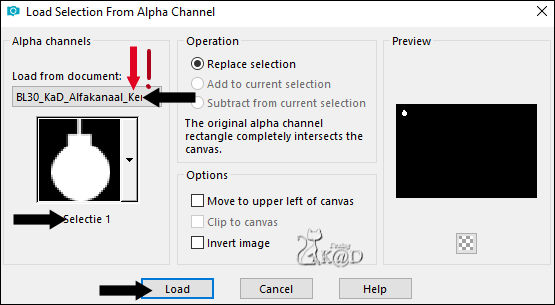
Selections – Load/Save Selection – Load Selection From Alpha Channel “BL30_KaD_Alfakanaal_Kerstbal” – Selectie 1 – see PS
ATTENTION : This is the second alpha channel
Fill selection with pattern (silver still active)
Effects – edge effects – Enhance
Adjust – Sharpness – Sharpen
Select none
12-1
Plugins – Alien Skin – Eye Candy 5 – Impact – Glass : CLEAR
Image – Resize: 50%, all layers NOT checked
Put the ball in the tree
Effects – 3D-effects – Drop Shadow: V&H 1 – 50 – 1 – Color #000000
Duplicate about 6 times and spread over your tree
13
Activate top layer (Copy (6) of Raster 4)
Layers – New Raster Layer (Raster 5)
Selections – Load/Save Selection – Load Selection From Alpha Channel “BL30_KaD_Alfakanaal_Kerstbal” – Selectie 1 – see step 12
Fill with foreground color
Effects – edge effects – Enhance
Adjust – Sharpness – Sharpen
Select none
13-1
Plugins – Alien Skin – Eye Candy 5 – Impact – Glass : CLEAR
Image – Resize: 50%, all layers NOT checked
Put the ball in the tree
Effects – 3D-effects – Drop Shadow: V&H 1 – 50 – 1 – Color #000000
Duplicate about 6 times and spread over your tree
13-2
Repeat this 2x with a different color ( step 13 t/m 13-1)
14
Activate top layer (Copy (6) of Raster 7)
Layers – New Raster Layer (Raster 8)
Selections – Load/Save Selection – Load Selection From Alpha Channel – Selectie 5 – see PS
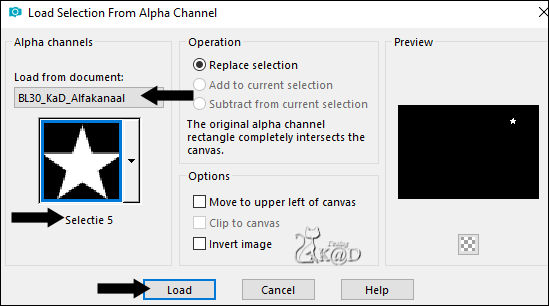
Fill selection with pattern (silver still active)
Plugins – Alien Skin – Eye Candy 5 – Impact – CLEAR
Select none
14-1
Effects – edge effects – Enhance
Move a little more to the left (in the middle of the top of the tree)
15
Activate the layer with your Christmas tree and close the bottom 4 layers - see PS
(not all layers are on the print screen)
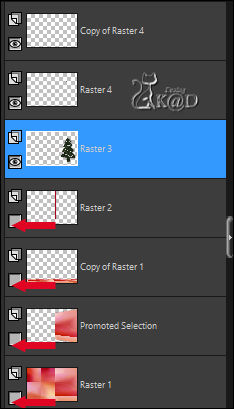
Layers – Merge visible
Effects – 3D-effects – Drop Shadow: V0 – H 7 – 50 – 30 – Color #000000
Layers – View – All (all layers are open)
16
Activate Raster 1
Layers – New Raster Layer (Raster 3)
Fill with Background color (Color 2)
Layers – New Mask layers – From Image “Narah_Mask_1240” – see PS
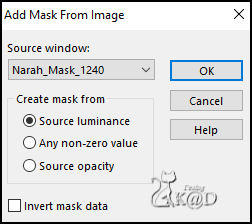
Image – Mirror and Flip
Layers – Duplicate – see PS
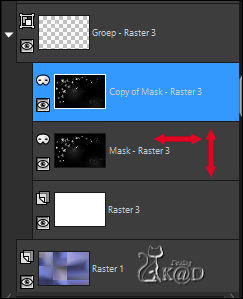
Layers –Merge – Merge group (Group - Raster 3)
17
Activate and copy : BL30_KaD_Text1
Edit – Paste as a new layer
Layers – Arrange – Bring to top
Press K – Pos X : 26 – Pos Y : 115 – Press M
18
Activate and copy : @LadyCrea376
Edit – Paste as a new layer
Image – Resize : 75%, all layers NOT checked
Press K – Pos X : 231 – Pos Y : 7 – Press M
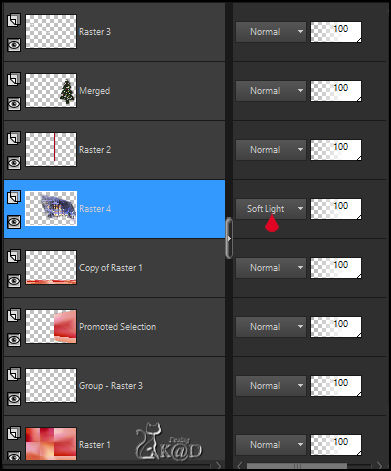
Layers – Arrange – Move down 3x
Change Blend mode to Soft light
Result
19
Activate and copy: BL30_KaD_Element1
Edit – Paste as a new layer
Layers – Arrange – Bring to top
Press K – Pos X : 539 – Pos Y : 4 – Press M
Effects – 3D-effects – Drop Shadow: V0 – H 7 – 50 – 30 – Color #000000
20
Activate and copy your Christmas gift tube
Edit – Paste as a new layer
Edit if needed
Place Left on the floor +/- in the middle of the first square.
21
Layers – Duplicate
Image – Mirror
Image – Resize : resize as you see fit
Place against the trunk of the tree
Give both drop shadow as you see fit.
22
Activate Raster 1
Edit – Copy
Image – Add borders :
1 pix background color
3 pix foreground color
1 pix background color
Select all
15 pix foreground color
Selection invert
Edit – Paste into selection
23
Plugins – Simple – Zoom out and Flip
Adjust – Blur – Gaussian Blur : 15
Adjust – Add/Remove Noise – Add Noise – see PS
Select none
24
Image – Add borders :
1 pix background color
3 pix foreground color
1 pix background color
25
Add your name or watermark,
Add my watermark to your creation HERE
26
Lyers – Merge all layers (Flatten)
Image – Resize - Width 900 Pixels - Resize all Layers checked
Adjust – Sharpen – Unsharp Mask : 2 – 30 – 2 – no check marks
Save as JPG file and you're done!
I hope you enjoyed this tutorial
Karin
04/08/2020
