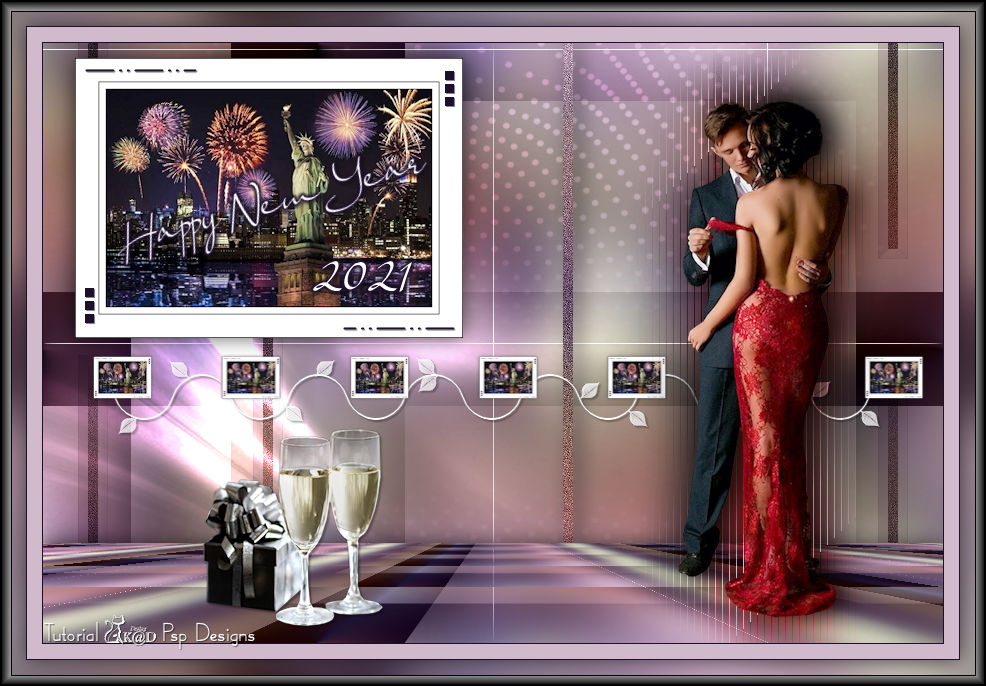
Materials for the tutorial :
Disclaimer :
Each Graphic is the property of the original artist to whom the copyright belongs and
may not be placed in a collection or offered for sale on-line or otherwise.
Choose a tube of a couple, a tube of a New Year's decoration and an image with a New Year's scene (eg Fireworks, landscape, ...)
I use a tube from Mina (couple) and Claudia Viza (deco)
The picture comes from the internet
1/ BL31_KaD_Element1
2/ BL31_KaD_Element2
3/ BL31_KaD_Frame_Alfakanaal
Alpha Selections : open in PSP and minimize
1/ BL31_Achtergrond (this image is not empty – it contains alpha selections)
Masks : open in PSP and minimize
1/ Narah_Mask_1109
2/ Narah_Mask_1351
Color palette :
If you work with your own colors, make your own color palette with the alpha channel,
so you can easily switch between your colors.
There are color differences in the different versions of Psp.
Therefore, use the html codes of the color palette to be sure,
that you have the same colors. Also when merging layers, there may be color differences.
Plugins :
1/ Unlimited 2.0 : Mock – Windo (-)
2/ MuRa’s Meister : Perspective Tiling – Copies
3/ Alien Skin – Eye Candy 5 – Impact – Gradient Glow
3/ Tramages : Tow the Line
4/ AAA Filters : AAA Framer
(-) Import into Filters Unlimited
---------------------------------------
THE TUTORIAL
When working with your own colors, play with the Blend Mode and/or Opacity at your own discretion
From now on I use the terms "MIRROR" and "FLIP" again.
Mirror: Mirror horizontal - Flip: Mirror vertical
Let’s get started.
Remember to save your work often
Colors :
First make your own color palette, so that you can easily switch between your colors.
Use the Alfa_Colorpallet-6 in the materials for this.
Foreground: see # 3-1
Background: see # 3-1
1
Open : BL31_KaD_Alfakanaal
Window – Duplicate
Minimize the original – we're working on the copy
2
Select all
Activate and copy : BL31_Achtergrond*
Edit – Paste into selection
Select none
*TIP :
Take your own New Year's image - Paste into selection
Seamless Tiling - Default
Gaussian blur
Paste my background as a new layer - Set Blend Mode to Luminance
Layers - Merge Down
2-1
Plugins –Unlimited 2.0 – Mock – Windo – DEFAULT
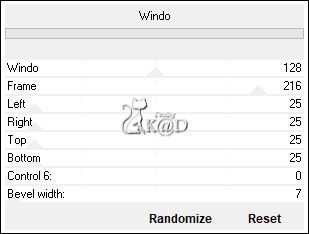
3
Effects – Image effects – Seamless Tiling– see PS
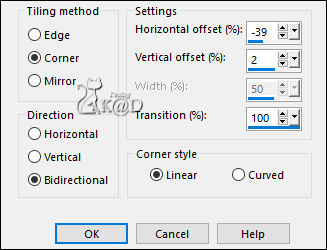
Layers – Merge all layers
Layers – Convert to Background layer (Raster 1)
3-1
Colorize according to your chosen New Year's image or use the tip at point 2
Choose:
Color 1 = foreground = Dark
Color 2 = background color = Light
4
Selections – Load/Save Selection – Load Selection From Alpha Channel – Selectie 1 – see PS
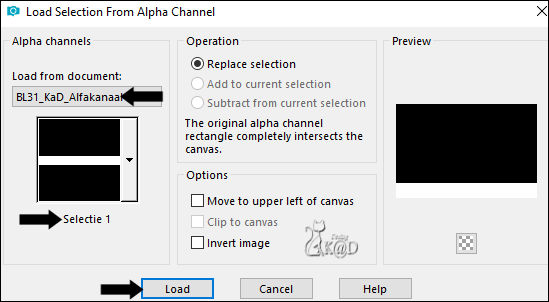
Selections – Promote selection to layer
Plugins – MuRa’s Meister – Perspective Tiling – DEFAULT
Select none
4-1
Effects – 3D-effects – Drop Shadow : V& H 0 – 60 – 30 – Color #000000
5
Activate : BL31_KaD_Frame_Alfakanaal
Window – Duplicate – we're working on the copy
Keep selection !
Activate and copy : your New Year's image
Edit – Paste into selection
Adjust – Sharpness – Sharpen
Select none
Edit – copy
Back to your work
6
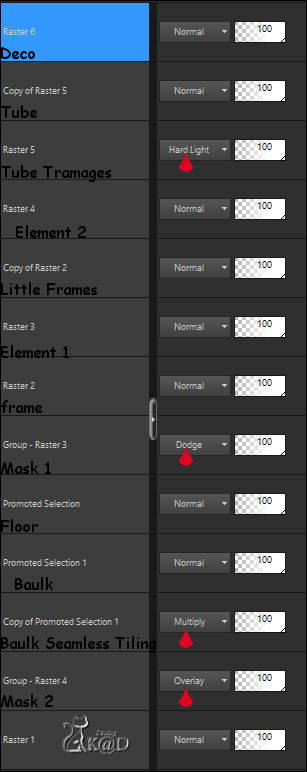
Edit – Paste as a new layer (Raster 2)
Image –Resize : 90%, all layers NOT checked
Press K – Pos X : 32 – Pos Y : 15 – Press M HELP
(K : activate the Move Tool – M : deactivate the Move Tool)
Effects – 3D-effects – Drop Shadow : V& H 0 – 60 – 30 – Color #000000
7
Layers – New Raster layer
Selections – Load/Save Selection – Load Selection From Alpha Channel – Selectie 2 – see PS
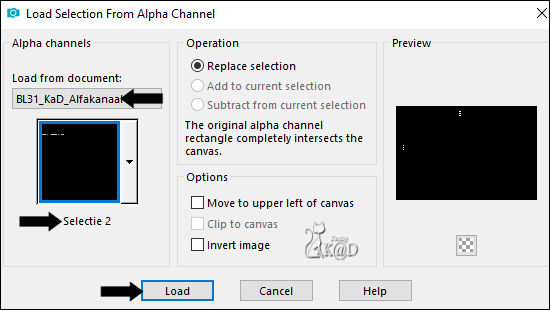
Fill with foreground color
Select none
Effects – 3D-effects – Drop Shadow : V& H1 – 50 – 1 – Color #000000
Layers – Merge – Merge Down
8
Layers – New Raster layer
Fill with background color
Layers – New Mask layers – From image “Narah_Mask_1109” – see PS
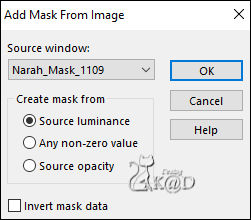
Layers – Duplicate– You have the mask 2x in your layer pallet – see PS
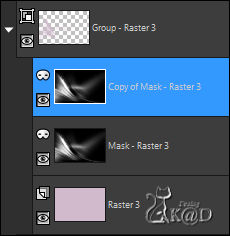
Layers – Merge – Merge group (Group - Raster 3)
Change Blend mode to Dodge
Layers – Arrange – Move down
9
Activate Raster 1
Selections – Load/Save Selection – Load Selection From Alpha Channel – Selectie 3 – see PS
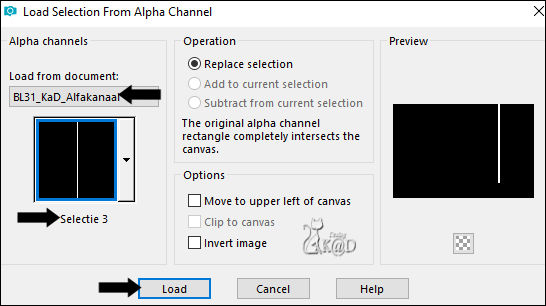
Selections – Promote selection to layer (Promoted selection 1)
Adjust – Blur – Gaussian blur : 25
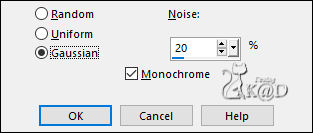
Adjust – Add/Remove Noise – Add Noise – see PS
9-1
Adjust – Sharpness – Sharpen
Layers – Duplicate (Copy of Promoted selection 1)
Select none
Effects – Image effects – Seamless Tiling– same values
10
Layers – Duplicate
Image – Mirror
Layers – merge – Merge down
Layers – Arrange – Move down
Set Blend Mode toMultiply
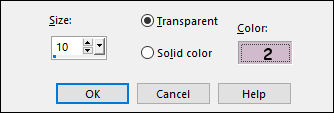
Effects – 3D-effects – Chisel – see PS
11
Activate the layer above (Promoted selection 1)
Effects – 3D-effects – Drop Shadow : V0 – H 7 – 50 – 30 – Color 1
11-1
Effects – Image effects – Offset : H -150 – V 0 – transparent
12
Activate top layer (Raster 2)
Layers – Duplicate (Copy of Raster 2)
Image – Resize: 15%, all layers NOT checked
Press K – Pos X : 47 – Pos Y : 311 – Press M
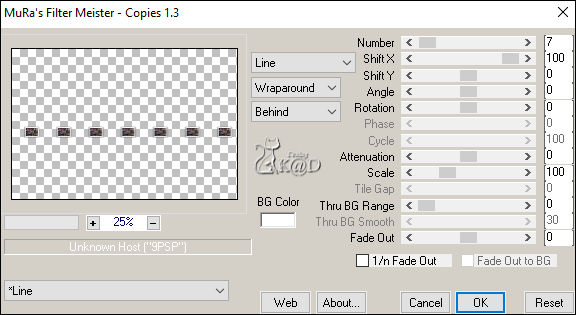
Plugins – MuRa’s Meister – Copies – see PS
Adjust – Sharpness – Sharpen
13
Activate and copy : BL31_KaD_Element1
Edit – Paste as a new layer (Raster 3)
Press K – Pos X : 70 – Pos Y : 312 – Press M
Effects – 3D-effects – Drop Shadow : V& H 2 – 35 – 2 – Color #000000
Layers – Arrange – Move down
14
Activate Raster 1
Layer – New raster layer
Fill with background color
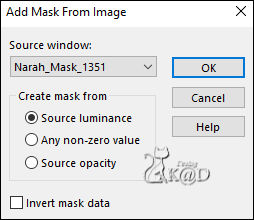
Layers – New Mask layer – From image “Narah_Mask_1351” – see PS
Layers – Merge group (Group - Raster 4)
Set Blend mode to Overlay
15
Activate and copy : BL31_KaD_Element2
Edit – Paste as a new layer (Raster 4)
Layers – Arrange – Bring to top
Press K – Pos X : 74 – Pos Y : 112 – Press M
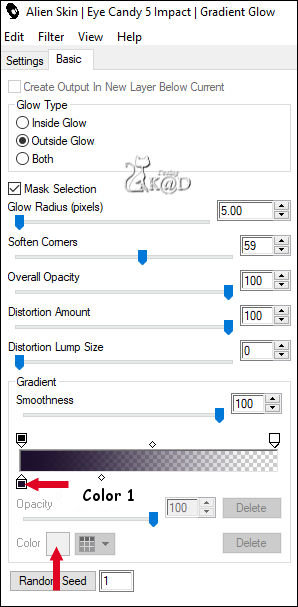
Plugins – Alien Skin – Eye Candy 5 – Impact – Gradient Glow – see PS
15-1
Effects – 3D-effects – Drop Shadow : V& H 2 – 35 – 2 – Color #000000
16
Activate and copy: your tube couple
Edit – Paste as a new layer (Raster 5)
Adjust/resize if necessary
Put Right, +/- over the penultimate frame
16-1
Layers – Duplicate (Copy of Raster 5)
Activate the layer just below (Raster 5)
Adjust – Blur – Gaussian blur : 25
Plugins – Tramages – Tow the Line – DEFAULT
Set Blend mode to Hard Light
16-2
Activate top layer (Copy of Raster 5)
Effects – 3D-effects – Drop Shadow : V 0 – H 7 – 50 – 30 – Color #000000
17
Activate and copy: your deco tube
Edit – Paste as a new layer (Raster 6)
Adjust/resize if necessary
Put Left a bit in front of the mask
Give drop shadow according to your tube
Result
18
Activate Raster 1
Edit – Copy
19
Image – Add borders :
1 pix color 1
15 pix color 2
1 pix color 1
20
Select all
Image – Add borders : 25 pix color 2
Selection invert
Edit – Paste into selection
Adjust – Blur – Gaussian : 25
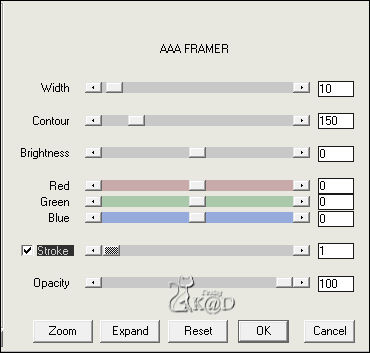
Plugins – AAA Filters – AAA Framer – see PS
21
Selection invert
Effects – 3D-effects – Drop Shadow : V& H 0 – 60 – 30 – Color #000000
Select none
22
Add your name or watermark,
Add my watermark to your creation HERE
23
Image – Add Borders : 1 pix color #000000
Image – Resize – Width 900 Pixels – Resize all Layers checked
Adjust – Sharpen – Unsharp Mask : 2 – 30 – 2 – no check marks
Save as JPG file and you're done!
I hope you enjoyed this tutorial
Karin
22/09/2020
