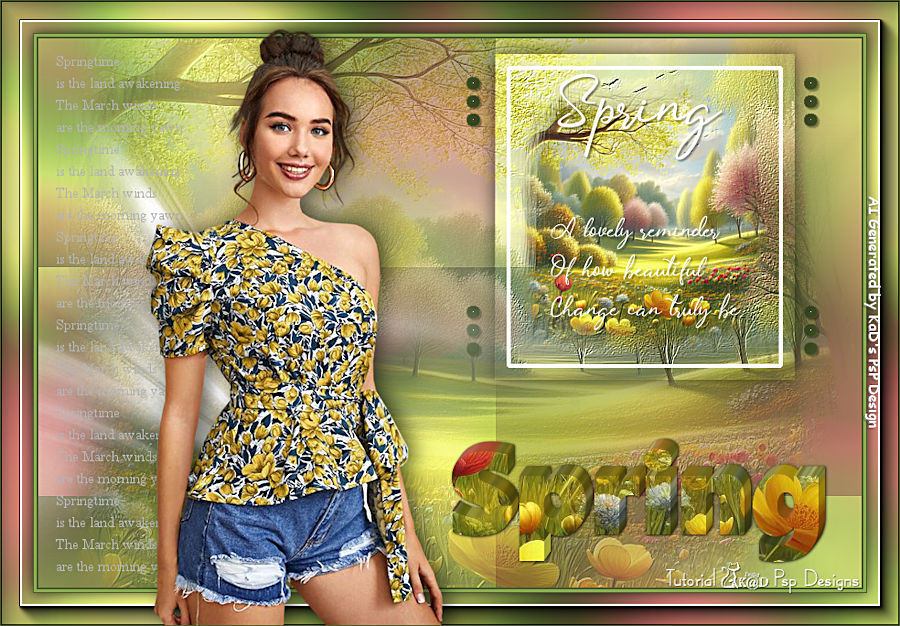
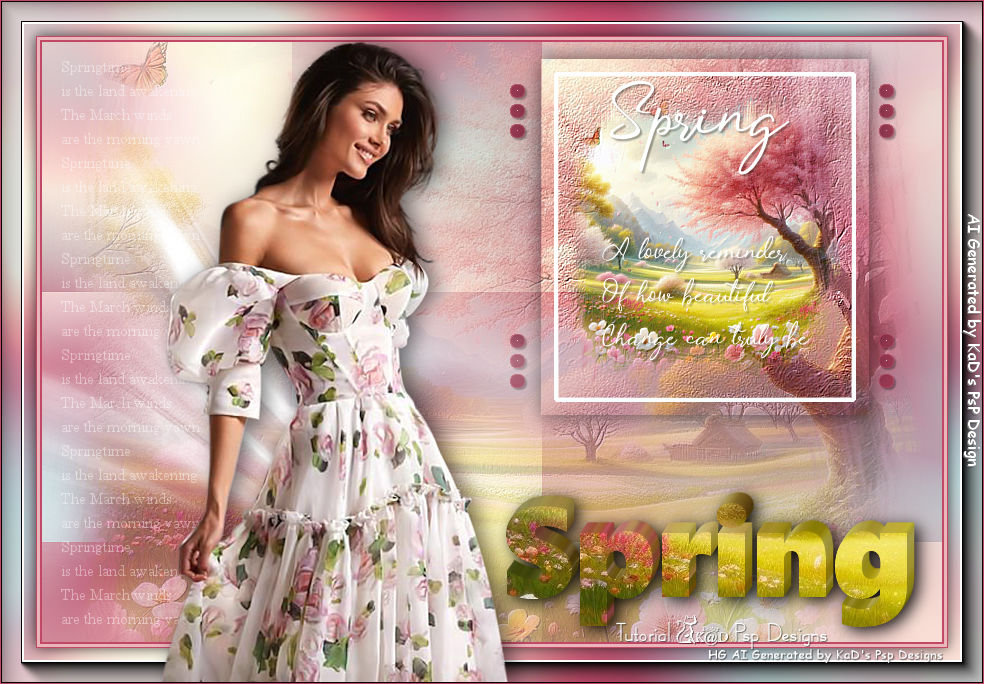
In order not to ruin the surprise for others PLEASE do not post your version in puclic
before the end of the challenge.
In this case it’s 30/05/2019.
Submit your work no later than 30/05/2024.
Thanks !
Materials for the tutorial :
Disclaimer :
Each Graphic is the property of the original artist to whom the copyright belongs and
may not be placed in a collection or offered for sale on-line or otherwise.
Tubes :
(*) If you recognize them as one of your own, please let me know, so I can add your name or remove the tube.
THEME
SPRING
Tubes : (*)
Do you recognize a tube of yourself, please contact me so that I can mention your name or – if you wish – the tube can be removed.
Choose a tube of a cheerful woman/man/child I use a tube from LB
1/ BL61-Landschap_AIGenerated by KaDsPspDesign
2/ BL61_KaD_Element1 + 2 + 3
Alpha Selections : open in PSP and minimize
1/ BL61_KaD_Alfakanaal
Masks : open in PSP and minimize
1/ Narah_Mask_1109
Filter presets : double clik to install
1/ BL61_KaD_Glass1
2/ BL61_KaD_Extrude1
Color palette :
If you work with your own colors, make your own color palette with the alpha channel,
so you can easily switch between your colors.
There are color differences in the different versions of Psp.
Therefore, use the html codes of the color palette to be sure,
that you have the same colors. Also when merging layers, there may be color differences.
Plugins :
1/ Mehdi : Wavy Lab 1.1 – Sorting Tiles
2/ Graphics Plus – Emboss
3/ Alien Skin – Eye Candy 5 – Impact : Glass – Extrude – Perpective Shadow
(-) Import into Filters Unlimited
---------------------------------------
THE TUTORIAL
When working with your own colors, play with the Blend Mode and/or Opacity at your own discretion
From now on I use the terms "MIRROR" and "FLIP" again.
Mirror: Mirror horizontal - Flip: Mirror vertical
Let’s get started.
Remember to save your work often.
Some print screens have other colors than the original.
Colors :
First create your own color palette, so that you can easily switch between your colors.
Use the Alfa_Kleurenpallet-6 in the materials for this.
Color 1: Foreground: Not too light a color from your landscape tube
Color 2: Background: Not too dark a color from your landscape tube
Color 3: a contrasting light color from your landscape tube
Color 4: a contrasting light color from your landscape tube
Color 5: White (#ffffff)
Color 6 : Black (#000000)
1
Open the alpha channel : BL61_KaD_Alfakanaal
Window – Duplicate
Minimize the original – we continue on the copy
2
Plugins – Mehdi – Wavy Lab 1.1 – see PS
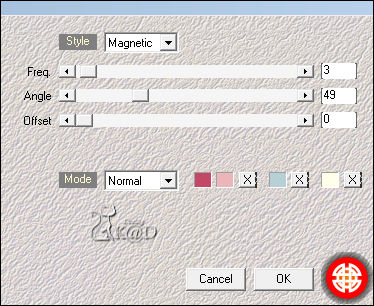
Effects – Image effects – Seamless Tiling – Default
Adjust – Blur – Gaussian blur : 20
3
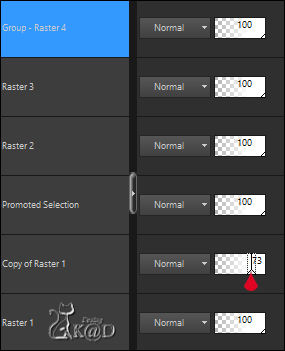
Layers – Duplicate (Copy of Raster 1)
Plugins – Mehdi – Sorting Tiles – see PS
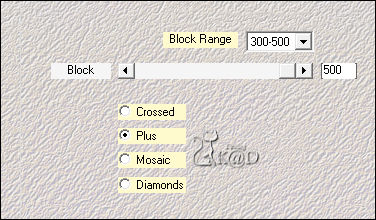
Adjust – Sharpness – Sharpen
4
Activate & copy : BL61-Landschap_AIGenerated by KaDsPspDesign
Edit – Past as a new layer
Image – Resize: 90%, all layers NOT checked
Plugins – Graphics Plus – Emboss – All on 0
Change Layer opacity to 60
Layers – Merge – Merge down (Copy of Raster 1)
Change Layer opacity to 73
5
Selections – Load/Save Selection – Load Selection From Alpha Channel – Selectie 1 – see PS
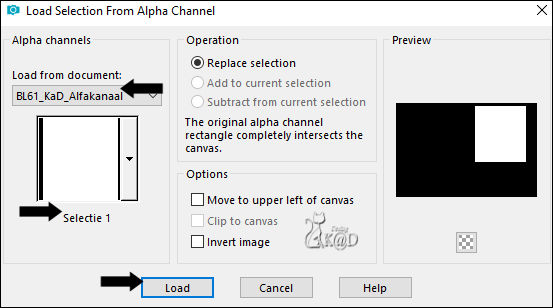
Selections – Promote selection to layer (Promoted selection)
Effects – 3D-effects – Drop Shadow : V&H 0 – 60 – 30 – Color #000000
Selections – Modify – Contract : 15
Activate & copy : BL61-Landschap_AIGenerated by KaDsPspDesign
Edit – Past into selection
Plugins – Graphics Plus – Emboss – All on 0
6
Change Foreground color to Color 5
Selections – Modify – Select Selection Borders– see PS
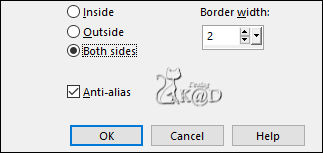
Fill selection with Foreground color
Select none
7
Activate & copy : BL62_KaD_Element1
Edit – Past as a new layer (Raster 2)
Press K – Pos X : 560 – Press Y : 38 – Druk M UITLEG
Effects – 3D-effects – Drop Shadow : V&H 2 – 35 – 2 – Color #000000
8
Selections – Load/Save Selection – Load Selection From Alpha Channel – Selectie 2 – see PS
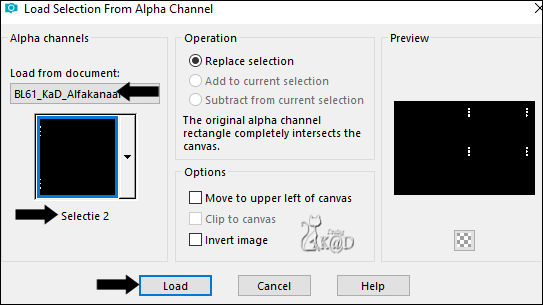
Layers – New Raster layer(Raster 3)
Fill selection with Background color
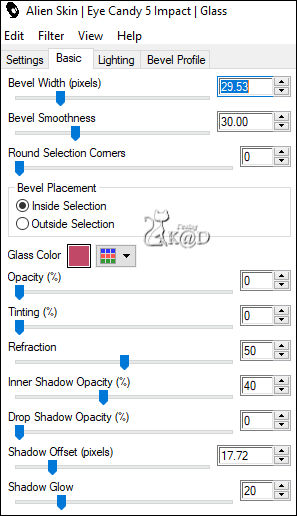
Plugins – Alien Skin – Eye Candy 5 – Impact – Glass :
Choose the preset on the left: BL61_KaD_Glass1 or fill in manually – see PS
Possibly in basic, adjust the color to your Color 2
Select none
Effects – 3D-effects – Drop Shadow : V&H 2 – 35 – 2 – Color #000000
9
Layers – New Raster layer
Fill with Foreground color
Layers – New Mask layer – From image “Narah_Mask_1109” – see PS
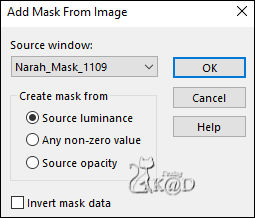
Layers – Duplicate (You now have 2x the mask in your layers)
Layers – Merge – Merge group (Group Raster 4)
Adjust – Sharpness – Sharpen
Result
10
Activate & copy : BL62_KaD_Element2*
Edit – Past as a new layer (Raster 4)
Press K – Pos X : 449 – Pos Y : 434 – Press M
Would you like to make this element yourself from your own landscape tube?
*10-1
*Activate your Text tool with these settings – see PS

*Type: SPRING
*Click apply
*Then click on text cutter (outlined on the PS)
*10-2
*Change canvas size : Add 50 to each side
*Plugins – Alien Skin – Eye Candy 5 – Impact – Extrude – Preset : BL61_KaD_Extrude1
* Plugins – Alien Skin – Eye Candy 5 – Impact – Perspective Shadow : Drop Shadow, lowest
* Edit – Copy
* Continue with # 10
11
Activate bottom layer
Edit – Copy
Image – Add borders :
2 pix Color 2
3 pix Color 1
1 pix Color 2
Select all
12
Image – Add borders : 35 pix Color 5
Selection – Invert
Edit – Past into selection
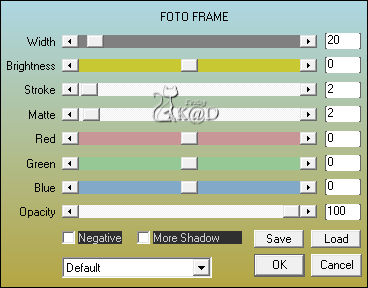
Plugins – AAA Frames – Foto Frame – see PS
13
Selection – Invert
Effects – 3D-effects – Drop Shadow : V&H 0 – 40 – 20 – Color #000000
Repeat 1x
Select none
14
Activate & copy : your main tube
Edit – Past as a new layer
Adjust if necessary (reduce, sharpen, mirror, etc.)
Place her with her nose to the rightGuideline : POS X : 158
Effects – 3D-effects – Drop Shadow : V 0 – H 7 – 50 – 30 – Color #000000
15
Activate & copy : BL62_KaD_Element3
Edit – Past as a new layer
Press K – Pos X : 60 – Pos Y : 60 – Press M
Layers – Arrange – Move down
Set Blend Mode to Soft Light (depending on your colors!)
16
Activate top layer
Add your name or watermark,
Add my watermark to your creation HERE
Are you working with my background: BL 61-Landscape AI Generated by KaDsPspDesign,
then also place “HG_AIGeneratedBij KaD” on your creation.
17
Image – Add borders : 1 pix color 2
Image – Resize - Width 900 Pixels - Resize all Layers checked
Adjust – Sharpen – Unsharp Mask : 2 – 30 – 2 – no check marks
Save as JPG file and you're done!
I hope you enjoyed this tutorial
Karin
01/03/2024
Extra Ex with tube by Jeanne
