General preparations :
First install the filters that you did not have, before you open PSP !!
Open your tubes in PSP, duplicate them and close the originals.
Do not forget to remove the watermarks on the copies.
Plugings HERE en HERE
Permission tubes HERE
Blank color palette Alpha channel : HERE
Materials : HERE
Materials for the tutorial :
Disclaimer: Each Graphic is the property of the original artist to whom the copyright belongs
and may not be placed in a collection or offered for sale on-line or otherwise.
Tubes :
(*) If you recognize them as one of your own, please let me know, so I can add your name or remove the tube.
Open your tubes in PSP, duplicate them and close the originals.
1/ KaD_WomanFace56
2/ 463_KaD_Text1
Frame : Open in PSP en minimize
1/ 463_KaD_Text1
Brush : Export as a custom brush HELP
1/ 463_KaD_TextWyetta
Alpha Selections : open in PSP en minimize
1/ 463_KaD_Alfakanaal
Plugins Preset : double click to install
1/ 463_KaD_GradientGlow
Color palette :
If you work with your own colors, make your own color palette with the alpha channel,
so you can easily switch between your colors.
When working with your own colors,
play with the Blend Mode and/or Opacity at your own discretion

Plugins :
1/ Mehdi : Wavy Lab 1.1
2/ Unlimited 2.0 : &<BKG Designers sf10II> – Gregs FO Warp (-)
3/ Unlimited 2.0 :Filter Factory Gallery A – Weave (-)
4/ Italian Editors Effect : Effetto Fatasma
5/ Carolaine & Sensibility : CS-HLines
6/ Mock : Windo
7/ AAA Frames : Foto Frame
8/ AP 01 [Innovations] : Lines – Silverlining
9/ Alien Skin – Eye Candy 5 – Impact
(-) Import Plugins in Unlimited 2.0 to become the same result.
---------------------------------------
The Tutorial :
From now on I use the terms "MIRROR" and "FLIP" again.
Mirror : Mirror horizontal – Flip : Mirror vertical
Let’s get started.
Remember to save your work often
Colors :
Foreground : Color 1 = #f1ede9
Background : Color 2 = #655949
1
Open the alpha channel : 463_KaD_Alfakanaal
Window – Duplicate
Minimize the original – we continue on the copy
2
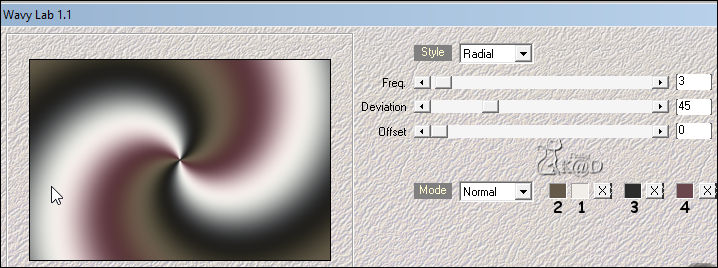
Plugins – Mehdi – Wavy Lab 1.1 – see PS
3
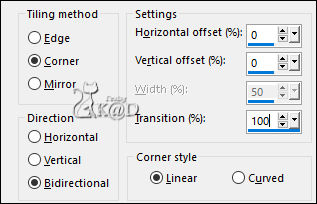
Plugins – Image effects – Seamless Tiling – see PS
Adjust – Blur – Gaussian Blur : 45
4
Layers – Duplicate
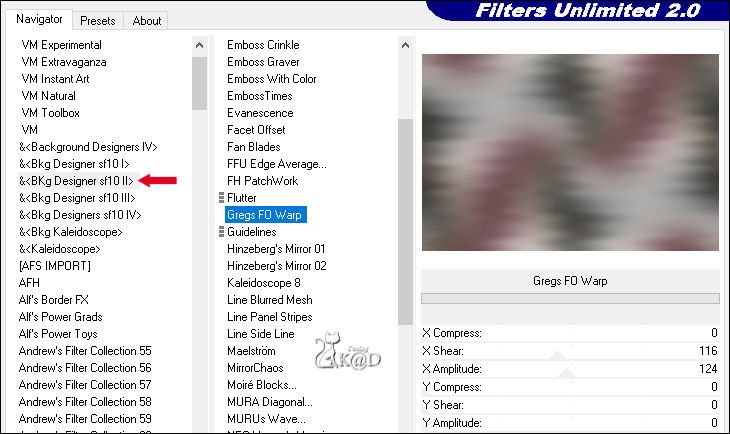
Plugins – Unlimited 2.0 – &<BKG Designers sf10II> – Gregs FO Warp – Default – see PS
5
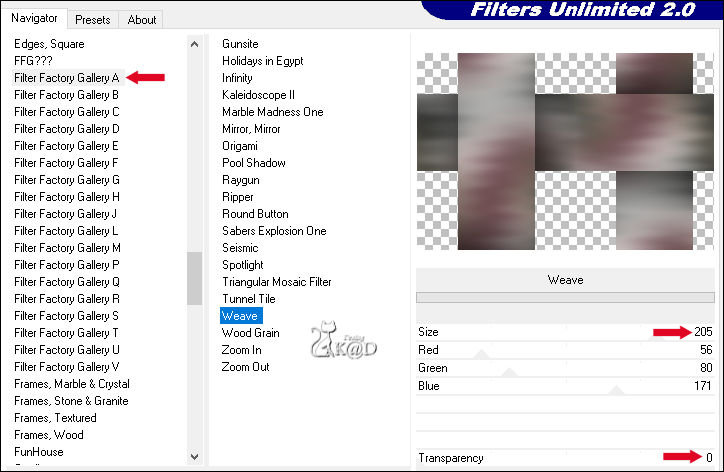
Plugins – Unlimited 2.0 –FFGA – Weave – see PS
Layers – Duplicate
Image – Mirror & Flip
Blend mode = Screen
Result
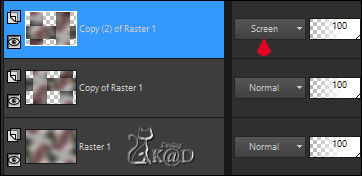
Layers – Merge – Merge visible (Merged)
6
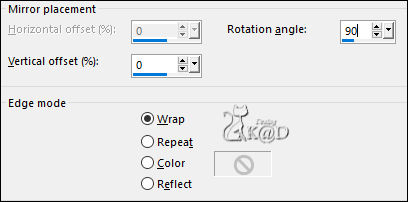
Effects – Reflection effects – Rotating Mirror– see PS
7
Selections – Load/Save Selection – Load Selection From Alpha Channel – Selectie 1 – see PS
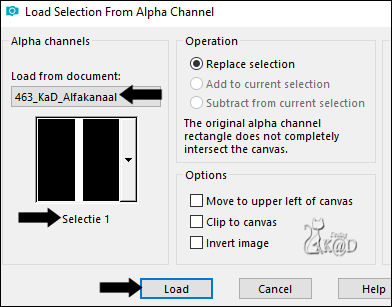
Selections – Promote selection to layer (Promoted Selection)
Layers – New Raster layer (Raster 1)
Fill with foreground
Selections – Edit – Contract selection : 2
Press Delete on the keyboard
Select none
Layers – Merge – Merge down
8
Plugins – Italian Editors Effect – Effetto Fatasma : 9 -2
Adjust – Sharpen – Sharpen
Layers – Duplicate (Promoted Selection Shadow 1
Image – Mirror
Layers – Merge – Merge down (Promoted Selection)
9
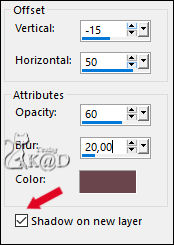
Effects – 3D-effects – Drop shadow – On New Layer : (Promoted Selection Shadow 1)
V -15 – H 50 – 60 – 20 – Color 4 – see PS
10
Stay on the shadow layer (Promoted Selection Shadow 1)
Plugins – Carolaine & Sensibility – CS-HLines – see PS
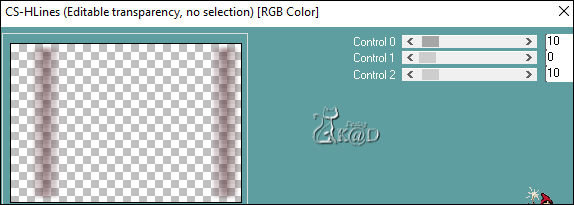
Press op Link/Unlink until shadow under the symbol is gone HELP – see PS
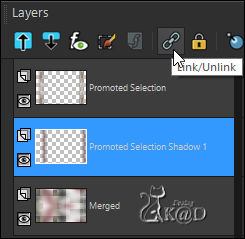
Effects – Edge Effects – Enhance Edges
11
Layers – New Raster layer (Raster 1)
Selections – Load/Save Selection – Load Selection From Alpha – Selectie 2 – see PS
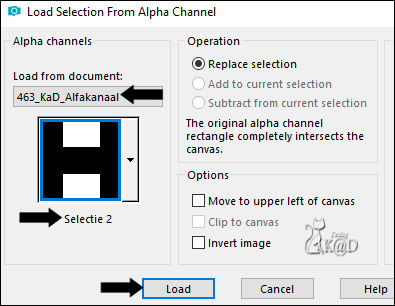
Fill selection met background color
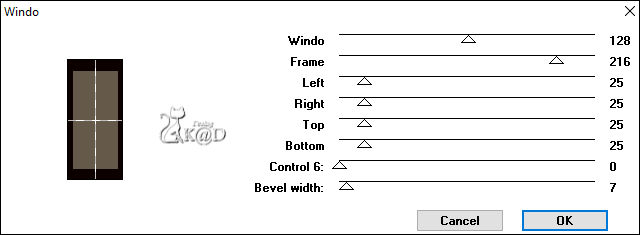
Plugins – Mock – Windo* – Default – see PS
* If you don’t have the two bottom controls in your plugin, that’s ok.
12
Plugins – AAA Frames – Foto Frame – see PS
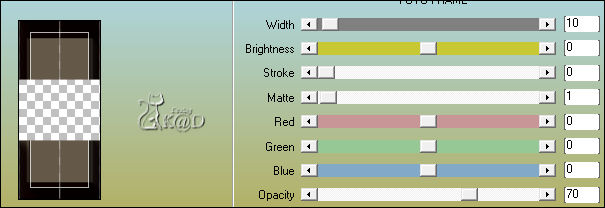
Select none
13
Plugins – 3D-effects – Drop shadow : V -15 – H -20 – 80 – 20 – Color 4 *
* No check mark new layer !
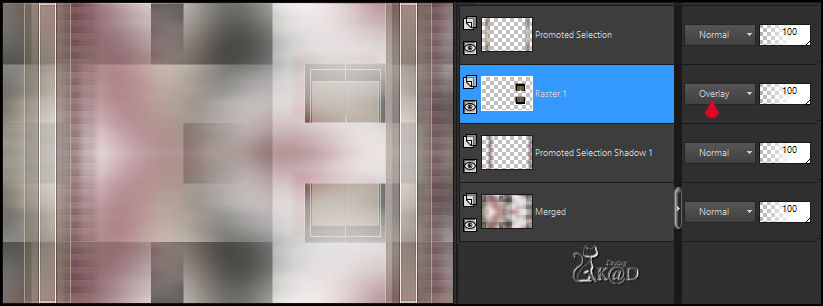
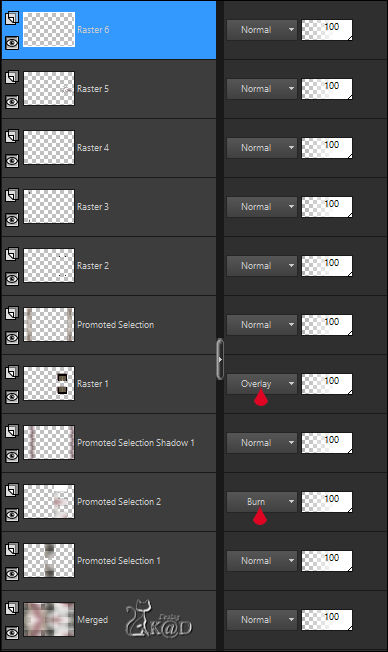
Blend mode = Overlay
13-1
Effects – Edge Effects – Enhance Edges
Result
14
Activate bottom layer (Merged)
Selections – Load/Save Selection – Load Selection From Alpha Channel – Selectie 3 – see PS
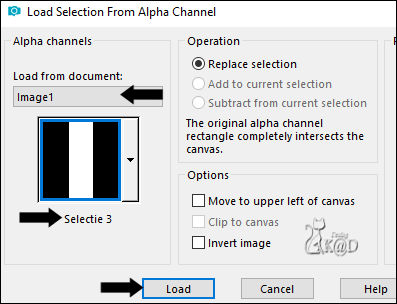
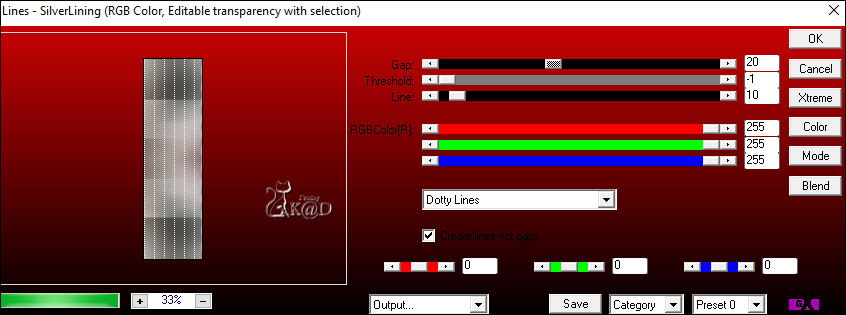
Selections – Promote selection to layer (Promoted Selection 1)
Plugins – AP 01 [Innovations] – Lines – Silverlining – Dotty Lines – zie PS
15
Selections – Load/Save Selection – Load Selection From Alpha Channel – Selectie 4 – see PS
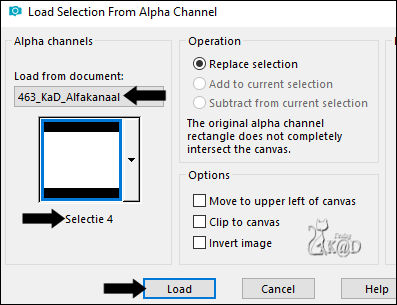
Press Delete on the keyboard
Select none
16
Activate bottom layer (Merged)
Selections – Load/Save Selection – Load Selection From Alpha Channel – Selectie 5 – see PS

Selections – Promote selection to layer (Promoted Selection 2)
Plugins – AP 01 [Innovations] – Lines – Silverlining – Horizontal – see PS

Select none
17
Plugins – 3D-effecten – Drop shadow – V&H 0 – 40 – 20 – Color #000000
Layers – Move – Move layer up
Blend mode = Burn
18
Set foreground color to Color 4
Activate top layer (Promoted Selection)
Layers – New Raster layer (Raster 2)
Selections – Load/Save Selection – Load Selection From Alpha Channel – Selectie 6 – see PS
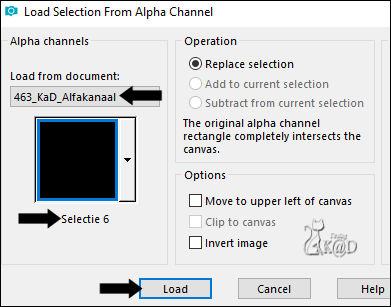
Fill with foreground color
Select none
Plugins – Alien Skin – Eye Candy 5 – Impact – Glass – CLEAR
19
Layers – New Raster layer (Raster 3)
Selections – Load/Save Selection – Load Selection From Alpha Channel – Selectie 7 – see PS
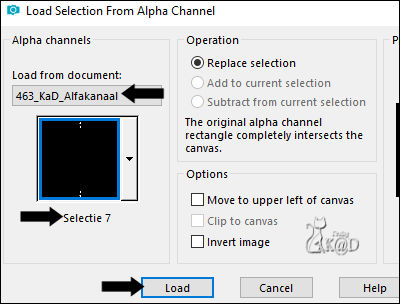
Fill with background color
Select none
Plugins – Alien Skin – Eye Candy 5 – Impact – Glass – CLEAR
20
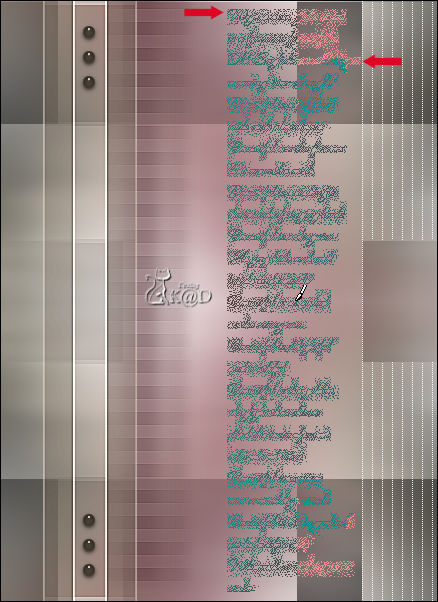
Activate : 463_KaD_TextWyetta and Export as a custom brush
Layers – New Raster layer (Raster 4)
Set foreground color to Color 1
Activate Paint brush (B) en activate de brush “463_KaD_TextWyetta” you just made
Stamp 1x met Foreground color – see PS
21
Activate and copy : 463_KaD_Text1
Edit – Paste – Past as a new layer (Raster 5)
Plugins – Alien Skin – Eye Candy 5 – Impact – Gradient Glow :
On the left side, choose the preset : 463_KaD_GradientGlow
On the tab Basic you can adjust the color.
Press K – Pos X : 660 – Pos Y : 239 – Press M HELP
(K : activate the Move Tool – M : deactivate the Move Tool)
22
Layers – New Raster layer (Raster 6)
Selections – Load/Save Selection – Load Selection From Alpha Channel – Selectie 8 – see PS
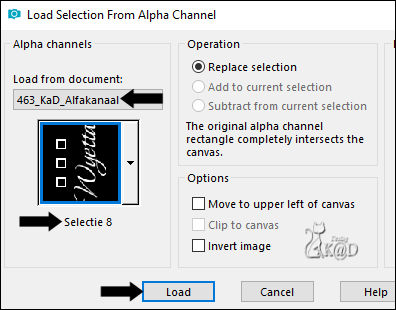
Fill selection with Foreground color
Select none
Plugins – 3D-effects – Drop shadow – V&H 1 – 35 – 1 – Color #000000
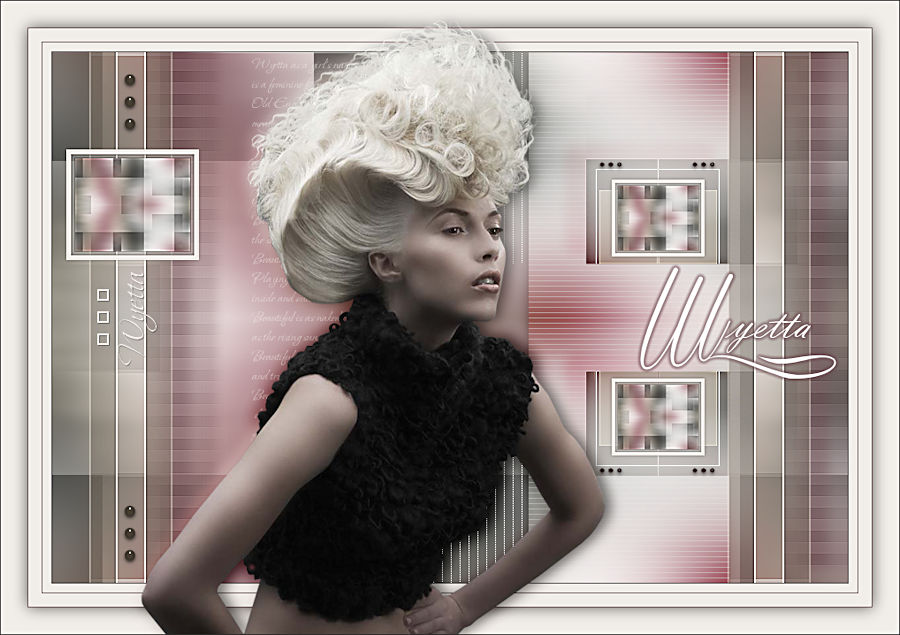
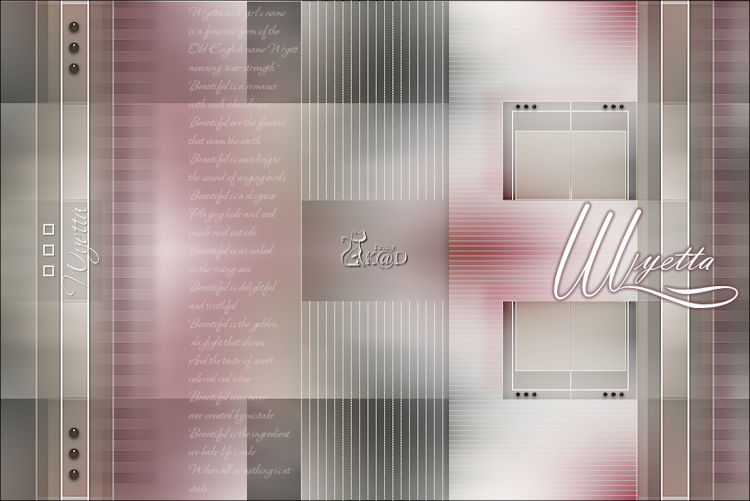
Result
Check your layers and blend mode carefully
23
Activate bottom layer (Merged)
Edit – Copy
Layers – Merge – Merge visible
24
Activate Frame : 463_KaD_Lijst
Window Duplicate
Click with Magic Wand in the middle of the frame (blank part)
Edit – Paste into selection
Select none
Adjust – sharpen – Sharpen
Put it aside for later (Save)
25
Back to your main work
Image – Add borders :
1 pix color 3
10 pix color 1
1 pix color 4
15 pix color 1
1 pix color 4
26
Select all
Image – Add borders : 30 pix color 1
Plugins – 3D-effect – Drop shadow – V&H 0 – 60 – 25 – Color #000000
Select none
27
Activate and copy: KaD_WomanFace56
Edit – Past as a new layer (Raster 2)
Image – Resize : 75%, no check mark for all layers
Press K – Pos X : 158 – Pos Y : 21 – Press M
28
Layers – duplicate (Copy of Raster 2)
Activate the layer just below (Raster 2)
Adjust – Blur – Gaussian Blur : 10
Blend mode = Overlay
29
Activate top layer (Copy of Raster 2)
Plugins – 3D-effects – Drop Shadow – V 0 – H 7 – 50 – 20 – Color #000000
30
Activate en copy the image you made at #24
Back to main work
Edit – Past as new layer (Raster 3)
Press K – Pos X : 74 – Pos Y : 168 – Press M
31
Layers – Duplicate (Copy of Raster 3)
Image – Resize : 70%, no check mark for all layers
Press K – Pos X : 691 – Pos Y : 202 – Press M
31
Layers – Duplicate (Copy (2) of Raster 3)
Image – Flip
Layers – Merge – Merge down 2x
Plugins – 3D-effects – Drop Shadow – V&H 0 – 40 – 5 – Color #000000
32
Add your name or watermark,
Add my watermark to your creation HERE
33
Image – Add Borders : 1 pix color 3
Image – Resize – Width 900 Pixels – Resize all Layers checked
Adjust – Sharpen – Unsharp Mask : 2 – 30 – 2 – no check marks
Save as JPG file and you're done!
I hope you liked this tutorial
Karin
21/02/2019
E-mail me your result 
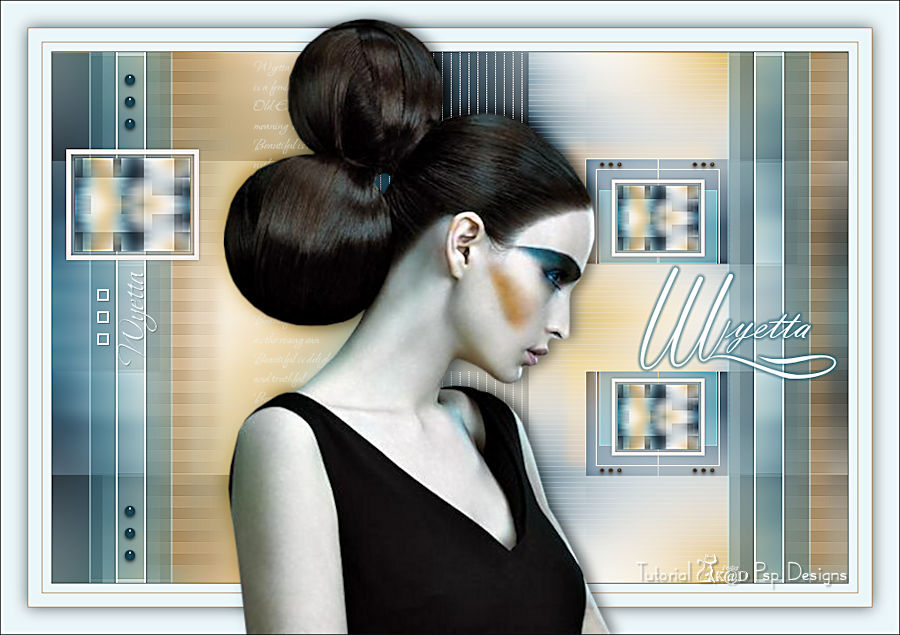
Extra Example – Tube : Bellisimo Tubes
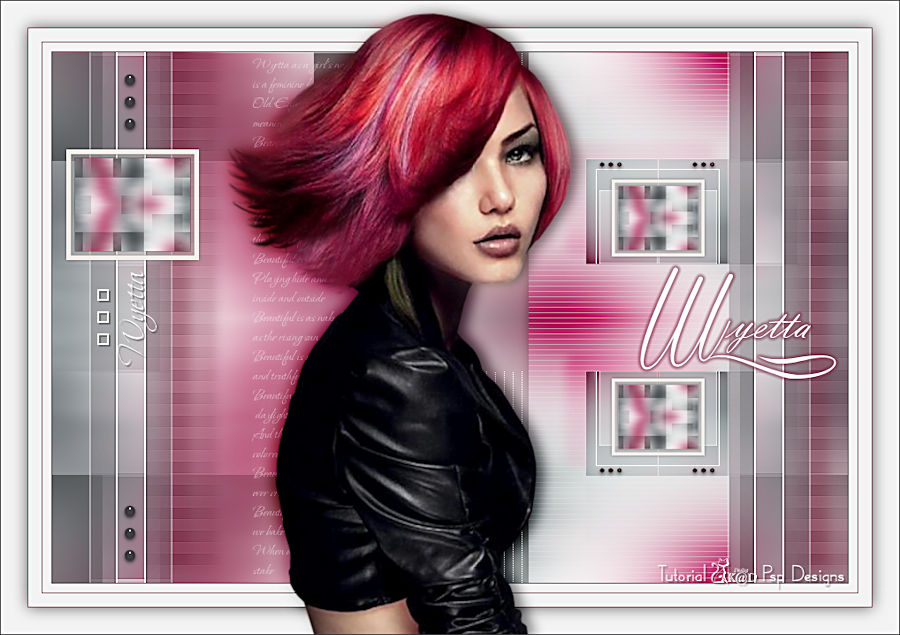
Extra Example – Tube : SVB

Click on the banner below to go to the galllery.


