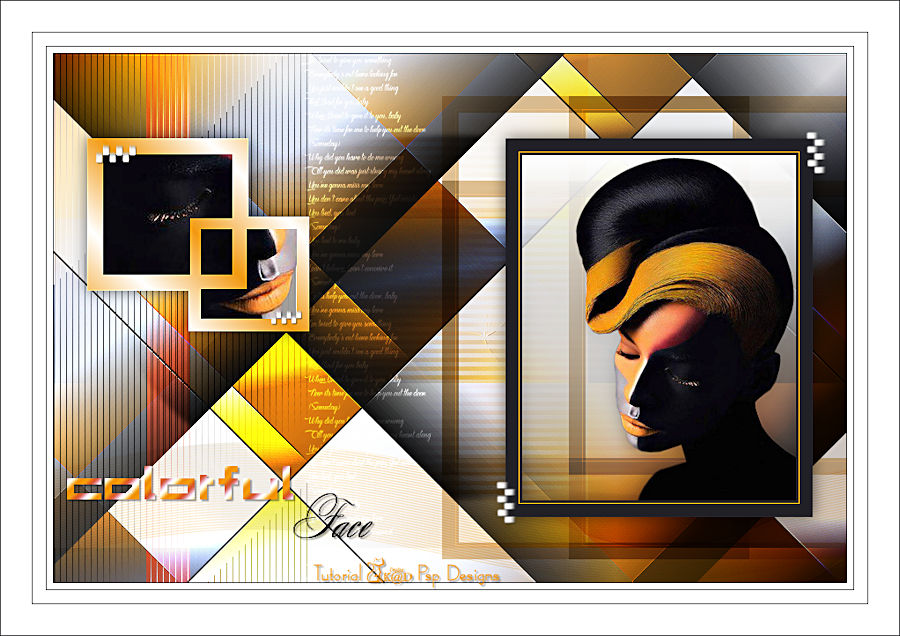
Algemene voorbereidingen :
General preparations :
First install the filters that you did not have, before you open PSP !!
Open your tubes in PSP, duplicate them and close the originals.
Do not forget to remove the watermarks on the copies.
Plugins HERE en HERE
Permission tubes HERE
Blank color palette Alpha channel : HERE
Materials : HERE
Materials for the tutorial :
Disclaimer:
Each Graphic is the property of the original artist to whom the copyright belongs and may
not be placed in a collection or offered for sale on-line or otherwise.
Tubes :
(*) If you recognize them as one of your own, please let me know, so I can add your name or remove the tube.
Open your tubes in PSP, duplicate them and close the originals.
Do not forget to remove the watermarks on the copies.
1/ KaD_WomanFace59
2/ 467_KaD_Deco1
3/ 467_KaD_Deco2
4/ 467_KaD_Deco3
5/ 467_KaD_Text2
Alpha Selections : open in PSP en minimize
1/ 467_KaD_Alfakanaal (this image is not empty – it contains alpha selections)
Color palette :
If you work with your own colors, make your own color palette with the alpha channel,
so you can easily switch between your colors.
When working with your own colors, play with the Blend Mode and/or Opacity at your own discretion
There are color differences in the different versions of Psp.
Therefore, use the html codes of the color palette to be sure,
that you have the same colors. Also when merging layers, there may be color differences.

Plugins :
1/ Mehdi : Wavy Lab 1.1
2/ °V° Kiwi’s Oelfilter : Zig Zag – Videowand
3/ Simple : Left Right Wrap – Diamonds
4/ FM Tile Tools : Blend Emboss
5/ Italian Editors effect : Effetto Fantasma
6/ Visual Manipulation : Transmission
7/ Tramages : Tow the Line
(-) Import into Filters Unlimited
------------------------------------------------
TUTORIAL
From now on I use the terms "MIRROR" and "FLIP" again.
Mirror: Mirror horizontal - Flip: Mirror vertical
Let’s get started.
Remember to save your work often
Colors :
Foreground color : Color 1
Background color : Color 2
TIP: Also use these colors if you work with your own colors.
Change only the colors 4 and 5 with a color from your tube.
1
Open the alpha channel :
Window – Duplicate
Minimize the original – we continue on the copy
2
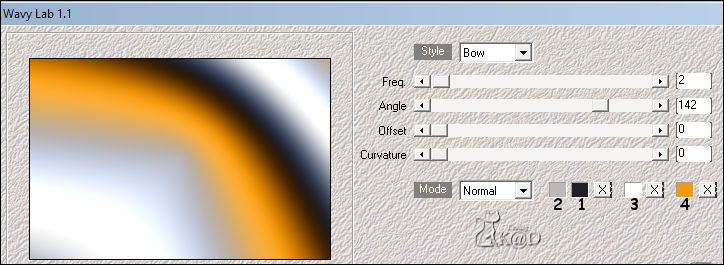
Plugins – Mehdi – Wavy Lab 1.1 – see PS
3
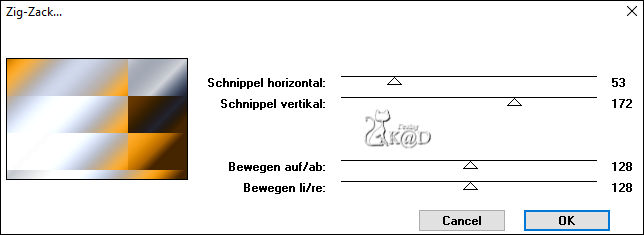
Plugins - °V° Kiwi’s Oelfilter – Zig Zack – see PS
4
Layers – Duplicate (Copy of Raster 1)
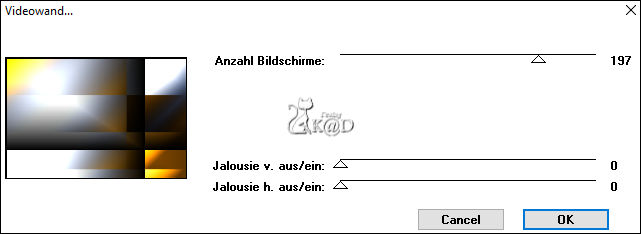
Plugins - °V° Kiwi’s Oelfilter – Videowand – see PS
5
Effects – Edge effects – Enhance
6
Plugins – Simple – Left Right Wrap
7
Plugins – Simple – Diamonds
8
Selections – Load/Save Selection – Load Selection From Alpha Channel – Selectie 1 – see PS
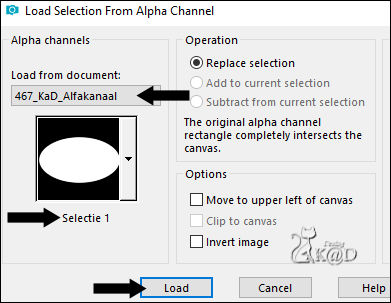
Selections – Promote selection to layer (Promoted Selection)
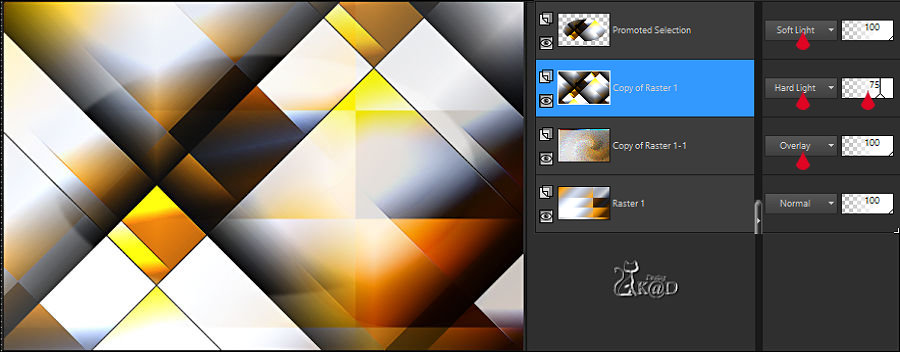
Blend Mode = Soft Light
Select none
9
Set Blend Mode for the middle layer (Copy of Raster 1) to Hard light en layer opacity to 75
10
Activate Raster 1
Layers – Duplicate (Copy of Raster 1)
Rename this layer “Copy of Raster 1-1” (It’s clearer on the print screens)
Adjust – Blur – Radial blur – see PS
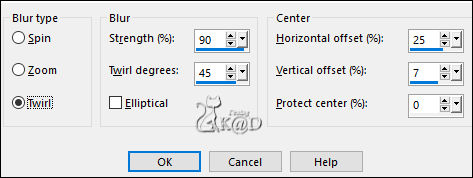
Plugins – FM Tile Tools – Blend Emboss – Default – see PS
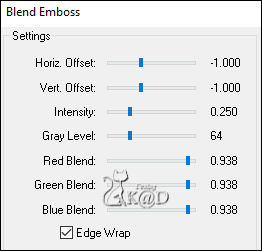
Adjust – Sharpen – Sharpen More
11
Effects – Edge effects – Enhance more
Blend mode = Overlay
Result
12
Set background color to color 4
Layers – New Raster Layer (Raster 2)
Lavers – Move – Move to top
Selections – Load/Save Selection – Load Selection From Alpha Channel – Selectie 2 – see PS
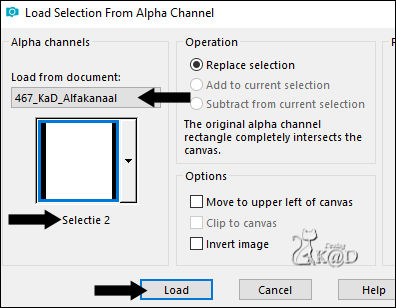
Fill with foreground color
Selection – Edit – Contract 15 pix
Fill with background color
Selection – Edit – Contract 1 pix
Fill with foreground color
Selection – Edit – Contract 3
Press Delete on the keyboard
Keep selection !
13
Change foreground color to Gradient : Linear : 0 – 0 – Fading White – see PS
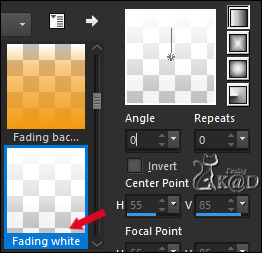
Layers – New Raster Layer (Raster 3)
Fill selection with Gradient
Keep selection !
14
Activate : KaD_WomanFace59
Image – Mirror
Edit – copy
Back to your main work
Edit – Past as new layer (Raster 4)
Image – Resize : 55%, no check mark all layers
Move the tube into selection – see PS
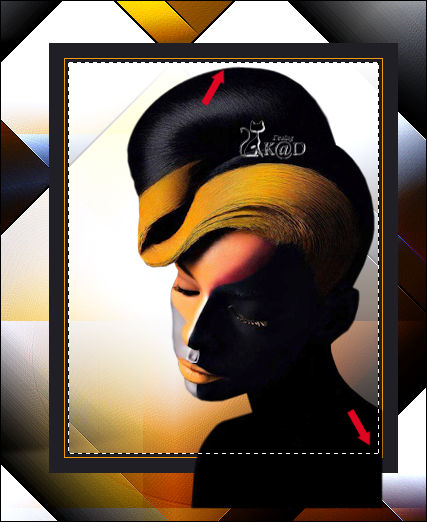
Selection Invert
Press Delete on the keyboard
Select none
15
Activate Raster 2 (= frame)
Layers – Duplicate
Plugins – Italian Editors effect – Effetto Fantasma : 41 – 41
Blend Mode = Multiply
Layers – Move – Move down
16
Activate Raster 4 (top layer)
Layers – Merge – Merge Down 2x
Adjust – Sharpen – Sharpen
Effects – 3D-effects – Drop Shadow : V&H 0 – 60 – 25 – Color #000000
17
Change foreground color to color 3
Change foreground color to Gradient Foreground-Background: Linear – see PS
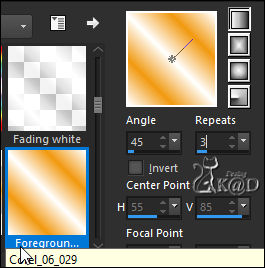
Layers – New Raster Layer (Raster 3)
Selections – Load/Save Selection – Load Selection From Alpha Channel – Selectie 3 – see PS
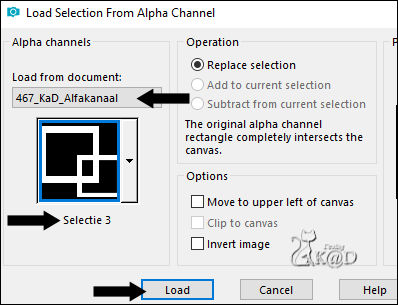
Fill with gradient
17-1
Change foreground gradient back to color
Bring Opacity filling tool down to 70
Layers – New Raster Layer (Raster 4)
Selections – Load/Save Selection – Load Selection From Alpha Channel – Selectie 4 – see PS
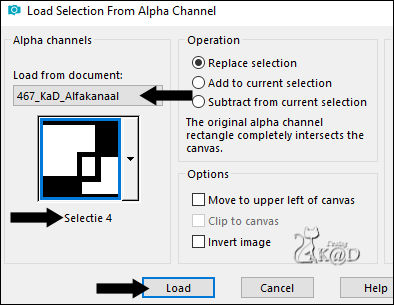
Fill with foreground color
18
Activate: KaD_WomanFace59
Image – Mirror
Edit – copy
Edit – past as new layer (Raster 5)
Move the eye and mouth into selection – see PS
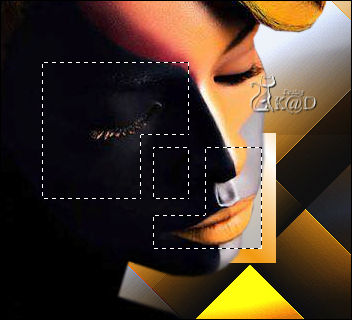
Selection invert
Press Delete on the keyboard
Select none
19
Layers – Merge – Merge down 2x
Effects – 3D-effects – Drop Shadow: V&H 0 – 60 – 25 – Kleur #000000
Adjust – Sharpen – Sharpen
Result
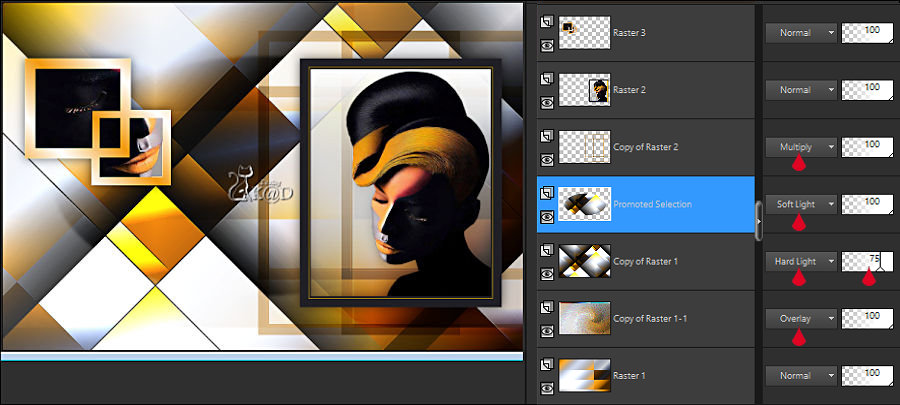
20
Activate Copy of Raster 1-1 (see PS above)
Selections – Load/Save Selection – Load Selection From Alpha Channel – Selectie 1 – see #8
Plugins – Visual Manipulation – Transmission – see PS

Select none
21
Activate & copy : 467_KaD_Deco2
Edit – Paste as a new layer (Raster 4)
Layers – Move – Move up 2x
Objects – Align – align vector object : Bottom (X : 0 – Y: 441)
Blend Mode = Multiply
22
Activate & copy : 467_KaD_Text2
Edit – Paste as a new layer (Raster5)
Press K – Pos X : 281 – Pos Y : 2 – Press M HELP
(K : activate the Move Tool – M : deactivate the Move Tool)
Blend Mode = Overlay
23
Activate & copy : 467_KaD_Deco1
Edit – Paste as a new layer
Layers – Move – Move to top
Press K – Pos X : 48 – Pos Y : 88 – Press M
Effects – 3D-effects – Drop Shadow : V&H 1 – 50 – 1 – color #000000
24
Layers – New Raster layer (Raster 7)
Selections – Load/Save Selection – Load Selection From Alpha Channel – Selectie 5 – see PS
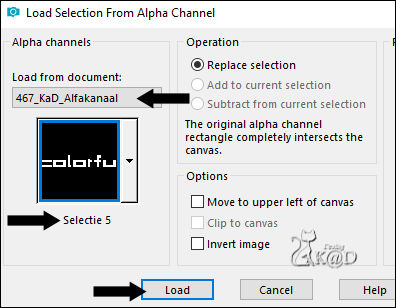
Plugins – Mehdi – Wavy Lab 1.1 – see PS

Select none
Effects – 3D-effects – Drop Shadow : V&H 2 – 35 – 2 – color #000000
25
Set background color to color 6 and opacity filling tool to 100
Layers – New Raster layer (Raster 8)
Selections – Load/Save Selection – Load Selection From Alpha Channel – Selectie 6 – see PS
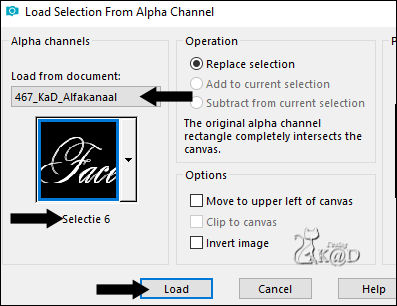
Fill with background color
Select none
Effects – 3D-effects – Drop Shadow : V&H 2 – 35 – 2 – color #000000
26
Activate Promoted Selection – see PS
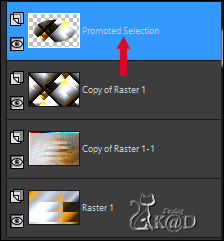
Activate & copy : 467_KaD_Deco3
Edit – past as new layer (Raster 9)
Press K – Pos X : 105 – Pos Y : 0 – Press M
Blend Mode = Overlay
27
Activate Raster 1
Selections – Load/Save Selection – Load Selection From Alpha Channel – Selectie 7 – see PS
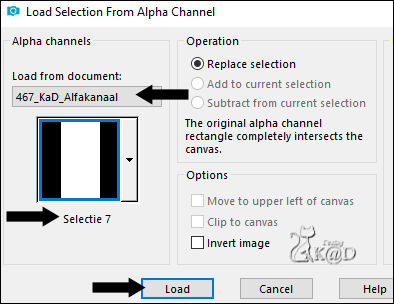
Selections – Promote selection to layer (Promoted Selection 1)
Plugins – Tramages – Tow the Line – Default
Blend Mode = Multiply
Select none
Result
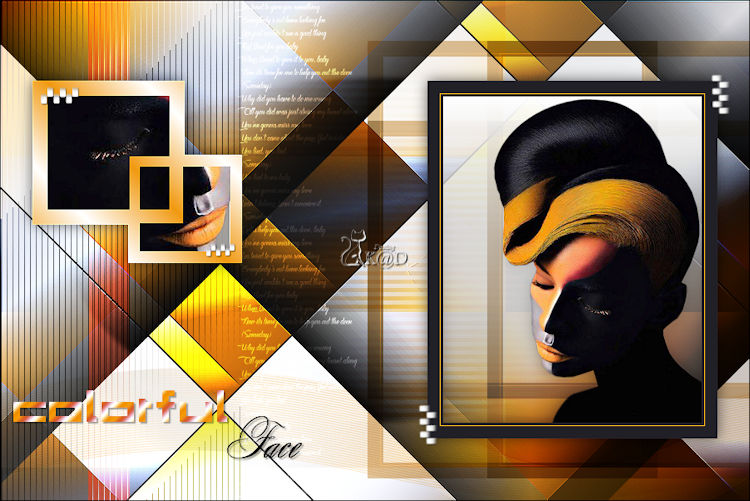
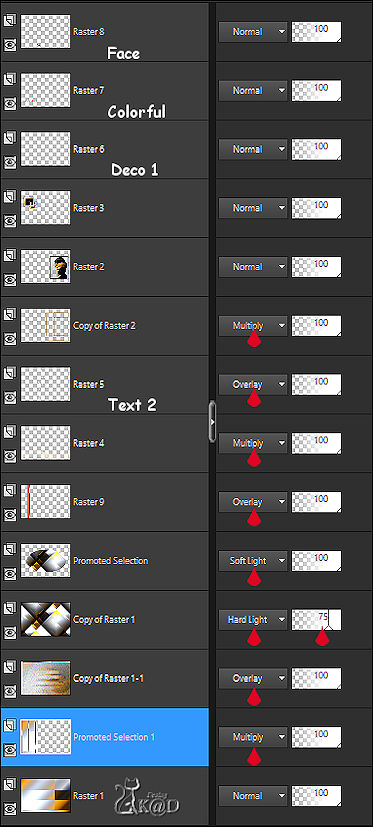
Layers – Merge – Merge all layers
28
Image – Add borders :
1 pix color 1
7 pix color 3
1 pix color 1
15 pix color 3
1 pix color 1
35 pix color 3
29
Add your name or watermark,
Add my watermark to your creation HERE
30
Image – Add borders : 1 pix color 1
Image – Resize - Width 900 Pixels - Resize all Layers checked
Adjust – Sharpen – Unsharp Mask : 2 – 30 – 2 – no check marks
Save as JPG file and you're done!
I hope you enjoyed this tutorial
Karin
21/03/2019
Je uitwerking mailen 
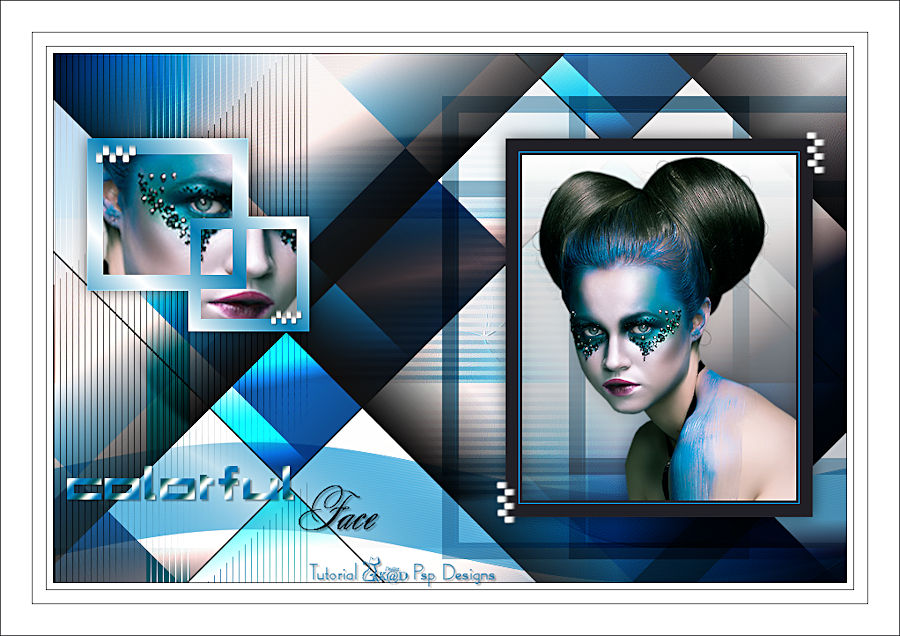
Extra vb – Tube : Calguis

Klik op de banner hieronder om naar de galerij te gaan.


