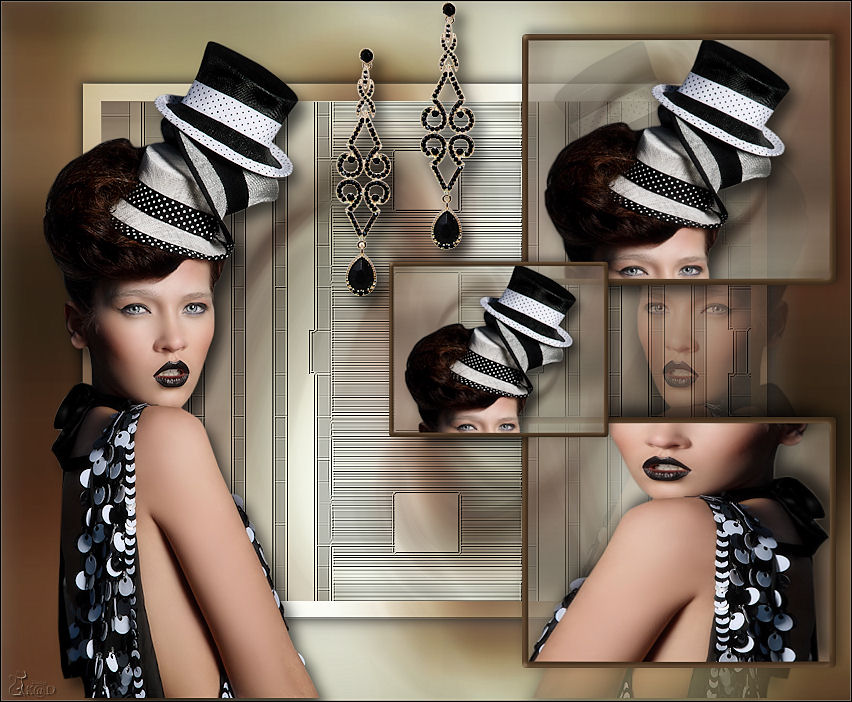
Crazy Hat

This tutorial is written with PSPX2
But can easily made with other versions
Preparations :
Open tubes in PSP
Install filters before you open PSP!
Install fonts in fonts folder in PSP
Install mask in your mask folder in PSP, unless otherwise specified
Install textures in texture folder in PSP
* If you recognize a tube as one of yours, please contact me so I can
give you credit or – if you wish – remove the tube.
Filters HERE
Material HERE
Materials :
Tubes :
1/ k@rine_ dreams _Lady_Hat_1576_Mars_2011
2/ calguisboucledoreillenoir9129
Background :
1/ background1 – K@D
Selections :
1/ CrazyHat1_K@D.PspSelection
Mask :
1/ sg_behind-bars2.PspMask
Filters :
Nik Color Efex (in zip)
---------------------------------------
Procedure
Let’s get started – Have Fun!
Remember to save your work often.
Colors : -
1
Open a new image – 650 – 500 pix – transparent
Selections – select all
2
Open background1
Edit – copy
Edit – paste into selection
Selections – none
3
Layers – duplicate
Layers – new mask layer
Find mask : sg_behind-bars2
* source luminance
4
Edge effects – enhance
Layers – merge group
Effects – 3D-effects – drop shadow : V&H 1 – 80 – 0
Layers – merge down
5
Image – canvas size : see print screen
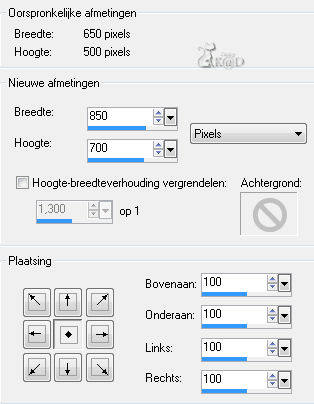
Layers – new raster layer
Selections – select all
Edit – paste into selection (background is still in memory)
Layers – arrange – sent to bottom
6
Effects – AAA Frames – photo Frame –see print screen
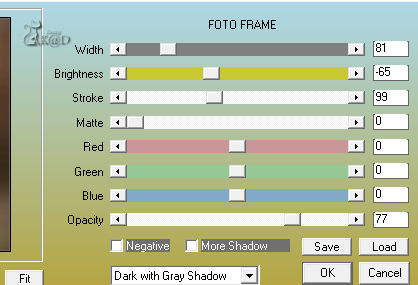
7
Effects – Nik Color Efex 3.0 – Glamour Glow – see print screen
Select on the left side : Glamour glow
See print screen
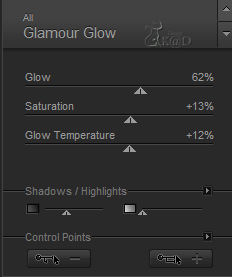
8
Selections - none
9
Activate top layer
Layers – new raster layer
Select rectangle – zie print screen
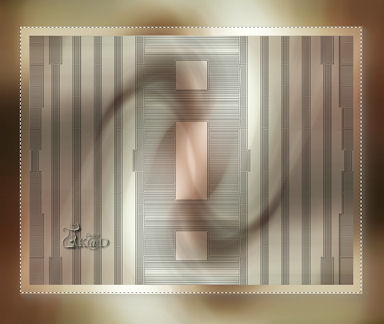
Effects – 3D-effects – drop shadow : V&H 4 – 50 – 18
Repeat with V&H -4
Selections – none
10
Selections – load from dis
Find selection : CrazyHat1
* source luminance – replace selection
Click load
11
Layers – new raster layer
Edit – paste into selection (background is still in memory)
Opacity at 65
Selections – modify – select selection borders
Both – 3 – check anti-alias
Layers new raster layer
Fill #4c3622
12
Effects – 3D-effects – inner bevel– see print screen
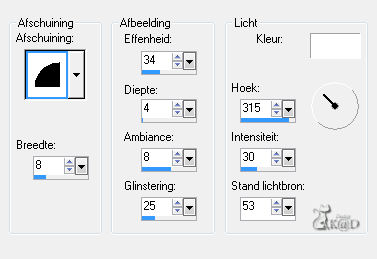
Selections - none
13
Selections – load from disk
Find selection : CrazyHat1
* source luminance – replace selection
Click load
14
Open tube : k@rine_ dreams _Lady_Hat_1576_Mars_2011
Duplicate : Shift D
Make selection – see print screen
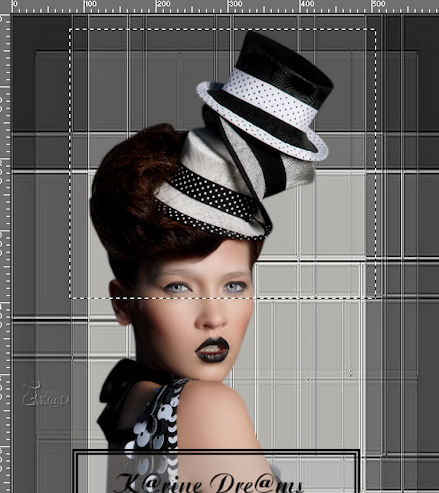
Edit - copy
15
Layers – new raster layer
Edit – paste into selection
Selections – none
16
Effects – 3D-effects –drop shadow : V10 – H8 – 65 – 20
17
Layers – arrange – move down
Activate top layer
Layers – merge down
Repeat 1x
18
Effects – 3D-effects – dropshadow : V-4 – H 4 – 50 – 18
19
Selections – load from disk
Find selection : CrazyHat1
* source luminance – replace selection
Click load
20
Layers – new raster layer
Open background
Edit – paste into selection
Opacity at 65
Selections – modify – select selection borders
Both – 3 – check anti-alias
Layers new raster layer
Fill with #4c3622
21
Repeat #12 – inner bevel
22
Open de copy van tube : k@rine_ dreams _Lady_Hat_1576_Mars_2011
Made selection – see print screen
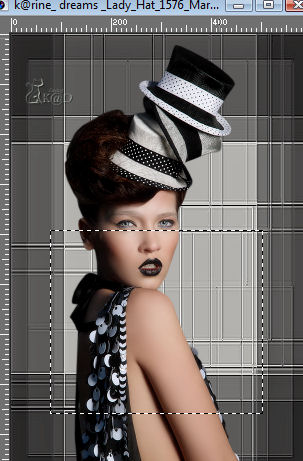
Image – mirror
Image – flip
Edit – copy
23
Selections – load from disk
Find selection : CrazyHat1
* source luminance – replace selection
Click load
Edit – paste into selection
Selections - none
24
Effects – 3D-effects – drop shadow : V10 – H8 – 65 – 20
25
Layers – arrange – move down
Activate top layer
Layers – merge down
Repeat 1x
26
Image - flip
Effects – 3D-effects –drop shadow : V-4 – H 4 – 50 – 18
27
Activate layer 2
Layers – duplicate
Image – resize : 70%, uncheck all layers
Layers – arrange – bring to top
Move into position – see example
28
Edit – copy
Edit – paste as a new layer
Image – resize 75%, uncheck all layers
Move to the left – see example
Effects – 3D-effects – drop shadow : V10 – H8 – 65 – 20
29
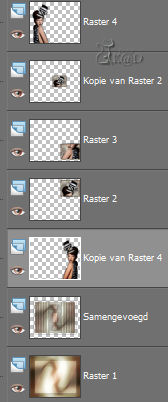
Layers – duplicate
Repeat # 7
Image – mirror
Layers – arrange – move down (4x)
This layers should be just above the layer merged – see print screen
Opacity at 40
30
Activate top layer
Open tube : calguisboucledoreillenoir9129
Close the watermark layer
Edit – copy merged
Edit – paste as a new layer
Image – mirror
Image – resize : 27%, uncheck all layers
Move into position - see example
Effects – 3D-effects – drop shadow : V10 – H8 – 65 – 20
31
Layers – new raster layer
Place your name and/or watermark
32
Image - add borders – 1 pix black
33
Image – resize : 620 pix
34
Adjust – sharpness – unsharp mask : 1 – 64 – 4
35
Save as .jpg
Your image is ready
I hope you enjoyed making it
Hugs,
K@rin – K@D’s Designs
04-04-2011


