Summerday - Blend
This tutorial is written with PSPX2
But can easily made with other versions
Preparations :
Open tubes in PSP
Install filters before you open PSP!
Install fonts in fonts folder in PSP
Install mask in your mask folder in PSP, unless otherwise specified
Install textures in texture folder in PSP
* If you recognize a tube as one of yours, please contact me so I can
give you credit or – if you wish – remove the tube.
Filters HERE
Material HERE
Materials :
4 Tubes :
1/ Liza TubeLady with striped hat 29-6-2010 - Liza
2/ KaraT6022 - Kara
3/ !cid_3E1F2761-993B-4C9C-A9EF-7995ACC7438B-1 – Fafy
4/ 12206401743_fleurs - Reveries
Mask :
1/ SophisticatSimone_Mask9
Filters :
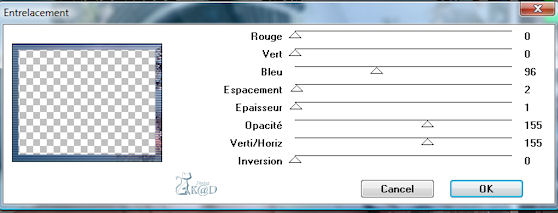
1/ Jeux de ligne - entrelacement
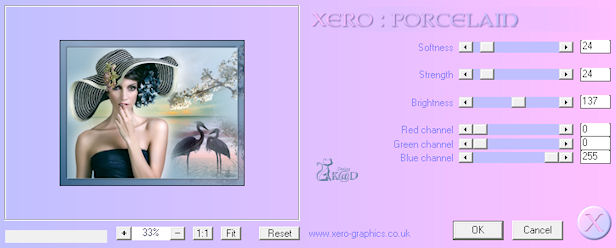
2/ Xero - Porcelaine
----------------------------------------
Procedure
Let’s get started – Have Fun!
Remember to save your work often.
Colors :
Foreground : #c1d3df
Background : #447186
Gradient : Foreground : Lineair : 45 – 0, check invert
1
Open a new image – 650x500 pix – transparent
Fill with gradient
2
Open tube : KaraT6022
Edit – copy
Edit – paste as a new layer
Image – mirror
Move a bit up – see example
3
Open tube : !cid_3E1F2761-993B-4C9C-A9EF-7995ACC7438B-1
Edit – copy
Edit – paste as a new layer
Image – resize : 80%, uncheck all layers
Move to the right and down – see example
4
Open tube : 12206401743_fleurs
Edit – copy
Edit – paste as a new layer
Image – mirror
Image - flip
Image – resize : 50%, uncheck all layers
Opacity : 75
Move up and to the right – see example – a big part falls outside your crea
5
Layers – merge visible
Edit – copy
Edit – paste as a NEW image
Minimalize this, we need it later
6
Back to your crea
Layers – new raster layer
Fill with foreground
7
Layers – new mask layer – from image
Look for your mask
Luminance from source – invert mask properties
Layers – merge group
Opacity 35
Effects – edge effects - enhance
6
Open tube : Liza TubeLady with striped hat 29-6-2010
Edit – copy
Edit – paste as a new layer
Image – resize : 85%, uncheck all layers
Move left against the edge
7
Layers – duplicate
Adjust – blur – Gaussian : 25
Blend mode : dodge
Layers – arrange – move down
8
Activate top layer
9
Image – add borders
1 pix foreground : #c1d3df
25 pix white
15
Select the white border with magic wand – anti-alias – inside
Change gradient to Liniair : 45 – 1, check invert
Fill border with gradient
16
Layers – new raster layer
Open the minimalized image
Edit – copy
Back to your crea
Edit – paste into selection
Opacity : 55
17
Effects – Jeux de Ligne – Entrelacement – see print screen

18
Selections – invert
Effects – 3D-effecten – drop shadow : V&H 5 – 65 – 5
Repeat with V&H -5
Selections – none
19
Layers – new raster layer
Place your name and/or watermark
Layers – merge all
20
Image – resize : 650 pix
21
Effects – Xero – Porcelain – see print screen

22
Save as .jpeg
Your image is ready
I hope you enjoyed making it
Hugs, K@rin
12-07-2010
