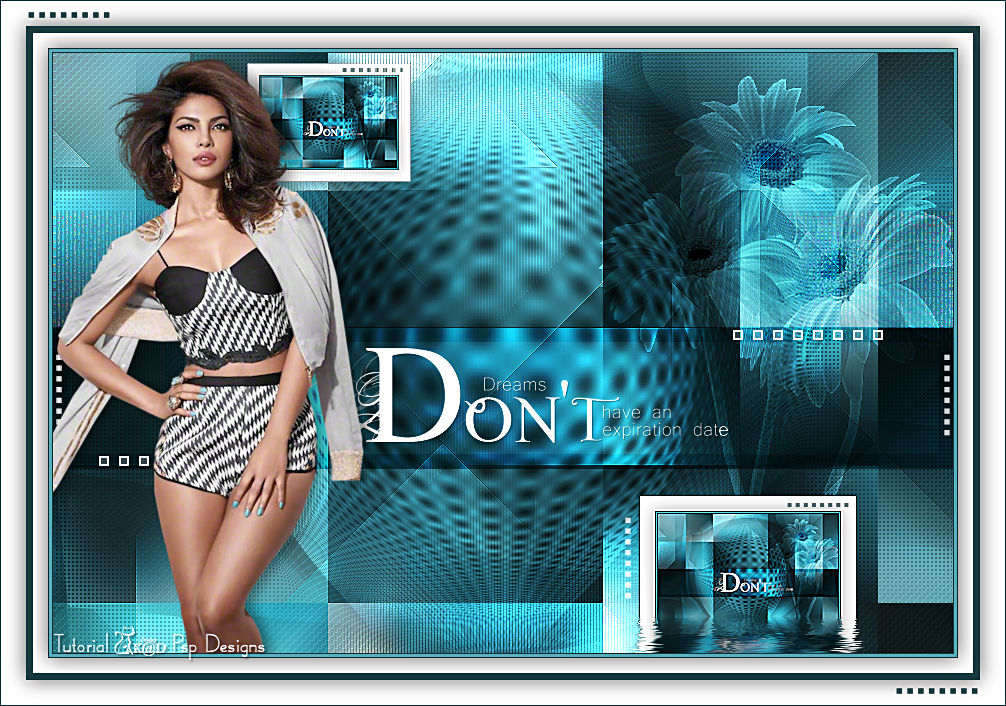
Problem with the alfakanaal ? HERE another version.
Materials for the tutorial :
Disclaimer :
Each Graphic is the property of the original artist to whom the copyright belongs and
may not be placed in a collection or offered for sale on-line or otherwise.
Choose a tube of a woman, complete or bust
I’m using a tube from SvB
1/ BL22_Deco1
2/ BL22_Deco2
3/ BL22_Deco3
Alpha Selections : open in PSP and minimize
1/ BL22_KaD_Alfakanaal (this image is not empty – it contains alpha selections)
Filter Preset : you can leave it in the materials folder
1/ BL22_KaD_FloodPreset
Color palette :
If you work with your own colors, make your own color palette with the alpha channel,
so you can easily switch between your colors.
There are color differences in the different versions of Psp.
Therefore, use the html codes of the color palette to be sure,
that you have the same colors. Also when merging layers, there may be color differences.
Plugins :
1/ Mehdi : Wavy Lab 1.1 – Sorting Tiles
2/ Flaming Pear : Flood
3/ Tramages : Tow the Line
(-) Import into Filters Unlimited
---------------------------------------
THE TUTORIAL
When working with your own colors, play with the Blend Mode and/or Opacity at your own discretion
From now on I use the terms "MIRROR" and "FLIP" again.
Mirror: Mirror horizontal - Flip: Mirror vertical
Let’s get started.
Remember to save your work often
Colors :
First, make your own color palette, so you can change your colors easily.
Color 1 (Foreground color) = #353536
Color 2 (Background color )= #a3a1a1
Color 3 : Light accent color from your tube
Color 4 : a darker version of color 3
Color 5 : white (#ffffff)
Color 6 : black (#000000)
1
Open the alpha channel : BL22_KaD_Alfakanaal
Window – Duplicate
Minimize the original – we continue on the copy
2
Start with same color 1 & 2
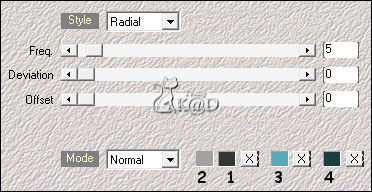
Plugins – Mehdi – Wavy Lab 1.1 – see PS
3
Adjust – Blur – Gaussiaans Blur : 35
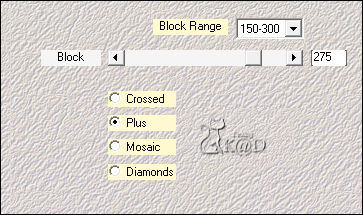
Plugins – Mehdi – Sorting Tiles – see PS
4
Layers – Duplicate (Copy of Raster 1)
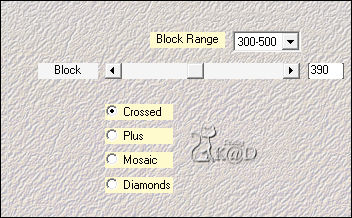
Plugins – Mehdi – Sorting Tiles – see PS
5
Effects – Image-effects – Seamless Tiling – see PS
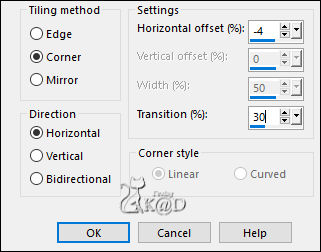
6
Effects – Edge effects – Enhance
Change Blend mode to Overlay and Layer opacity to 66
Layers – Merge – Merge down
7
Layers – Duplicate (Copy of Raster 1)
Image – Free rotate : Right – 90 – no checkmarks
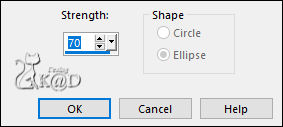
Effects – Geometric effects – Spherize – see PS
8
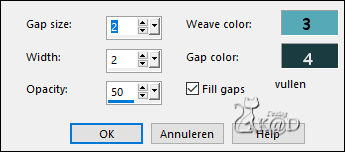
Effects – Texture effects – Weave – see PS
9
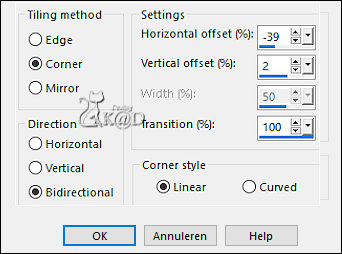
Effects – Image-effects – Seamless Tiling – see PS
10
Effects – Distortion effects – Warp – see PS
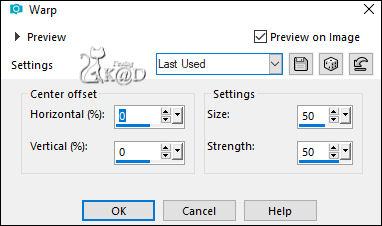
Repeat 1x
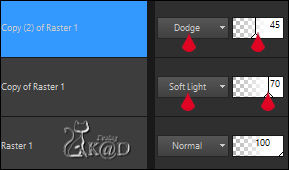
Change Blend mode to Soft Light and Layer opacity to 70
10-1
Layers – Duplicate
Change Blend mode to Dodge and Layer opacity to 45
Result
11
Layers – Merge – Merge visible (Merged)
12
Change foreground color to Color 4
Change background to Color 5 (white)
Layers – New Raster layer (Raster 1)
Selections – Load/Save Selection – Load Selection From Alpha Channel – Selectie 1 – see PS
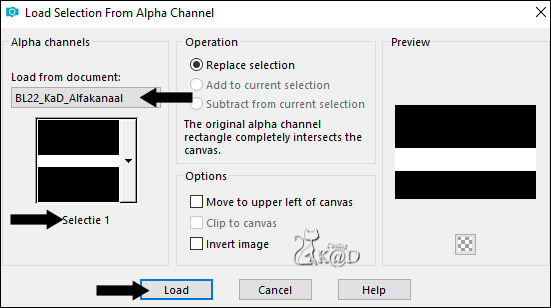
Fill with foreground color
12-1
Selection – Modify – Contract : 15
Press Delete on the keyboard
Change opacity Flood fill tool to 50
Fill with foreground color
Change opacity Flood fill tool back to 100
Select none
Change Blend mode to Overlay
13
Layers – New Raster layer (Raster 2)
Selections – Load/Save Selection – Load Selection From Alpha Channel – Selectie 2 – see PS
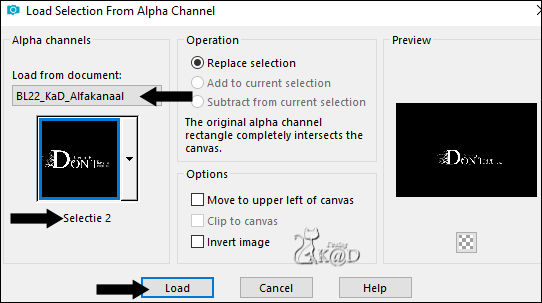
Fill with background color
Select none
Effects – 3D-effects – Drop Shadow : V&H 1 – 35 – 1 – Color #000000
14
Activate & copy : BL22_Deco1
Edit – Paste as a new layer (Raster 3)
Image – Mirror
Press K – Pos X : 545 – Pos Y : 22 – Press M HELP
(K : activate the Move Tool – M : deactivate the Move Tool)
Change Blend mode to Overlay
Adjust – Sharpen –Sharpen more
15
Edit – Copy – Copy merged
Edit – Paste as a new image
Image –Resize : 20%, all layers
15-1
Image – Add borders :
1 pix Color 4
1 pix Color 3
1 pix Color 4
Select all
15 pix Color 5
Effects – 3D-effects – Drop Shadow : V&H 0 – 40 – 20 – Color 4
Select none
Image – Add borders : 1 pix Color 4
Edit – Copy
16
Back to your work
Edit – Paste as a new layer (Raster 4)
Press K – Pos X : 586 – Pos Y : 442 – Press M
17
Layers – Duplicate (Copy from Raster 4)
Image –Resize: 75%, no checkmarks all layers
Press K – Pos X : 194 – Pos Y : 10 – Press M
Effects – 3D-effects – Drop Shadow : V&H 0 – 40 – 20 – Color #000000
Adjust – Sharpen –Sharpen more
18
Activate the layer below (Raster 4)
Adjust – Sharpen –Sharpen more
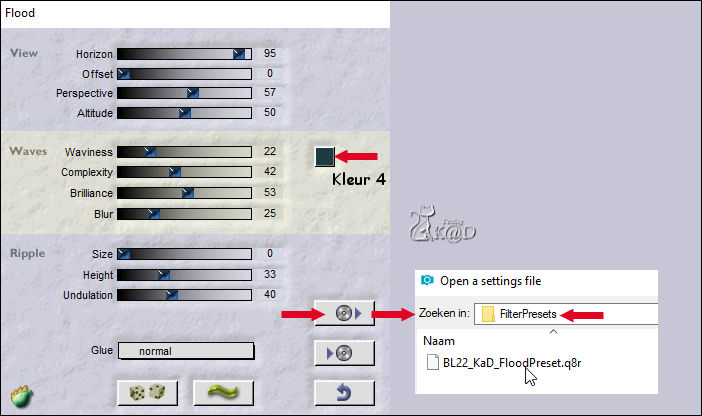
Plugins – Flaming Pear – Flood :
Click on the top disc and look for preset in the materials folder, or fill in the values manually – see PS
19
Activate & copy : BL22_Deco 2 (Raster 5)
Edit – Paste as a new layer
Layers – Arrange – Move to top
Press K – Pos X : 3 – Pos Y : 14 – Press M
20
Activate & copy : woman tube
Edit – Paste as a new layer (Raster 6)
Move to the left (against the edge)
Adjust size, sharpness if needed
21
Layers – Duplicate (Copy from Raster 6)
Activate the layer below (Raster 6)
Adjust – Blur – Gaussiaans Blur : 15
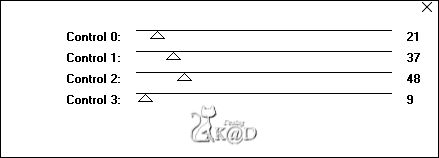
Plugins – Tramages – Tow the Line – see PS
22
Effects – Image-effects – Seamless Tiling – values are ok
Change Blend mode to Dodge
23
Activate top layer (Kopie van Raster 6)
Effects – 3D-effects – Drop Shadow: V 0 – H 7 – 50 – 20 – Color #000000
24
Your layer pallet should look like this
If ok, layers – Merge – Merge all
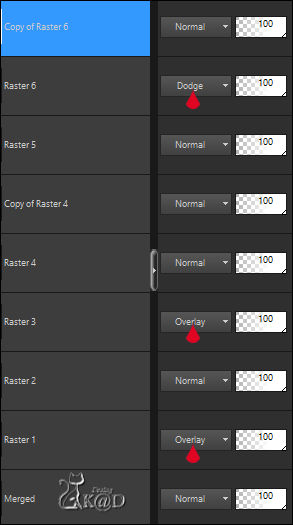
Image – Add borders :
1 pix Color 4
3 pix Color 3
1 pix Color 4
Select all
15 pix Color 5
Effects – 3D-effects – Drop Shadow: V&H 0 – 60 – 30 – Color #000000
Select none
25
Image – Add borders :
7 pix Color 4
Select all
25 pix Color 5
Effects – 3D-effects – Drop Shadow: V&H 0 – 60 – 30 – Color #000000
Select none
26
Activate & copy : BL22_Deco3
Edit – Paste as a new layer
Do not move
27
Add your name or watermark,
Add my watermark to your creation HERE
28
Image – Add Borders: 1 pix Color 4
Image – Resize – Width 900 Pixels - Resize all Layers checked
Adjust – Sharpen – Unsharp Mask : 2 – 30 – 2 – no check marks
Save as JPG file and you're done!
I hope you enjoyed this tutorial
Karin
04/09/2019
Email me your result 

