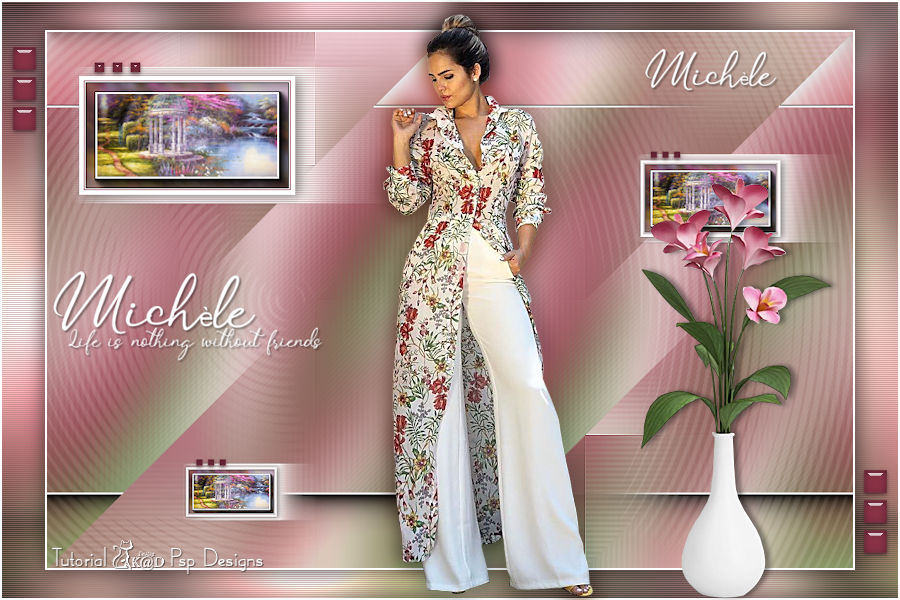
1/ Mina@.4070.MIST.paesaggio.05.16
2/ KaD_Woman_227
3/ KaD_Deco23
4/ 504_KaD_Element1 + 504_KaD_Element2
5/ 504_KaD_Element_FilterEyeCandy4000_MotionTrail *
* use if you don't have the filter
Alpha Selections : open in PSP and minimize
(this image is not empty – it contains alpha selections)
1/ 504_KaD_Alfakanaal
Filter Preset : Double click to install
1/ 504_KaD_Glass1
Color palette :
If you work with your own colors, make your own color palette with the alpha channel,
so you can easily switch between your colors.
There are color differences in the different versions of Psp.
Therefore, use the html codes of the color palette to be sure,
that you have the same colors. Also when merging layers, there may be color differences.

Plugins :
1/ Mehdi : Wavy Lab 1.1 – Sorting Tiles
2/ AAA Filters – Good Vibrations
3/ AAA Frames – Foto Frame
4/ Italian Editors – Effetto Fantasma
5/ EyeCandy 4000 – Motion Trail (element is included if you don't have this filter)
6/ Alien Skin – Eye Candy 5 – Impact
7/ Graphics Plus – Cross shadow
8/ Richard Rosenman – Solid border
(-) Import into Filters Unlimited
------------------------------------------------
THE TUTORIAL
When working with your own colors, play with the Blend Mode and/or Opacity at your own discretion
From now on I use the terms "MIRROR" and "FLIP" again.
Mirror: Mirror horizontal - Flip: Mirror vertical
Let’s get started.
Remember to save your work often
Some print screens have other colors than the original.
Colors :
Foreground color – Color 1 : #a1455c
Background color- Color 2 : #f7d9e1
1
Open the alpha channel : 504_KaD_Alfakanaal
Window – Duplicate
Minimize the original – we continue on the copy
2
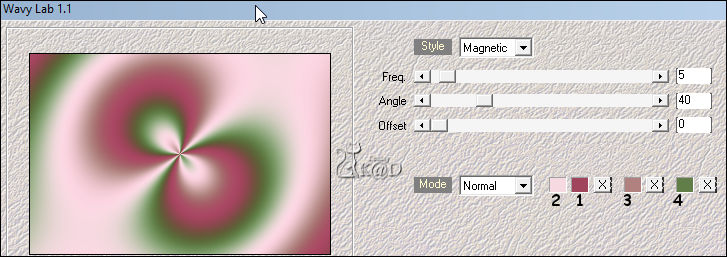
Plugins – Mehdi – Wavy Lab 1.1 – see PS
3
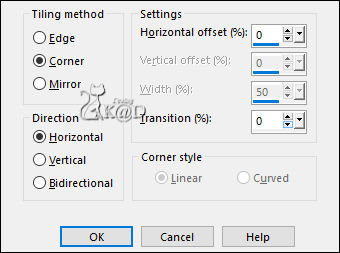
Effects – Image effects – Seamless Tiling – see PS
Adjust – Blur – Gaussian blur : 45
4
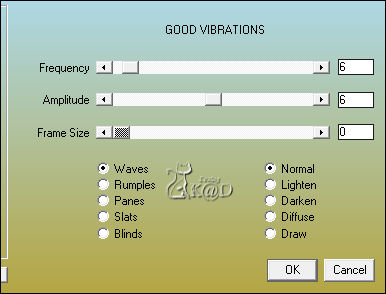
Plugins – AAA Filters – Good Vibrations – see PS
5
Layers – Duplicate (Copy of Raster 1)
Effects – Geometric effects – Skew – see PS
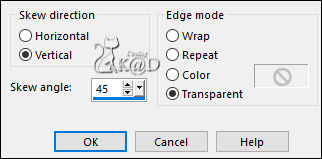
6
Effects – Image effects – Seamless Tiling – same values
7
Plugins – AAA Frames – Foto Frame – see PS
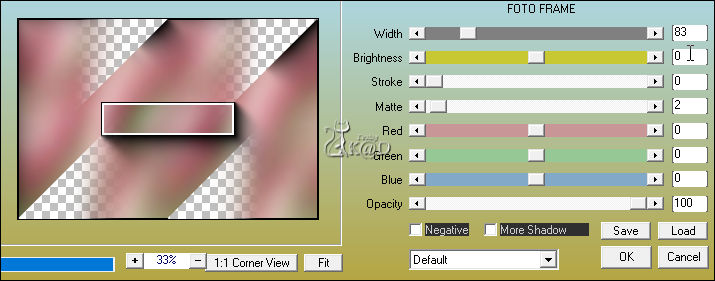
8
Effects – Image effects – Seamless Tiling – same values
9
Change Background color to Color 5 (#ffffff)
Layers – New Raster layer (Raster 2)
Change Opacity of the fill tool to 50
Selections – Load/Save Selection – Load Selection From Alpha Channel – Selectie 1 – see PS
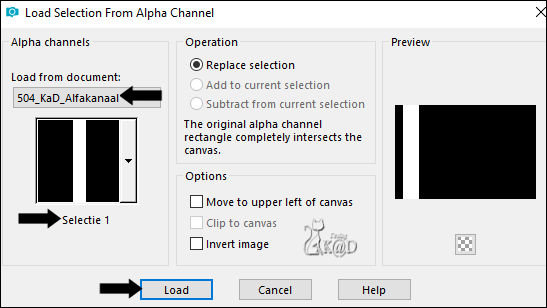
Fill with background color
Select none
Change Opacity of the fill tool back to 100
10
Plugins – Italian Editors – Effetto Fantasma : 16 – 16
11
Plugins – EyeCandy 4000 – Motion Trail* – see PS
* If you don't have this filter, use “504_KaD_Element_FilterEyeCandy4000_MotionTrail”
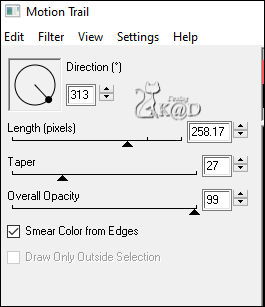
Layers – Duplicate
Image – Mirror and Flip
Layers – Merge – Merge down
Change Blend mode to Soft Light and Opacity to 30
12
Effects – Distortion effects – Wave – see PS

13
Effects – Distortion effects – Ripple – see PS

14
Activate Raster 1
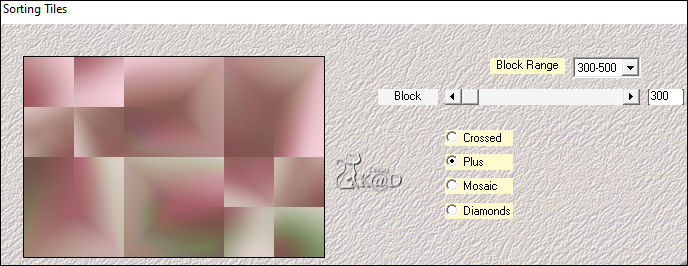
Plugins – Mehdi – Sorting Tiles – see PS
15
Effects – Edge effects – Enhance
16
Layers – New Raster layer (Raster 3)
Layers – Arrange – Bring to top
Selections – Load/Save Selection – Load Selection From Alpha Channel – Selectie 2 – see PS
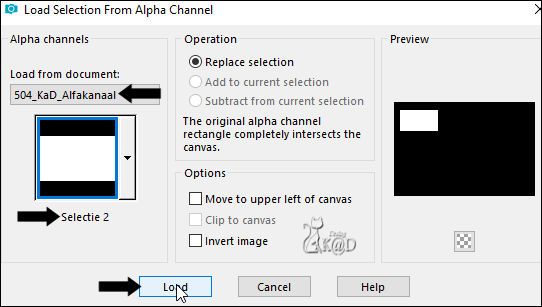
Fill with background color
Selections – Modify – Contract : 5
Fill with foreground color
Selections – Modify – Contract : 1
Fill with background color
Selections – Modify – Contract : 1
Press Delete on the keyboard
17
Activate Raster 1
Selections – Promote selection to layer (Promoted selection)
Layers – Arrange – Bring to top
Adjust – Blur – Gaussian blur : 10
Layers – Arrange – Move down
18
Layers – New Raster layer
Activate : Mina@.4070.MIST.paesaggio.05.16
Image – Mirror
Edit – Copy
Edit – Paste into selection
Image – Resize: 120%, all layers NOT checked
Move it back into selection
Adjust – Sharpness – Sharpen
Selection invert
Press Delete on the keyboard
Selection invert
19
Layer – Merge – Merge down (Promoted selection)
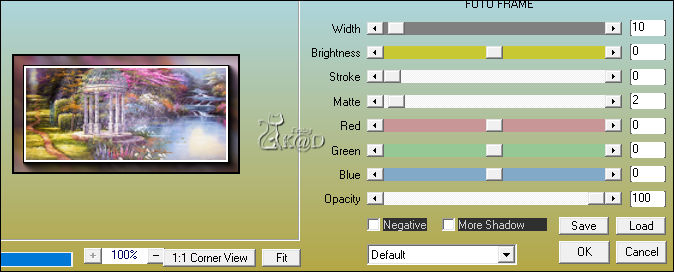
Plugins – AAA Frames – Foto Frame – see PS
Select none
20
Activate top layer (Raster 3)
Layers – Merge – Merge down (Promoted selection)
Effects – 3D-effects – Drop shadow : V 2 – H 5 – 40 – 20 – Color #000000
21
Layers – New Raster layer (Raster 3)
Selections – Load/Save Selection – Load Selection From Alpha Channel – Selectie 2 again

Selection – Modify – Expand : 10
Fill with background
Select none
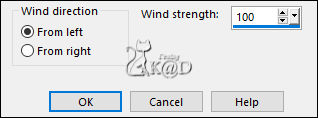
Effects – Distortion effects – Wind – see PS
22
Effects – Texture effects – Blinds – Color 3 – see PS
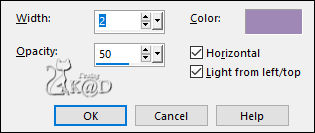
Layers – Arrange – Move down
23
Activate top layer (Promoted selection)
Layers – Merge – Merge down (Raster 3)
Layers – Duplicate
Image – Resize: 65%, all layers NOT checked
Press K – Pos X : 655 – Pos Y : 136 – Press M HELP
(K : activate the Pick Tool – M : deactivate the Pick Tool)
Adjust – Sharpness – Sharpen
24
Layers – Duplicate
Image – Resize: 65%, all layers NOT checked
Press K – Pos X : 152 – Pos Y : 481 – Press M
Adjust – Sharpness – Sharpen
25
Layers – New Raster layer (Raster 4)
Selections – Load/Save Selection – Load Selection From Alpha Channel – Selectie 3 – see PS
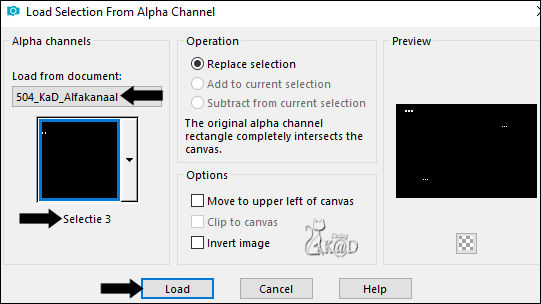
Fill with foreground color
Plugins – Alien Skin – Eye Candy 5 – Impact – Glass
Choose on the left the preset : 504_KaD_Glass – or fill in manually (Color 1)
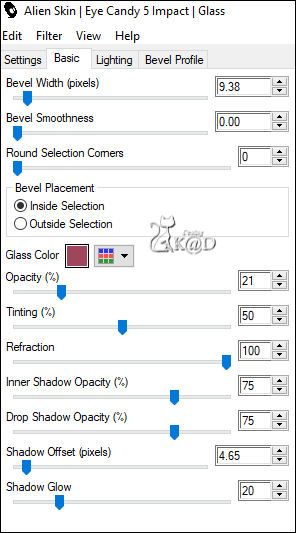
Select none
26
Activate and copy : 504_KaD_Element1
Edit – Paste as a new layer (Raster 5)
Press K – Pos X : 9 – Pos Y : 21 – Press M
Effects – 3D-effects – Drop shadow : V & H 2 – 35 – 2 – Color #000000
Result
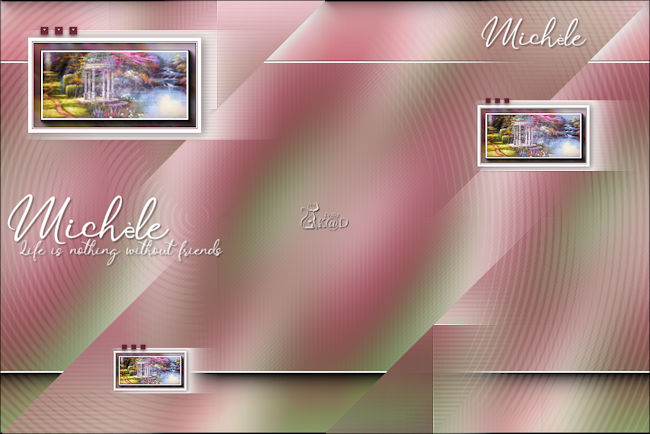
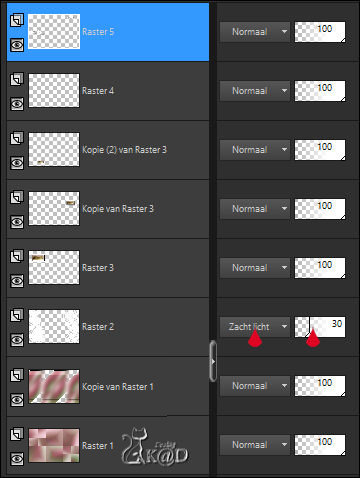
Layers – Merge – Merge visible
27
Layers – Duplicate
Image – Resize: 90%, all layers NOT checked
Select all – Selection Float – Selection Defloat
Plugins – Richard Rosenman – Solid border – see PS
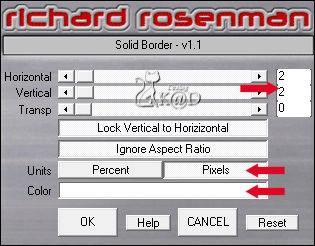
Effects – 3D-effects – Drop shadow : V & H 0 – 60 – 30 – Color #000000
Select none
28
Activate Raster Merged
Adjust – Blur – Gaussian blur : 10
Plugins – Graphics Plus – Cross Shadow – STANDAARD
28-1
Effects – Texture effects – Blinds – same values
29
Plugins – Richard Rosenman – Solid border – same values
30
Activate and copy : KaD_Woman_227
Edit – Paste as a new layer (Raster 1)
Layers – Arrange – Bring to top
Image – Resize: 68%, all layers NOT checked
Move a bit to the right
Adjust – Sharpness – Unsharp Mask : 2 – 30 – 2 – no check marks
31
Layers – Duplicate (Copy of Raster 1)
Activate the layer just below (Raster 1)
Adjust – Blur – Gaussian blur : 10
Change Blend mode to Multiply
32
Activate and copy : 504_KaD_Element2
Edit – Paste as a new layer – Don’t move (Raster 2)
Select all – Selection Float – Selection Defloat
Fill with foreground colot (Color 4)
Plugins – Alien Skin – Eye Candy 5 – Impact – Glass – same values
Select none
33
Activate and copy : KaD_Deco23
Edit – Paste as a new layer (Raster 3)
Layers – Arrange – Bring to top
Image – Resize: 60%, all layers NOT checked
Place bottom right – check the example
Effects – 3D-effects – Drop shadow : V 0 – H 5 – 40 – 7 – Color #000000
Adjust – Sharpness – Unsharp Mask : 2 – 30 – 2 – no check marks
34
Add your name or watermark,
Add my watermark to your creation HERE
35
Save as JPG file and you're done!
I hope you enjoyed this tutorial
Karin
06/04/2022
Mail me your version 
Extra Ex with tubes by Malacka & Mina & SvB

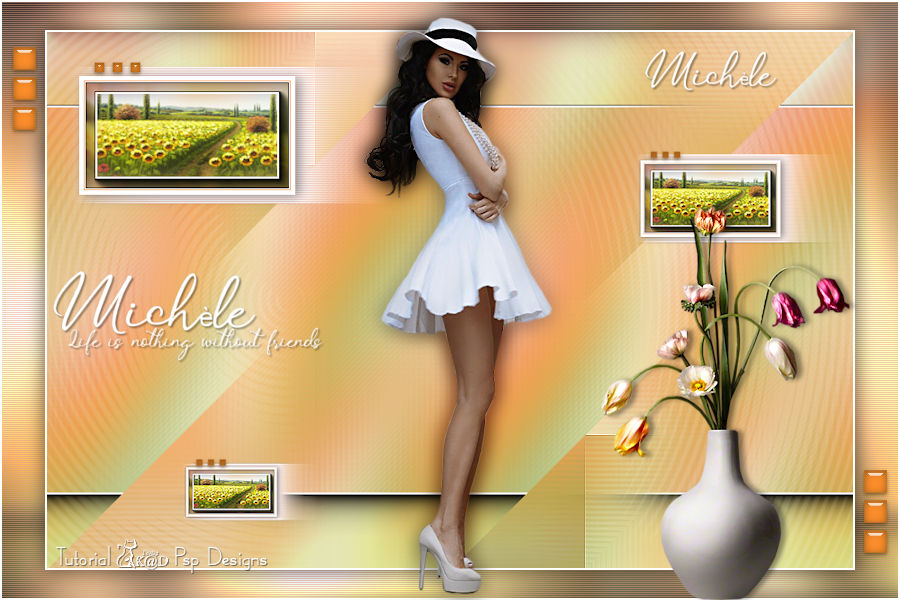
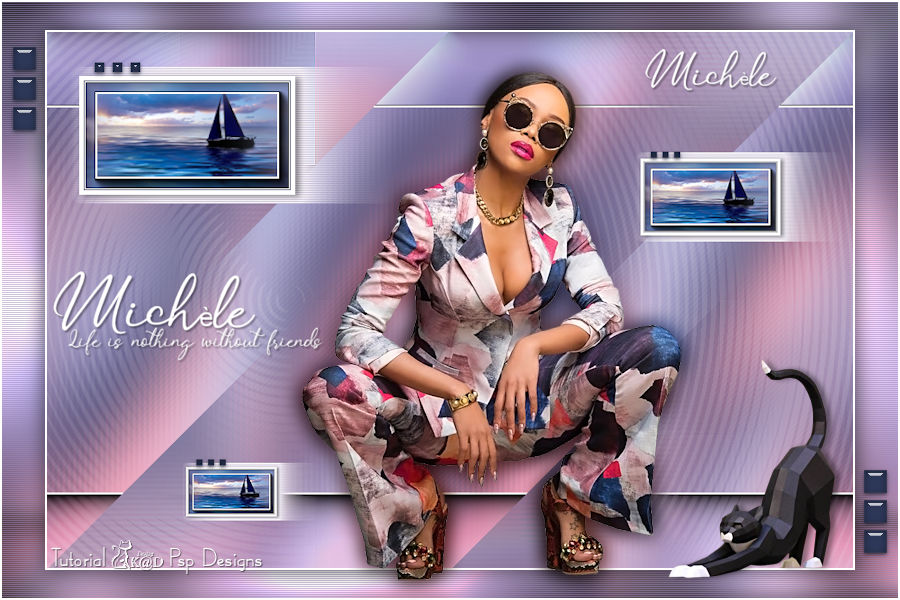
Extra Ex with tubes by Lily & CorinneVicaire & Ina


Click on banner below to go to the gallery


