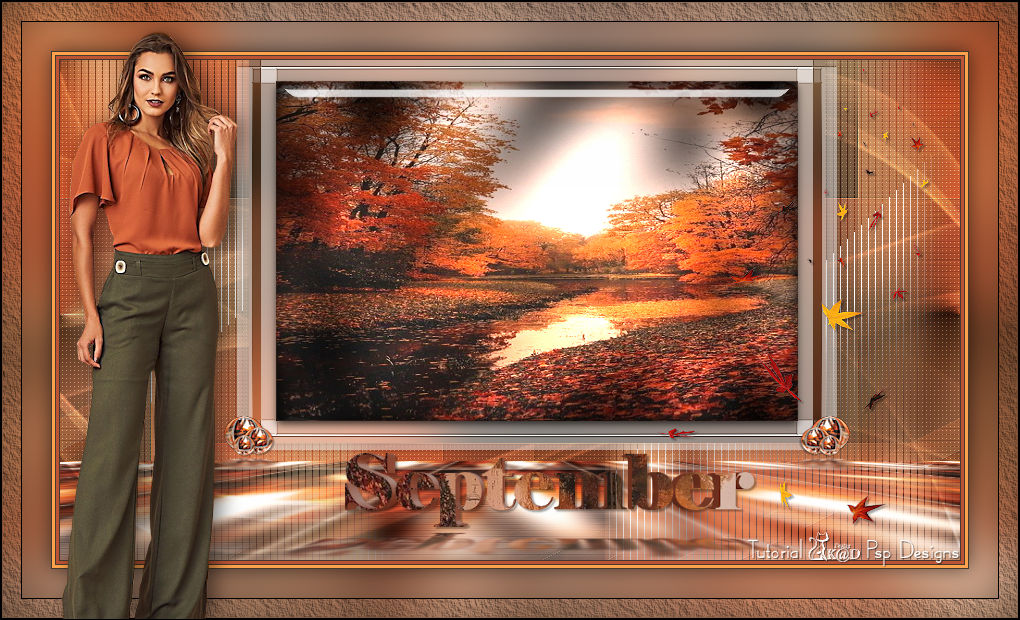
Materials for the tutorial :
Disclaimer :
Each Graphic is the property of the original artist to whom the copyright
belongs and may not be placed in a collection or offered for sale on-line or otherwise.
1/ KaD_Woman_240
2/ Falling Leaves 04 by www.the-night-bird.deviantart.com
3/ 519_KaD_Element1 + 519_KaD_Element2
4/ 4 Herfstbeelden (from the internet)
Alpha Selections : open in PSP and minimize
(this image is not empty – it contains alpha selections)
1/ 519_KaD_Alfakanaal
Masks : open in PSP and minimize
1/ Narah_Mask_0967
Filter Preset : double click to install
1/ 519_KaD_Flexify2
2/ 519_KaD_Glass1
Color palette :
If you work with your own colors, make your own color palette with the alpha channel,
so you can easily switch between your colors.
There are color differences in the different versions of Psp.
Therefore, use the html codes of the color palette to be sure,
that you have the same colors. Also when merging layers, there may be color differences.

Plugins :
1/ Tramages – Pool Shadow
2/ Mehdi – Sorting Tiles
3/ Carolaine and Sensibility – CS-Halloween2 + CS-LDots
4/ Italian Editors – Effetto Fantasma
5/ Alien Skin – Eye Candy 5 – Impact – Glass + Perspective Shadow
6/ MuRa’s Meister – Perspective Tiling*
*Element is included with the materials
7/ Flaming Pear – Flexify 2
8/ AAA Frames – Texture Frame
(-) Import into Filters Unlimited
------------------------------------------------
THE TUTORIAL
When working with your own colors, play with the Blend Mode and/or Opacity at your own discretion
From now on I use the terms "MIRROR" and "FLIP" again.
Mirror: Mirror horizontal - Flip: Mirror vertical
Let’s get started.
Remember to save your work often
Some print screens have other colors than the original.
Colors :
Foreground color : Color 1
Background color : Color 2
1
Open : 519_KaD_Alfakanaal
Window – duplicate
Minimize the original– we work on the copy
2
Select all
Activate and copy : Herfstbeeld4
Edit – Paste into selection
Select none
Effects – Image effects – Seamless Tiling – Default but Transition on 100
Adjust – Blur – Gaussian blur : 50
* if necessary adjust with Plugin : Adjust – Variations
3
Plugins – Tramages – Pool Shadow – see PS
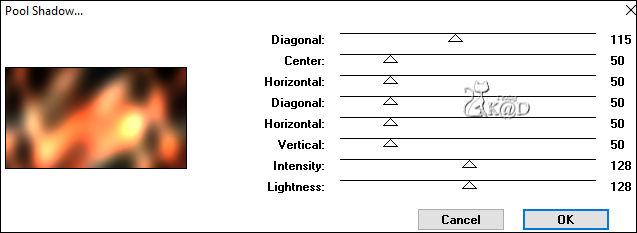
4
Plugins – Mehdi – Sorting Tiles – see PS
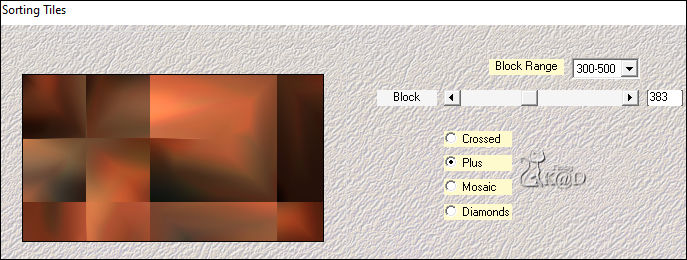
5
Effects – Image effects – Seamless Tiling – see PS
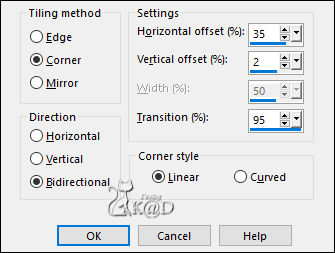
6
Effects –Edge Effects – Enhance
7
Change Background color to Color 5
Layers – New Raster layer
Fill with Background color
Layers – New Mask layer – From image “Narah_Mask_0967” – see PS
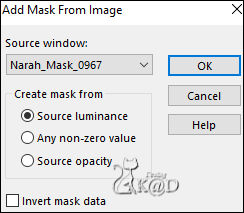
Layers – Merge – Merge group (Group Raster 2)
8
Layers – Duplicate
Image – Mirror and Flip
Layers – Merge – Merge down (Group Raster 2)
Change Blend mode to Overlay
9
Edit – Copy Special – Copy merged
Edit – Paste as a new layer (Raster 2)
Effects – Geometrics effects – Skew – see PS
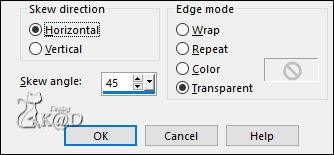
Repeat 1x
10
Plugins – Carolaine and Sensibility – CS-Halloween2 – see PS
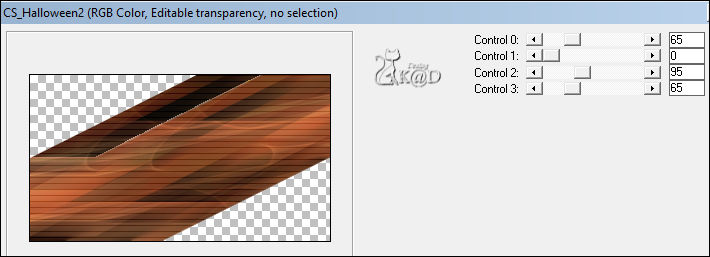
11
Effects – Image effects – Seamless Tiling – same values as before
Change Blend mode to Overlay and Layer Opacity to 26
12
Effects –Edge Effects – Enhance
13
Activate Raster 1
Selections – Load/Save Selection – Load Selection From Alpha Channel – Selectie 1 – see PS
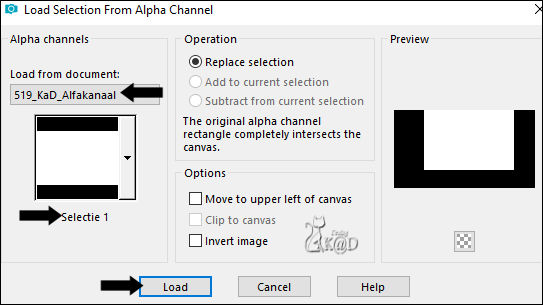
Selections – Promote selection to layer (Promoted selection)
Adjust – Blur – Gaussian blur : 20
14
Selections – Modify – Select selection borders – see PS
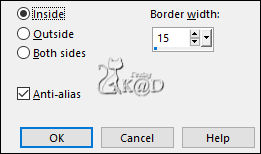
Layers – New Raster layer (Raster 3)
Fill selection with background color
Select none
Plugins – Italian Editors – Effetto Fantasma : 7 – 8
15
Effects –Edge Effects – Enhance
16
Layers – New Raster layer (Raster 4)
Selections – Load/Save Selection – Load Selection From Alpha Channel – Selectie 2 – see PS
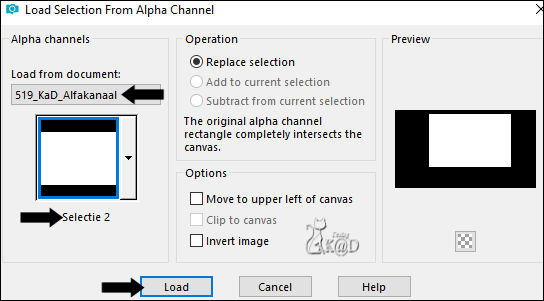
Activate and copy : Herfstbeeld1
Edit – Paste into selection
Plugins – Tramages – Poolshadow – same values as before
Adjust – Sharpness – Sharpen
17
Plugins – Alien Skin – Eye Candy 5 – Impact – Glass
Select the preset on the left : 519_KaD_Glass1 or enter manually – see PS
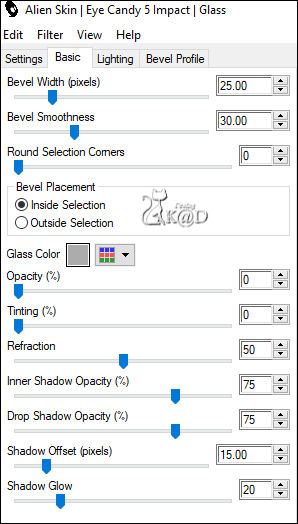
Layers – Merge – Merge down 2x
Select none
18
Layers – Duplicate
Image – Flip
Adjust – Blur – Gaussian blur : 8
Plugins – MuRa’s Meister – Perspective Tiling – see PS
*or use my element : "KaD_ElementFilterMuRa'sMeister"
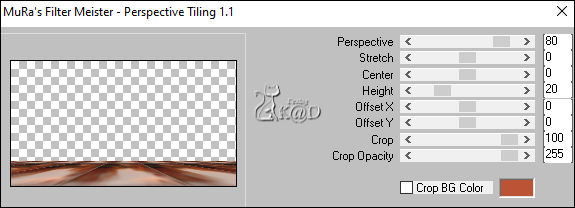
Layers – Arrange – Move down
19
Activate “Promoted selection “
Layers – Arrange – Bring to top – see PS
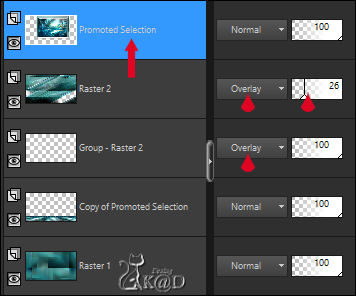
Effects – 3D-effects – Drop shadow : V&H 0 – 40 – 20 – Color #000000
20
Activate and copy : 519_KaD_Element1
Edit – Paste as a new layer
Layers – Arrange – Move down
* if necessary adjust with Plugin : Adjust – Variations
Change Blend mode to Screen
21
Activate and copy : Falling Leaves 04
Edit – Paste as a new layer (Raster 4)
Layers – Arrange – Bring to top
Image –Resize : 16%, all layers NOT checked
Press K – Pos X : 596 – Pos Y : 4 – Press M HELP
(K : activate the Pick Tool – M : deactivate the Pick Tool)
Effects – 3D-effects – Drop shadow : V&H 2 – 35 – 2 – Color #000000
Adjust – Sharpness – Sharpen
22
Activate and copy : 519_KaD_Element2
Edit – Paste as a new layer (Raster 5)
Press K – Pos X : 285 – Pos Y : 393 – Press M
* if necessary adjust with Plugin : Adjust - Variations
Effects – 3D-effects – Drop shadow : V&H 2 – 35 – 2 – Color #000000
23
Plugins – Alien Skin – Eye Candy 5 – Impact – Perspective Shadow – Reflect in Front – Sharp
24
Edit – Copy Special – Copy merged
Edit – Paste as a new layer (Raster 6)
Effects – Geometrics effects – Circle – Transparent
24
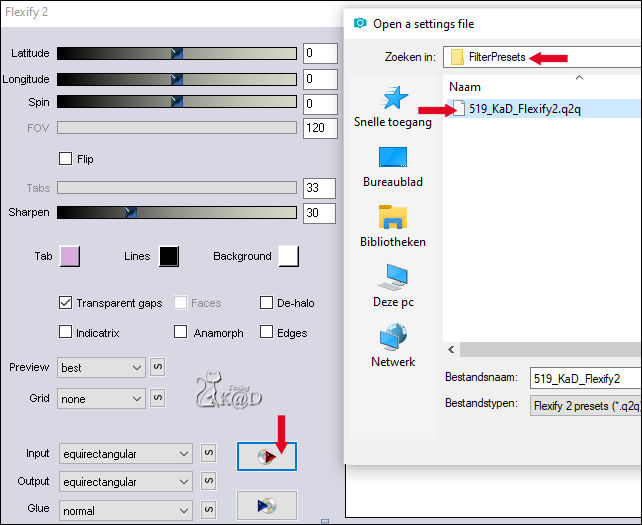
Plugins – Flaming Pear – Flexify 2
Click on the top diskette (red arrow) and choose the preset: 519_KaD_Flexify2
Or fill in manually – see PS
25
Image –Resize: 8%, all layers NOT checked
Adjust – Sharpness – Sharpen more
Effects – 3D-effects – Drop shadow : V&H 2 – 35 – 2 – Color #000000
25-1
Plugins – Alien Skin – Eye Candy 5 – Impact – Perspective Shadow – Reflect in Front – Sharp
Press K – Pos X : 152 – Pos Y : 356 – Press M
25-2
Layers – Duplicate
Image –Resize : 75%, all layers NOT checked
Press K – Pos X : 174 – Pos Y : 367 – Press M
25-3
Layers – Duplicate
Image –Resize : 75%, all layers NOT checked
Press K – Pos X : 166 – Pos Y : 375 – Press M
Layers – Merge – Merge down 2x (Raster 6)
25-4
Layers – Duplicate
Image – Mirror
Press K – Pos X : 732 – Pos Y : 356 – Press M
Layers – Merge – Merge down
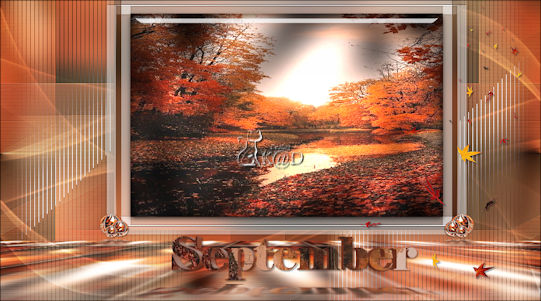
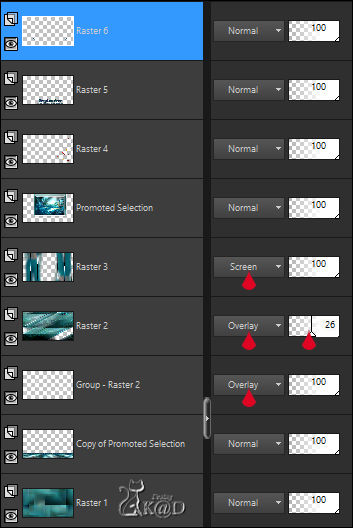
Result
26
Activate Raster 1
Layers – Duplicate (Copy of Raster 1)
Plugins – Carolaine and Sensibility – CS-LDots – see PS
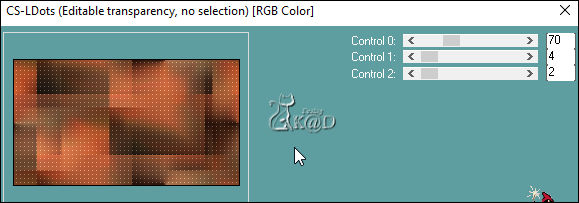
Change Blend mode to Luminance
27
Image – Add borders :
1pix Color 1
3 pix Color 2
1pix Color 1
3 pix Color 4
1pix Color 1
Select all
Edit – Copy
28
Image – Add borders: 50 pix Color 3
Selection invert
Edit – Paste into selection
Adjust – Blur – Gaussian blur : 25
Plugins – AAA Frames – Texture Frame – see PS
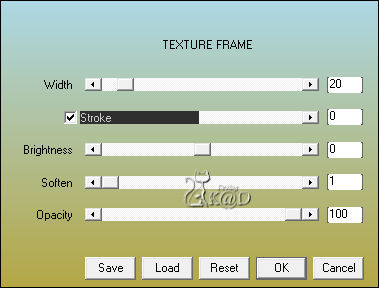
29
Selection invert
Effects – 3D-effects – Drop shadow : V&H 0 – 60 – 30 – Color #000000
Select none
30
Activate and copy : KaD_Woman_240
Edit – Paste as a new layer
Image –Resize: 50%, all layers NOT checked
Image – Mirror
Press K – Pos X : 60 – Pos Y : 28 – Press M
Effects – 3D-effects – Drop shadow : V 0 – H 7 – 30 – 10 – Color #000000
Adjust – Sharpness – Unsharp Mask : 2 – 30 – 2 – no check marks
31
Add your name or watermark,
Add my watermark to your creation HERE
32
Image – Add Borders : 1 pix color 6
Image – Resize – Width 900 Pixels - Resize all Layers checked
Adjust – Sharpness – Unsharp Mask : 2 – 30 – 2 – no check marks
Save as JPG file and you're done!
I hope you enjoyed this tutorial
Karin
27/04/2023
Mail me your version 
Extra vb tube van Roby

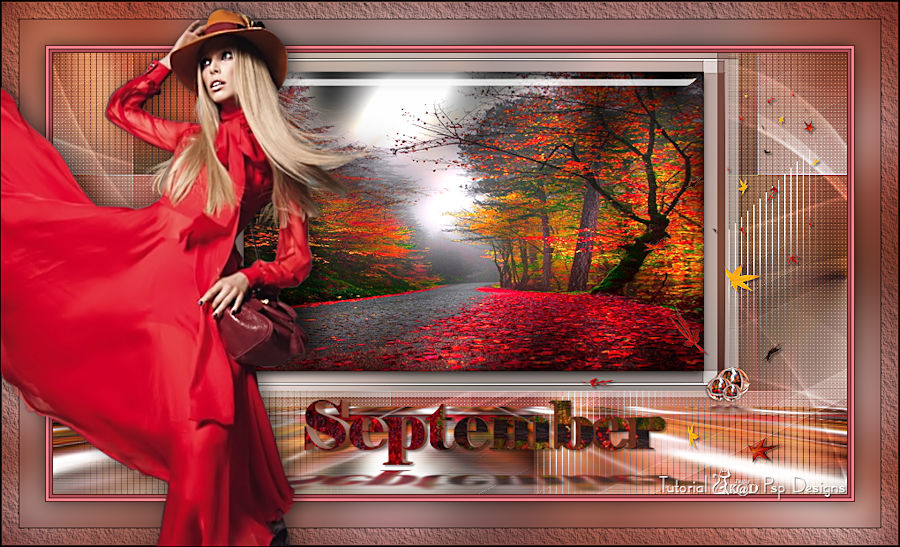
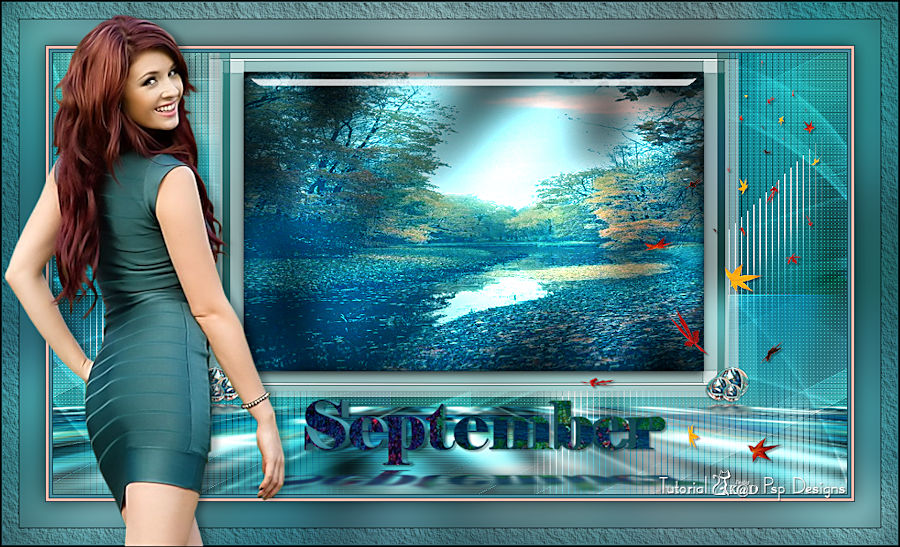
Extra vb tube van Animabelle

Extra Ex. tubes from Animalbelle

Click on banner below to go to the gallery


